
Results 1 to 10 of 52
Thread: Wood working help
 LinkBack URL
 About LinkBacks
Hybrid View
-
12-03-2009, 05:14 PM #1newb

- Join Date
- Apr 2008
- Location
- Arlington/Abilene TX
- Posts
- 355
Thanked: 14
Haha well, my end product is going to be a Humidor for myself (test box) and then a jewelry box/keepsake box for my girlfriend (final box)
l want to use maple, red oak, mahogany, or cherry with just a bees wax, or mineral oil, just something to really bring out and deepen the color of the wood. I want to round the edges off with a router, and finish with brass quadrant hinges on boxes, with perhaps magnets for the Humidor, and a lock and key for the jewelry box.
In my dreams i'd like to have the edges done in a bright maple/birch or perhaps a darker wood like cocobolo or even African black wood, but doing that may be easier than the dovetails (example)
Further on down the line i would eventuall prefer that all the furniture in my house/apartment be personally made by me with details that represent some memory. For instance, the jewelry box i want to make for my girlfriend i want to make 2 dovetails on one corner two on the second four on the third and seven on the fourth to represent the date 2/24/7 which is our anniversary hahaha. Will anyone notice? most likely not, but i will
-
12-03-2009, 05:35 PM #2Damn hedgehog

- Join Date
- Jun 2009
- Location
- SW Finland
- Posts
- 3,081
Thanked: 1806
You've already gotten some good hints here, so this is maybe repeating, but:
If you want to make good dovetails, you get them done only after practise and then practise some more. And then some more. You also need good marking gauge: easy to make it by yourself, but they do not cost much either. When you draw the lines, use very sharp pencil or knife, and decide which side of the line you are about to cut.
Sharp chisel would also help you a lot.
It takes time to reach good results. You have to get relaxed and enjoy your time while working. Working in a rush or stress will get you into poor results.'That is what i do. I drink and i know things'
-Tyrion Lannister.
-
12-03-2009, 06:30 PM #3Junior Member

- Join Date
- Nov 2009
- Posts
- 5
Thanked: 0
I'm a furnituremaker myself and I would try to explain this as good as possible ( my english isn't very good btw) There are many ways to make good dovetails but I would tell you the one I think it's best.
Steps:
1: Take 1 piece of wood and measure the thickness of it. Take your other piece of wood and draw the so called ''shoulder'' on the wood (the distance = thickness wood +1 or 2 mm away from the end grain) with a sharp pencil. The shoulder must be drawn with help of our ''Carpenter's square'' all around the wood.
2: First we make the so called ''tailes'' we draw them on one side of the wood with our ''Sliding bevel'' (notice that you do not make them to sharp or else your tail might break) 80* is a good angle.
3: Wenn those are drawn take your carpenters square again and draw the lines over to the other side of the wood. Take your sliding bevel to finish the job.
4: Mark the waste areas! It's easy to become confused at this point.
5: Take your saw (best to use is a japanese saw) and saw 1 or 2 mm outside the lines, almost till you reach the shoulder.
6. Wenn this is done, take a coping saw to remove the waste between the tails. ( yey!! it starting to look like something!)
7. Take a nice big SHARP chisel and CAREFULLY slice the acces wood off ( DO NOT USE A HAMMER FOR THIS. This is carpenters work )
)
(note: it isn't that importent that you presicly follow the lines now, as long your tailes are SQUARE )
8: Take a square block of wood and lay it down on your shoulder ,and clamp it. Take your chisel and take away the remaining wast. Work halfway and flip your wood around and repeat the proces. (if you don't work halfway, your wood will break on the other side)
9: Make sure your shoulders are also square.
10: Wenn this is all done, we make the pins that will slide into the tails.
(also on this piece of wood, draw your shoulder onto it. (again, the thinkness + 1 or 2 mm away from the end of the wood)
11: Clamp your piece(where the pins are going to come) and lay your tails on the end of the grain. If you use a dark piece of wood, take some chalk to make it more easy to see.
12: Now, Take a good SHARP knife and use your tails as a guide for marking out the position of the pins. Shade in the area's to be cut.
13: Take your carpenters square and draw the lines over to the shoulder. Now it's time to remove the waste the same way wenn we made the tails.
The reason we now mark the pins with a sharp knive is because this is the perfect possition where to be cut.
14: Try to fit the joint every now and then and look closely where to remove more wood so you don't take away wood on places were you shouldn't.
I tried to explain it the best i could and i hope this was usefull
IJsBlok
-
12-03-2009, 06:42 PM #4Junior Member
- Join Date
- Nov 2009
- Posts
- 5
Thanked: 0
The last dovetail you see is also the hardest. Because nothing is square.
I thought some people might enjoy to watch them ^^
-
12-03-2009, 10:02 PM #5Senior Member

- Join Date
- Mar 2008
- Posts
- 1,875
Thanked: 285
Oh hey; here's a way to do numbers! no, not mine
James krenov dovetail image by spalm_pics on Photobucket
[IMG]file:///C:/DOCUME%7E1/Kevin/LOCALS%7E1/Temp/moz-screenshot.jpg[/IMG][IMG]file:///C:/DOCUME%7E1/Kevin/LOCALS%7E1/Temp/moz-screenshot-1.jpg[/IMG]
-
12-04-2009, 05:33 AM #6newb
- Join Date
- Apr 2008
- Location
- Arlington/Abilene TX
- Posts
- 355
Thanked: 14
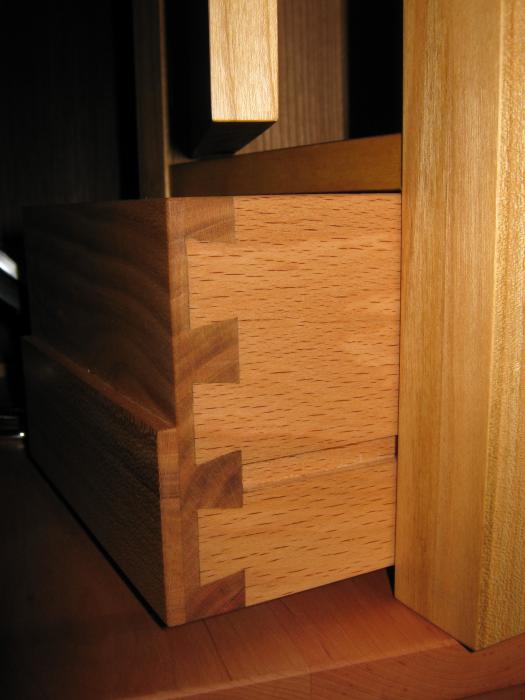
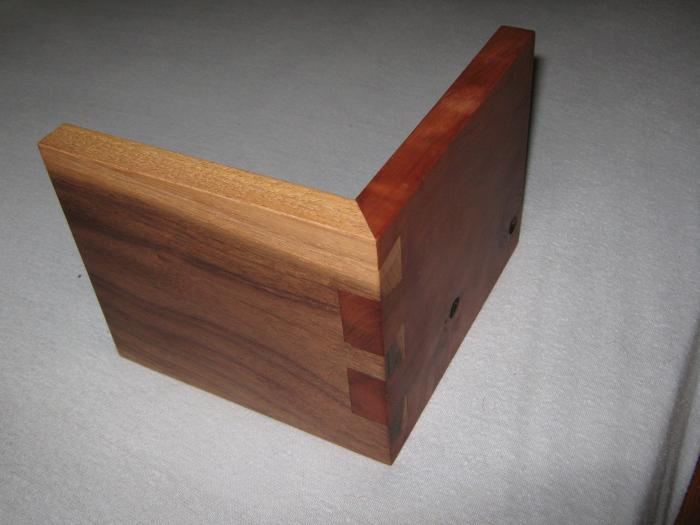
IJsBlok those are awesome dovetails!! The thing is, i usually pick things up very quickly and it frustrates me that I am not able to produce quality results out of the gates. How do you do the middle one? With the dovetails and the mitered top?
And thank you guys for all the advice, i knew this would be the right place to go :-)
-
12-04-2009, 07:38 AM #7Junior Member
- Join Date
- Nov 2009
- Posts
- 5
Thanked: 0
 Originally Posted by Detach

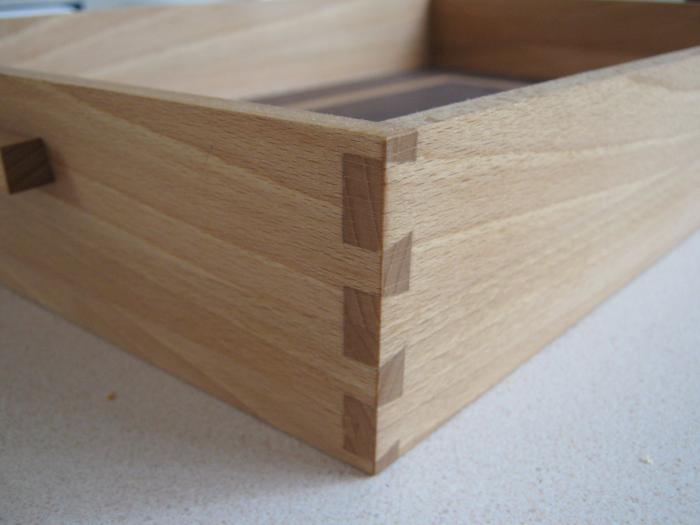
One other tip (for the wood to choose) the woods that work great for making dovetails are:
1 beech (photo 1 and 3 )
2 cherry, american and european (photo 2 the red side = american)
3 oak (although this one breaks out faster)
4 plane
5 walnut ( photo 2 brown/black side)
6 maple
My advice for you is: practice on beech, it's a very nice wood to slice and it's very cheap.
Surely there are more but I find those to work great.
Oke to the point here
The middle one with mitred sides isnt that extra work to do but you need to hold your head together.
steps:
1: Make your dovetails just the way you made them before. But now we need to place the tails a little different. Draw them in a way, so you have 2 HALF tails on the sides. 1 on the one side, 1 on the other side. Cut them clean and go to the next step.
2: Put your tails on the end grain (were the pins will come) again and slice the location were the pins need to go. saw/cut the pins clean. DO NOT cut the side pins away yet!! now we will look at those mitred points.
3:First you take your tail piece and saw/cut the end tails perfecly mitre.
The reason we didn't make the mitred points in step 1 is because if we did, we were not able to slice the place of the tails on the end grain for the pins.(It will not lay flat on the surface)
4: Then take your pin piece and you will start to see what you need to do to fit the joint. Yep, you need to make a mitred end on the side pins. (Do not make the end pins completely mitre, just the area where the pin piece will meet the mitred tail.
darn, it's hard to explain without images but I hope that you understand what to do.
Btw, I'm new on straight razor place and shaving with a straight for a month now. Shaver is a worldmaster silversteel. And going under the knife again today
Good look with your dovetails! If you need more help just say.
IJsBlok
-
12-08-2009, 12:12 AM #8Member
- Join Date
- Dec 2009
- Location
- St.Louis area
- Posts
- 35
Thanked: 8
I am a wood finisher by trade, so as far as the finish goes, exactly what do you mean by oil finish?


 Reply With Quote