Page 1 of 8 12345 ... LastLast
Results 1 to 10 of 72
Like Tree36Likes

Thread: Walking a W&B though the Buffers - Illustrated

  1. #1
    At this point in time... gssixgun's Avatar
    Join Date
    Jun 2007
    Location
    North Idaho Redoubt
    Posts
    26,957
    Thanked: 13223
    Blog Entries
    1

    Default Walking a W&B though the Buffers - Illustrated

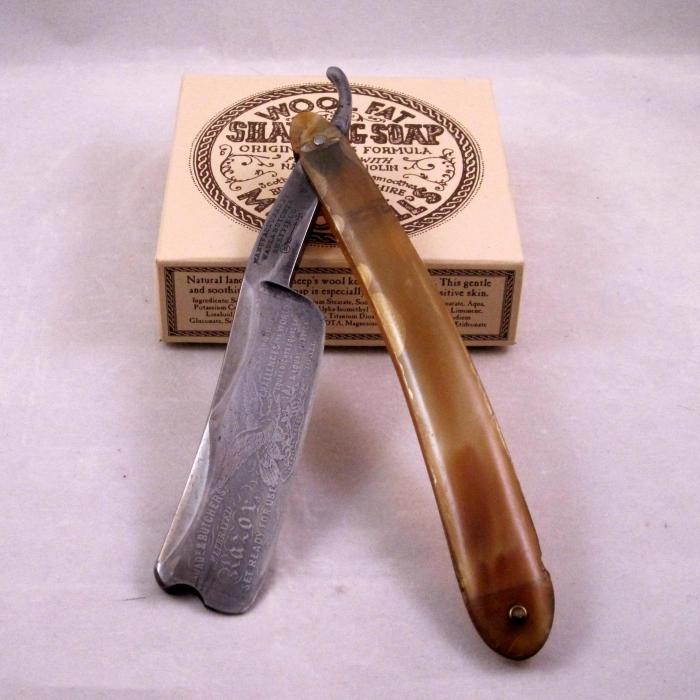
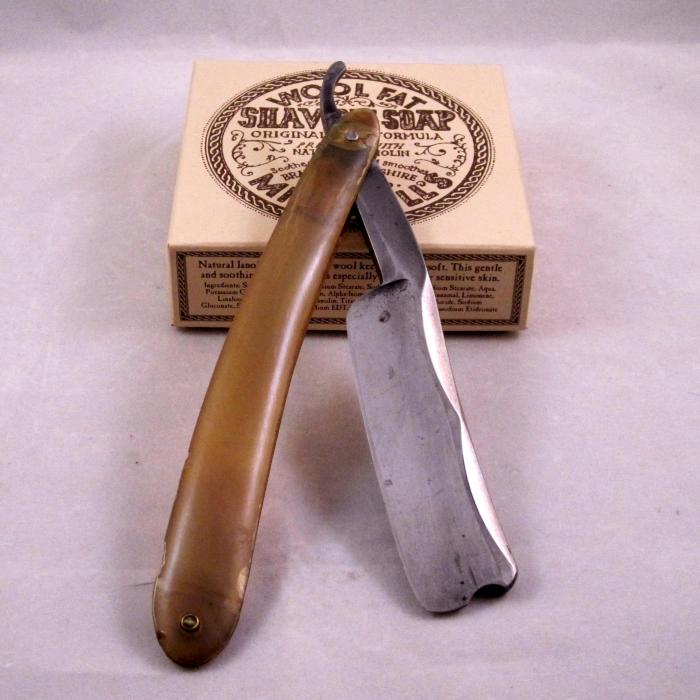
    I decided to take pics of this W&B "American" Razor as I tried out my new buffer bench...

    These are the before pics...

    A nice 7/8 + blade with almost null for hone wear and a tiny small bevel that isn't honed into 27 different levels


    Name:  Before 1.jpg
Views: 7002
Size:  55.8 KB

    Name:  Before 2.jpg
Views: 6738
Size:  55.0 KB

  2. The Following 9 Users Say Thank You to gssixgun For This Useful Post:

    AcquaDiParmesan (01-26-2017), Blackstangal (03-07-2010), Geezer (07-29-2010), HNSB (03-05-2010), MikeT (08-01-2016), nipper (06-29-2012), ShavedZombie (06-12-2010), tictac (07-03-2012), tinkersd (02-26-2012)

  3. #2
    At this point in time... gssixgun's Avatar
    Join Date
    Jun 2007
    Location
    North Idaho Redoubt
    Posts
    26,957
    Thanked: 13223
    Blog Entries
    1

    Default The New Buffer Bench !!!

    I built this around one of the support beams in the shop, it is 6'x8' 3/4" particle board framed on a 2"x6" and supported by 4"x4" posts..I can walk across it so it is pretty solid... I still haven't had time to start the shelves that are going in underneath it

    There are 6 Harbor Freight Buffers that turn at 3450 rpm I run them most of the time with 4" wheels for polishing metal,,, I normally polish from spine to edge but that is a personal preference some people go from toe to heel also some go both directions...

    On the far end is the last HF Buffer set up for polishing scales, and a single wheel buffer that turns at 1725 rpm and that I use for the final polish on the blades..

    Name:  bb 1.jpg
Views: 7222
Size:  56.4 KB

    BTW in the pic above, that doorway leads to the old entry way to the small 2nd house that I call my shop, it is fully enclosed out there and that is where I keep all the "dust makers" like the saws and sander... Only my Scroll Saw and Drill Press are in this end of the shop


    Name:  bb 2.jpg
Views: 9794
Size:  64.6 KB

    Name:  bb 3.jpg
Views: 6471
Size:  54.1 KB

    Name:  bb 4.jpg
Views: 6533
Size:  51.9 KB
    Last edited by gssixgun; 03-04-2010 at 08:31 AM.

  4. The Following 19 Users Say Thank You to gssixgun For This Useful Post:

    Del1r1um (03-04-2010), HNSB (03-05-2010), JaimeCobos (02-12-2014), jc50 (02-09-2013), jmercer (08-31-2015), MikeT (08-01-2016), MuskieMan33 (02-12-2014), Mvcrash (09-16-2010), ne0nblakk (12-24-2013), nipper (06-29-2012), Purvis (04-20-2011), riooso (04-20-2011), ScottGoodman (03-07-2010), seanreum1 (10-27-2014), ShavedZombie (06-12-2010), str8fencer (04-20-2011), STRAIGHTRAZOR13 (03-04-2010), tictac (07-03-2012), Zephyr (04-08-2012)

  5. #3
    26. Hatter Engaging in Rhetoric Mijbil's Avatar
    Join Date
    Jan 2010
    Location
    Chicago, IL
    Posts
    246
    Thanked: 30

    Default

    very curious, glen (always about your mystical little vulcan-forge out there in Ideeho)- but the images, "Attachments" dont seem to work?

  6. #4
    JMS
    JMS is offline
    Usagi Yojimbo JMS's Avatar
    Join Date
    Jan 2007
    Location
    Ramona California
    Posts
    6,858
    Thanked: 792

    Default

    Quote Originally Posted by Mijbil View Post
    very curious, glen (always about your mystical little vulcan-forge out there in Ideeho)- but the images, "Attachments" dont seem to work?
    Yep........

  7. #5
    Senior Member Deryan's Avatar
    Join Date
    Aug 2009
    Location
    Wisconsin
    Posts
    507
    Thanked: 75

    Default

    Nice set up!!

  8. #6
    At this point in time... gssixgun's Avatar
    Join Date
    Jun 2007
    Location
    North Idaho Redoubt
    Posts
    26,957
    Thanked: 13223
    Blog Entries
    1

    Default The Greaseless Compounds

    I use the Fomax compounds and I start at 80 grit, how long you stay at 80 works pretty much the same as handsanding with wet-r-dry does.. You stay at the lower grit until you have clean steel, or as clean as you decide you can get...

    I just progress on up through the grits until the 600, at that time I use the brake cleaner and make sure the blade is clean and dry.. Make sure if you are wiping the blade off that your rag is clean because Murphy's Razor law says that it will have a piece of something that will leave a scratch on your nice finish


    Name:  gr 80.jpg
Views: 6470
Size:  44.0 KB

    Name:  gr 120.jpg
Views: 6428
Size:  41.6 KB

    Name:  gr 180.jpg
Views: 6512
Size:  40.2 KB

    Name:  gr 320.jpg
Views: 6449
Size:  46.1 KB

    Name:  gr 400.jpg
Views: 6466
Size:  38.0 KB

    Name:  gr 600.jpg
Views: 6447
Size:  40.1 KB

    Name:  gr 601.jpg
Views: 6458
Size:  53.5 KB
    MikeB52 likes this.

  9. The Following 8 Users Say Thank You to gssixgun For This Useful Post:

    32t (01-12-2011), HNSB (03-05-2010), MikeT (08-01-2016), MuskieMan33 (02-12-2014), nipper (06-29-2012), Purvis (04-20-2011), ShavedZombie (06-12-2010), tictac (07-03-2012)

  10. #7
    At this point in time... gssixgun's Avatar
    Join Date
    Jun 2007
    Location
    North Idaho Redoubt
    Posts
    26,957
    Thanked: 13223
    Blog Entries
    1

    Default The Polishing Compounds

    These normally have different names depending on the brand you are using but pretty much start at some type of Emory and progress up in grit to some type of very fine Rouge..

    I change my wheels during this stage when I get to the Rouges, I switch to a Soft buff from the Sewn Buffs that I used from the 80 grit all the way through... I first started using Sisal buffs in the lower grits (80 & 120) but switched to the Sewn buffs and liked the results better, but again that is just a personal preference...

    My final polish is usually a mood thing I have lately started using the Turtle Wax compounds but honestly I have tried just about every polishing compound you can think of, again whatever you think looks best...

    This stage is where the Brake Cleaner is indispensable, you want to make sure the steel is totally clean from the last compound, before moving to the next one... The spray Brake Cleaner cuts it right off there, no muss, no fuss, try it out..

    Emory Compound

    Name:  gr 700.jpg
Views: 6425
Size:  26.5 KB

    Stainless Steel Compound

    Name:  gr 701.jpg
Views: 6505
Size:  40.9 KB

    White Rouge

    Name:  gr 702.jpg
Views: 6470
Size:  23.3 KB

    Chrome Compound

    Name:  gr 703.jpg
Views: 6452
Size:  23.0 KB
    Last edited by gssixgun; 03-04-2010 at 08:16 AM.
    32t, CaptStatic and MikeB52 like this.

  11. The Following 10 Users Say Thank You to gssixgun For This Useful Post:

    CaptStatic (02-25-2012), HNSB (03-05-2010), mauledbyakitten (02-19-2012), MikeT (08-01-2016), MuskieMan33 (02-12-2014), nipper (06-29-2012), Purvis (04-20-2011), ShavedZombie (06-12-2010), str8fencer (04-20-2011), tictac (07-03-2012)

  12. #8
    At this point in time... gssixgun's Avatar
    Join Date
    Jun 2007
    Location
    North Idaho Redoubt
    Posts
    26,957
    Thanked: 13223
    Blog Entries
    1

    Default The completed W&B "American" in Melted Bronze Acrylic

    You didn't think I was going to leave ya hanging did ya????

    Here are some pics of the finished razor, again the camera just can't seem to catch the sparkle of the real scales...
    I used a Black acrylic wedge and Tri-Metal stacked washers with Nickel Silver pins...


    Name:  wb 1.jpg
Views: 6426
Size:  16.7 KB

    Name:  wb 2.jpg
Views: 6466
Size:  18.7 KB

    Name:  wb 3.jpg
Views: 6406
Size:  22.3 KB

    Name:  wb 4.jpg
Views: 6413
Size:  30.6 KB

    Name:  wb 5.jpg
Views: 6417
Size:  30.6 KB
    Last edited by gssixgun; 03-04-2010 at 08:24 AM.

  13. The Following 23 Users Say Thank You to gssixgun For This Useful Post:

    BigBubba (03-04-2010), CaptStatic (02-25-2012), carrolljc (06-02-2014), CraigC (01-14-2013), DMD (05-24-2010), HNSB (03-05-2010), jc50 (02-09-2013), JOB15 (06-21-2018), luckypip (05-10-2019), matt321 (03-04-2010), mauledbyakitten (02-19-2012), mglindo (06-01-2014), Michael70 (08-03-2016), MikeB52 (02-05-2017), MikeT (08-01-2016), MuskieMan33 (02-12-2014), nipper (06-29-2012), red96ta (03-06-2010), ShavedZombie (06-12-2010), str8fencer (04-20-2011), STRAIGHTRAZOR13 (03-04-2010), tictac (07-03-2012), wqueiroz (02-20-2011)

  14. #9
    JMS
    JMS is offline
    Usagi Yojimbo JMS's Avatar
    Join Date
    Jan 2007
    Location
    Ramona California
    Posts
    6,858
    Thanked: 792

    Default

    ...NICE!!!

  15. The Following User Says Thank You to JMS For This Useful Post:

    gssixgun (03-04-2010)

  16. #10
    They call me Mr Bear. Stubear's Avatar
    Join Date
    Jul 2009
    Location
    Alton, UK
    Posts
    5,715
    Thanked: 1683
    Blog Entries
    3

    Default

    Nice work Glen!

    Your workshop looks amazing! One of these days I'm going to have a workshop like that. The flat is just a little too small for a shop, and I dont think SWMBO would appreciate me bolting a load of buffers onto the dining room table...!
    WW243 likes this.

  17. The Following User Says Thank You to Stubear For This Useful Post:

    gssixgun (03-04-2010)

Page 1 of 8 12345 ... LastLast

Posting Permissions

  • You may not post new threads
  • You may not post replies
  • You may not post attachments
  • You may not edit your posts
  •