
Results 1 to 10 of 40
 15Likes
Thread: Any fix for a broken tang?
 LinkBack URL
 About LinkBacks
-
02-15-2011, 09:26 PM #1Junior Member

- Join Date
- May 2010
- Posts
- 6
Thanked: 0 Any fix for a broken tang?
I was in the process of restoring a Dubl Duck Satinedge when I realized the tang was bent and complicating the process of scale making. Tried to straighten it but ended up snapping the tang off about a 1/4" from the blade and was wondering if any had any ideas on a possible fix. It shaves to nice to just pitch it or let it go.
-
02-15-2011, 09:31 PM #2Scale Maniac


- Join Date
- Mar 2009
- Location
- Decorah, IA
- Posts
- 2,671
Thanked: 641
You could try some sort of soldering, just make sure you have ice or some sort of excellent heat-sink attached to the blade side before the blade starts. Originally Posted by swampkeeper4570

Or, you could try setting the whole affair into a new acrylic tang. (This is what I would do... seems like a fun project!)
-
02-15-2011, 09:54 PM #3Senior Member

- Join Date
- Jun 2007
- Location
- Belgium
- Posts
- 298
Thanked: 312
Sorry to hear about the damage.
Personally, I would advise against trying to solder that broken bit. Most lead-based solders don't really grab onto steel as well as they grab onto the non-ferrous metals like copper and brass. In any case, a lead-based solder is just going to be too weak to form a reliable bond on such a small, butt-joined break.
Brazing might successfully join the broken ends, but because of the higher temperature required for this I fear that you would succeed in overheating the steel and ruining the temper.
What might work to save the razor would be to carefully cut two cheek pieces of sheet brass (or even stainless steel) the length of the tang and sister them on either side of the join using a good quality epoxy. Don't forget to shape the cheek pieces properly and drill out the holes on either side for that rear pivot pin. You will want to clamp this up carefully while the epoxy is setting. If you do decide to try this, don't use a five-minute epoxy. Choose, instead for a long set epoxy (24-hour setting variety) which will give better strength. This is not an ideal solution, since you end up with a thicker tang, but that seems a reasonable trade-off. Of course, with only about a quarter inch of steel tang coming off the rear of the blade, this might still be something of a questionable join, but better than anything else I can think of in this situation.Last edited by ignatz; 02-15-2011 at 09:57 PM.
-
02-15-2011, 10:16 PM #4Lookin like a crim


- Join Date
- Apr 2009
- Location
- Coffs Harbour Australia, Home of the Big Banana
- Posts
- 2,706
Thanked: 1072
If you come up with anything let me know...
"I aint like that no more...my wife, she cured me of drinking and wickedness"
Clint Eastwood as William Munny in Unforgiven
-
02-15-2011, 10:32 PM #5Scale Maniac
- Join Date
- Mar 2009
- Location
- Decorah, IA
- Posts
- 2,671
Thanked: 641
Hmm... this has me pondering as I do my laundry. I am really intrigued by this...
-
02-15-2011, 10:36 PM #6what Dad calls me


- Join Date
- Feb 2008
- Location
- Kansas city area USA
- Posts
- 9,173
Thanked: 1677
It could be rewelded, but that brings on other problems.
It is easier to fool people than to convince them they have been fooled. Twain
-
02-15-2011, 10:52 PM #7Senior Member

- Join Date
- Aug 2007
- Location
- Gidgegannup WA
- Posts
- 457
Thanked: 86
See if you have either a gunsmith or a blacksmith in your area, or perhaps a custom knife smith, these people should be able to weld and re temper the blade.
Cheers
Heelerau Keep yo hoss well shod an yo powdah dry !
-
02-15-2011, 10:52 PM #8Senior Member

- Join Date
- Oct 2010
- Location
- Everett, Ontario
- Posts
- 1,554
Thanked: 309
I think I would drill into the broken pieces with a cobalt bit at a slow speed using a lot of cutting oil. Insert a metal pin and epoxy the ends together using the metal rod to strengthen it.
This is a kind of pinning used when modeling. I've never tried this with a razor and the hardened steel will be a bastard to drill.
-
The Following User Says Thank You to TrilliumLT For This Useful Post:
swampkeeper4570 (02-16-2011)
-
02-15-2011, 11:45 PM #9Brad Maggard

- Join Date
- Jan 2009
- Location
- Adrian, Michigan
- Posts
- 879
Thanked: 693
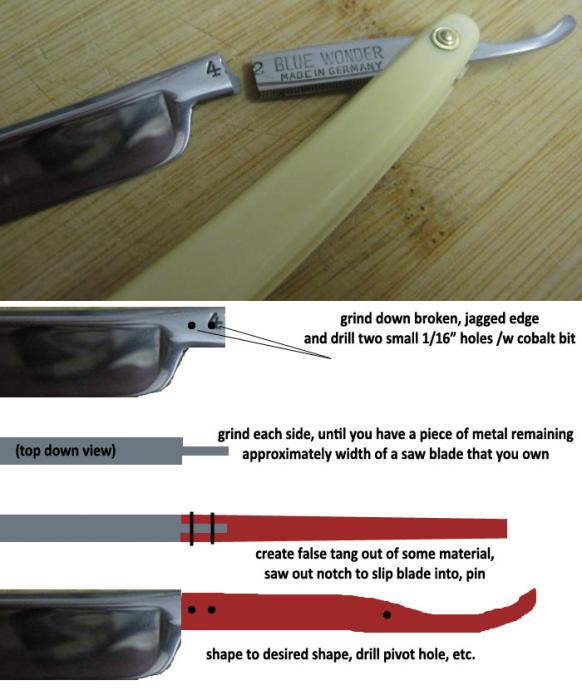
here is another thought. sorry for poor drawings.
-
The Following 5 Users Say Thank You to Undream For This Useful Post:
32t (02-10-2012), Birnando (02-16-2011), swampkeeper4570 (02-16-2011), vvti713 (02-13-2012), Zephyr (02-01-2012)
-
02-15-2011, 11:53 PM #10Scale Maniac
- Join Date
- Mar 2009
- Location
- Decorah, IA
- Posts
- 2,671
Thanked: 641
Originally Posted by Undream
Good illustration, Brad! That's what I think would be the best, most secure method. Definitely an advanced project, but it could be a lot of fun!


 Reply With Quote