
Results 1 to 10 of 13
 1Likes
Thread: Restoring with minimum loss
 LinkBack URL
 About LinkBacks
-
05-12-2011, 08:40 AM #1Member


- Join Date
- May 2011
- Location
- Johannesburg, South Africa
- Posts
- 55
Thanked: 0 Restoring with minimum loss
I recently inherited my great grandfathers "Kropp", and it is very valuable to me. However I cleaned it up the other day using some brass polish, and I noticed some carbon marks on it, and a few very stubborn watermarks(or at least they seem like it) on the blade. Luckily there are no signs of pitting on the blade.
It's still like it was from the manufacturers, with the rough grind at the tip of the spine, but I would love to restore it, to get it looking like a lot of the razors I have seen here, Brilliantly bright and an almost mirror finish. HOWEVER, it has an engraving of who the agents were in South Africa who sold it on behalf of Osbourne, Garrett and Co., and I ould hate to lost that engraving during the restoration process.
Taking all of this into consideration, how would I go about in restoring it?
Thanks
-
05-12-2011, 09:07 AM #2

This is kinda the catch 22 of restoration!

To remove any pitting or rust or marks you have to remove some steel, and unfortunately when you do that you'll lose maker stamps, gold wash and other etching or engraving. And the shallower the etching, the faster it'll disappear.
Glen restored a razor for me last year which had shallow engraving and he got a really great finish on it and kept the engraving, but he knows what he's doing!
I'm still learning and the blades I'm cleaning up by hand at the moment, I'm having to take a trade off between finish and keeping the engraving. I'm happy with the results but they're not totally mirror finished.
Given that the razor is precious to you I wouldn't go for a full near mirror polish as you'll possibly remove any engravings at the same time. I'd just clean it up as best you can with MAAS or other metal polish and leave it at that.
Careful with the MAAS as it'll take gold wash off if you have any!
The other option is to send it out to someone like Glen or Max who knows what they're doing and has the skills to restore it properly.
Hop that helps!
-
The Following User Says Thank You to Stubear For This Useful Post:
RazorFang (05-12-2011)
-
05-12-2011, 09:41 AM #3Member
- Join Date
- May 2011
- Location
- Johannesburg, South Africa
- Posts
- 55
Thanked: 0
Yeah, that would be a great option, only problem is I live in South Africa, and if that razor hits customs, it would be flagged as a weapon and be destroyed, and if not, the bloody baboons would mistreat it so badly, Glen would recieve it in a million pieces...
I wonder if I get a bufing wheel, for a bench grinder or the sorts, and get the finest rubbing compound, and if I work for weeks, if I cannot get the wanted results.
Only other option is to get instructions form someone and attempt it myself. I have a keen eye for detail, and I'm quite the fast learner, so I'll start on a part free from engraving, and then as I have the hang of it, I'll advance to the more detailed parts.Last edited by RazorFang; 05-12-2011 at 10:09 AM.
-
05-12-2011, 10:49 AM #4
If you don't want to send it abroad that's cool, but I definitely wouldn't recommend going at it with a buffer on your first attempt. Down that road lies disaster.
Especially as the blade has high sentimental value.
Because buffers are powered its easy to overheat the blade and ruin the temper, take off too much steel in a flash and the buffer could catch the blade and hurl it into the floor, or worse into your foot.
I'd get some sandpaper and micromesh and do it by hand. Sandpaper in 400, 600, 800 and 1200 plus micromesh of 1800, 3800, 6000 and 12000 will do the job. Then just MAAS polish to finish up with.
I do practice what I preach, having gotten into restoration very recently myself. That progression is what I've done on the half dozen blades I've cleaned up so far and it works great. It's also what I'll be doing for the scales when I get round to doing them.
I don't own a buffer at this point, and I won't be buying one until I'm happy with the whole process front to back and by hand. It's not worth the risk to the blades or my hands at the moment!
You can get the paper cheaply to do the job and whilst using sandpaper and micromesh takes longer it removes a lot of the risk of getting something wrong and really paying for it by losing the blade or a finger.
Any chance of some pics of the blade?
gssixgun likes this.
-
The Following User Says Thank You to Stubear For This Useful Post:
RazorFang (05-12-2011)
-
05-12-2011, 12:57 PM #5Senior Member

- Join Date
- May 2011
- Location
- Saudi Arabia and Scotland
- Posts
- 314
Thanked: 60
It's difficult to know the exact situation without seeing pictures, but do you mean there is engraving or gilding on the large surfaces of the blade? Adhesive tape can protect these pretty well, so that you use a polishing compound around them.
There is a self-adhesive copper tape sold for making reproduction Tiffany-style lampshades. It is common in many sizes on eBay. As it is meant to be stuck around panels of glass and soft-soldered together to imitate leaded panes, it clearly can't fall off at the first traces of frictional heat.
-
The Following User Says Thank You to Caledonian For This Useful Post:
RazorFang (05-12-2011)
-
05-12-2011, 01:01 PM #6Senior Member
- Join Date
- May 2011
- Location
- Saudi Arabia and Scotland
- Posts
- 314
Thanked: 60
The usual rule with sandpapering is to start coarse and progress to the finer grades. But the way you describe the very slight deterioration of this razor, I'd be inclined to experiment with the fine grades, and start with the finest that seems likely to accomplish anything in a halfway-reasonable period of time.
-
The Following User Says Thank You to Caledonian For This Useful Post:
RazorFang (05-12-2011)
-
05-12-2011, 04:59 PM #7At this point in time...


- Join Date
- Jun 2007
- Location
- North Idaho Redoubt
- Posts
- 27,152
- Blog Entries
- 1
Thanked: 13249
Stu is giving you perfect advice...
Couple of hints with it
WD-40 instead of water with wet-r-dry paper, try it you'll like it..
Still without a doubt the best way to clean a blade gently and keep the etch as sharp as possible is to use the "Tumbler Method" I have used just about every method you can name over the last few years, in fact I invented some of them for use on razors an still nothing beats a tumbler for etched blades to keep the etch intact...
It will never beat a Buffer for a perfect finish but a Buffer can take off etch fast...
Read this Thread (Book) http://straightrazorpalace.com/works...mentation.html
BTW I have a customer in South Africa that I have sent razors to, have not recieved any from him, but form me to him no probs yet....
Last hint: this thread is at the top of the Workshop forum stuck there all the time (A sticky) it has a treasure trove of info
http://straightrazorpalace.com/works...wers-here.htmlLast edited by gssixgun; 05-12-2011 at 05:02 PM.
-
The Following User Says Thank You to gssixgun For This Useful Post:
RazorFang (05-12-2011)
-
05-12-2011, 05:30 PM #8Member
- Join Date
- May 2011
- Location
- Johannesburg, South Africa
- Posts
- 55
Thanked: 0
Some photos of my prised possession:
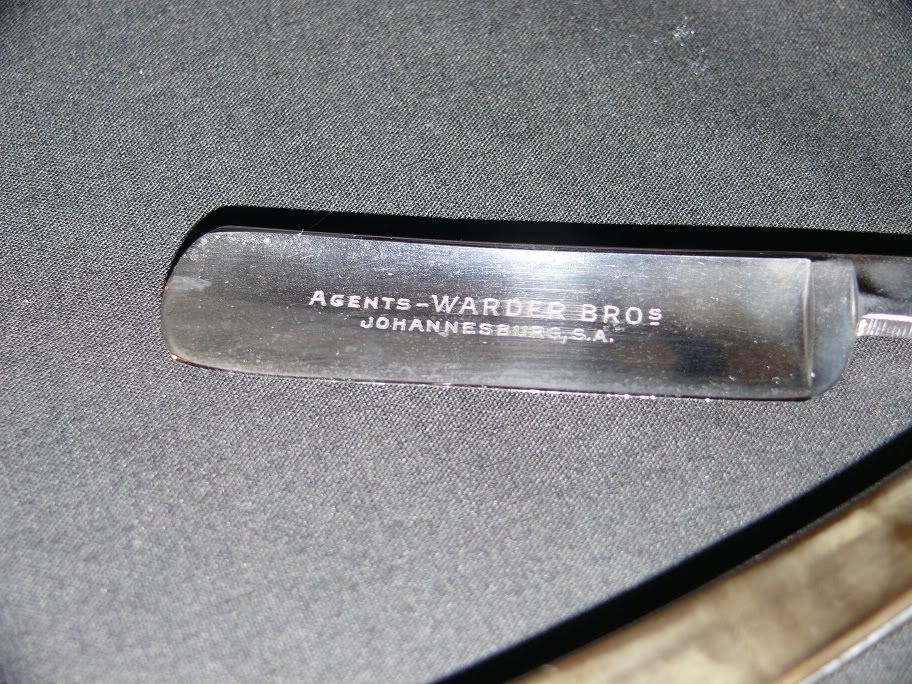
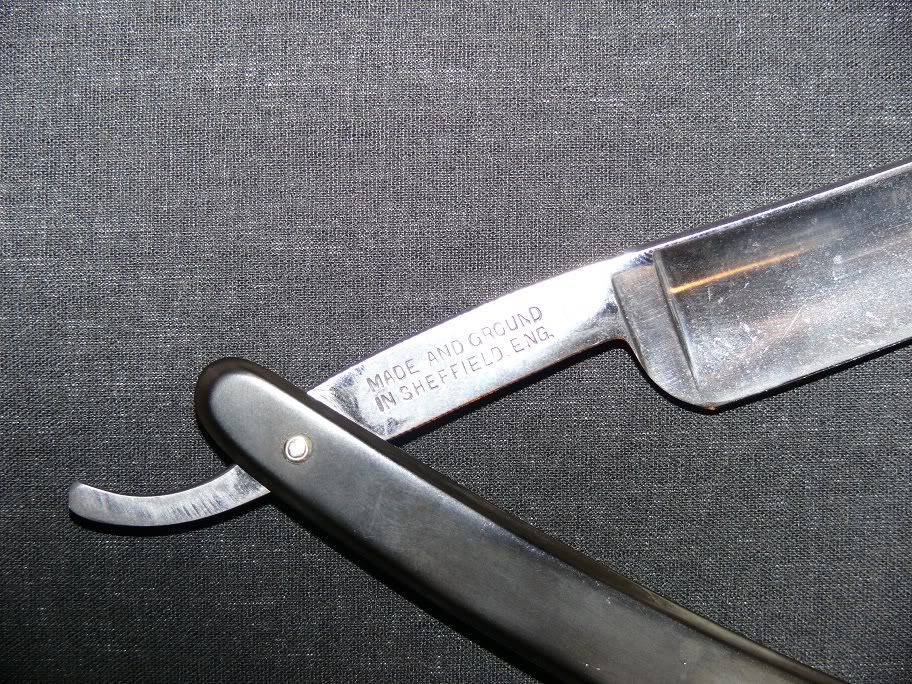
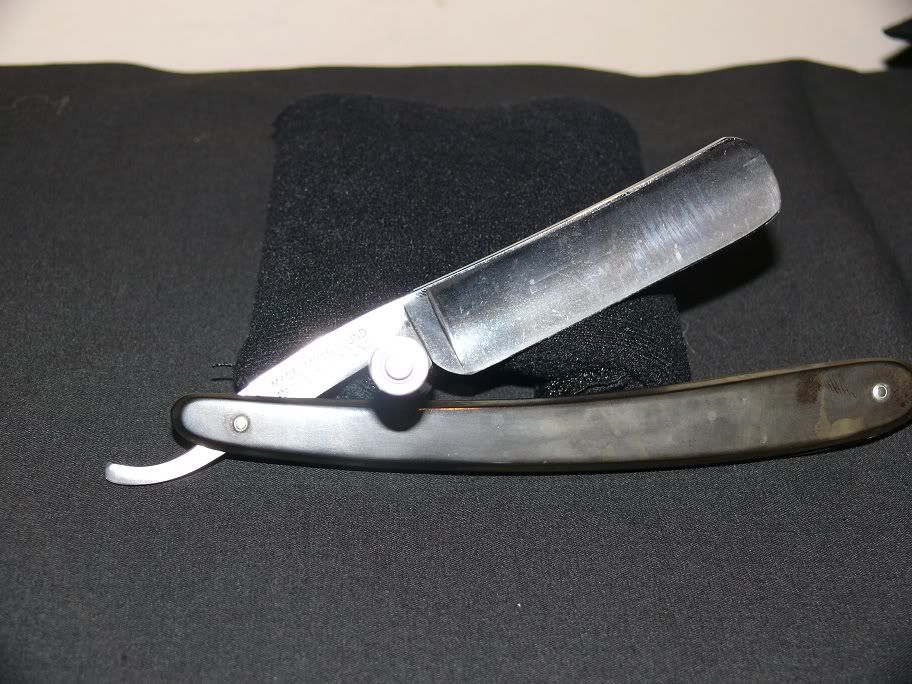
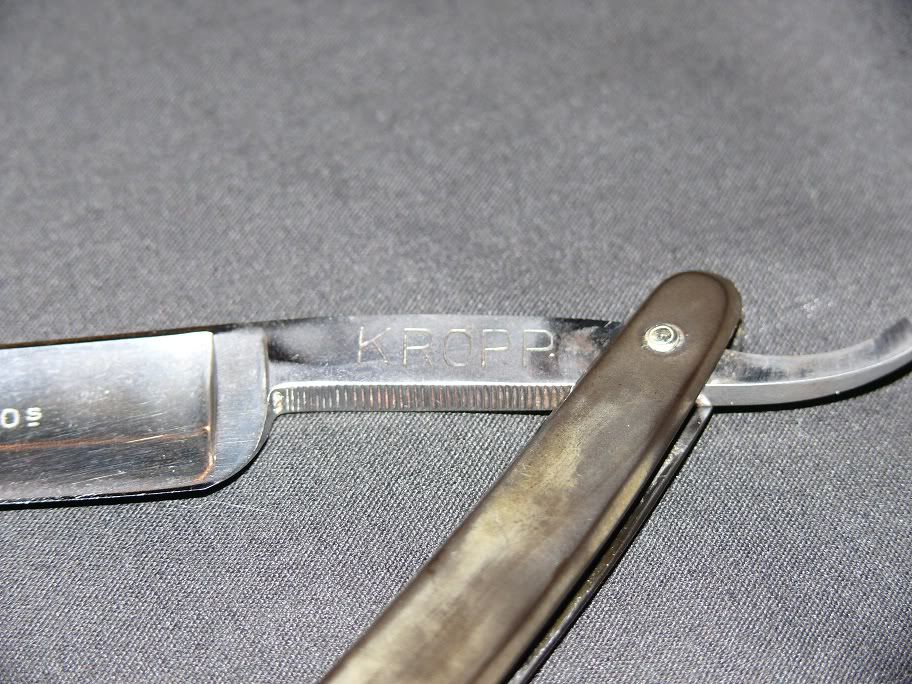
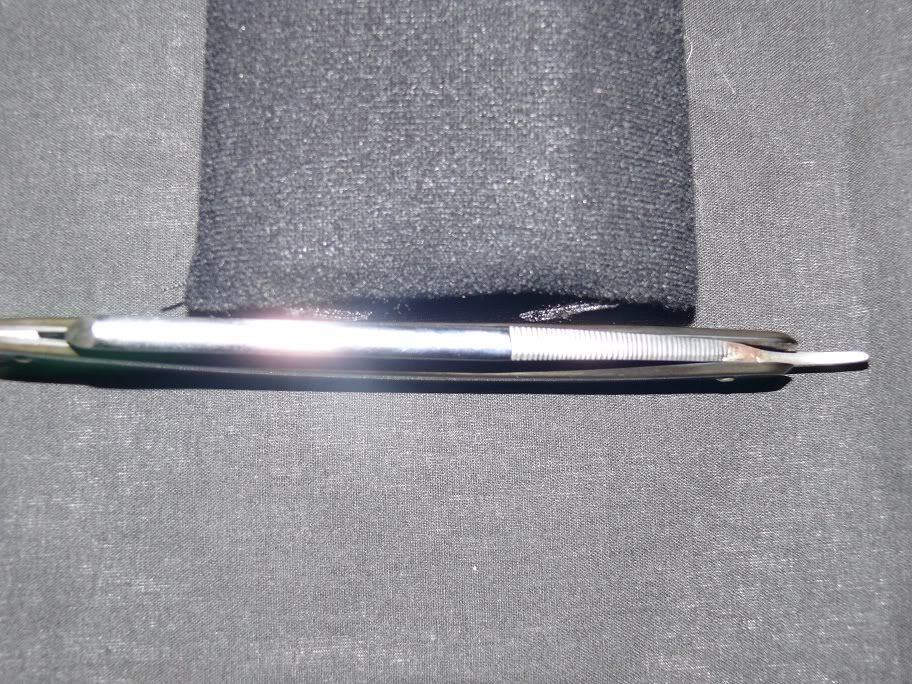
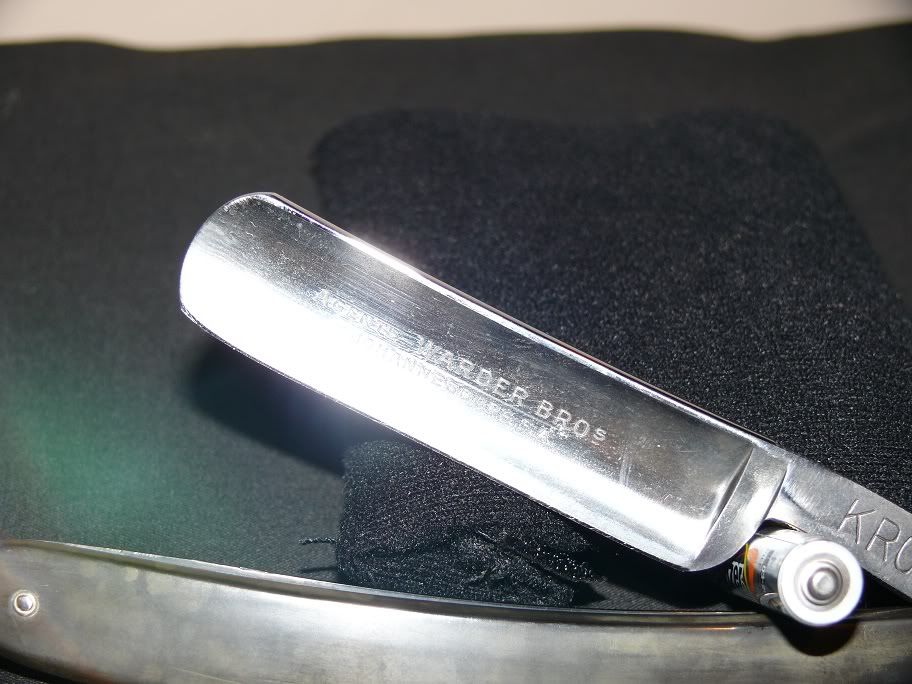
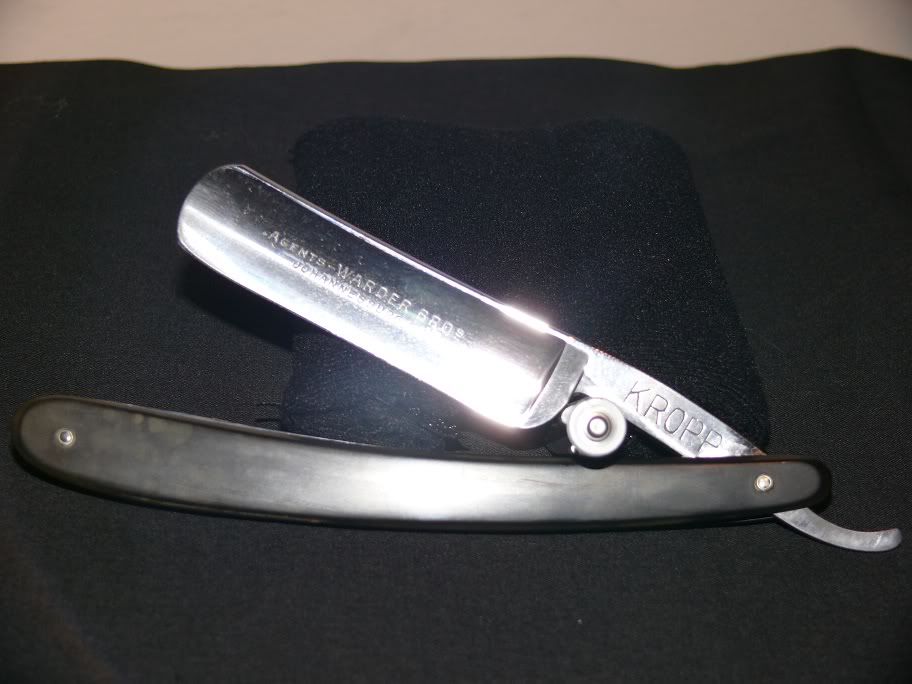
I hope this helps. Sorry, my Lumix isn't to great with macros.
P.S. @ Stubear, Caledonian, and gssixgun, thanks a million for all the help!!! I really appreciate it.Last edited by RazorFang; 05-12-2011 at 05:35 PM.
-
05-12-2011, 05:34 PM #9At this point in time...
- Join Date
- Jun 2007
- Location
- North Idaho Redoubt
- Posts
- 27,152
- Blog Entries
- 1
Thanked: 13249
First determine if the Etch is on, or in, the blade first,,, your thumbnail should tell you that,, if it is on the blade just about anything will take it off there so be very very careful...
-
The Following User Says Thank You to gssixgun For This Useful Post:
RazorFang (05-12-2011)
-
05-12-2011, 05:56 PM #10Member
- Join Date
- May 2011
- Location
- Johannesburg, South Africa
- Posts
- 55
Thanked: 0
Its fairly deep set, 1/10 to 2/10 mm I would say...


 Reply With Quote
