Results 1 to 10 of 20
-
10-25-2012, 05:42 PM #1< Banned User >

- Join Date
- Aug 2012
- Location
- Greenwood, Nova Scotia
- Posts
- 1,144
Thanked: 116 Double Duck - Chipped spike point advice
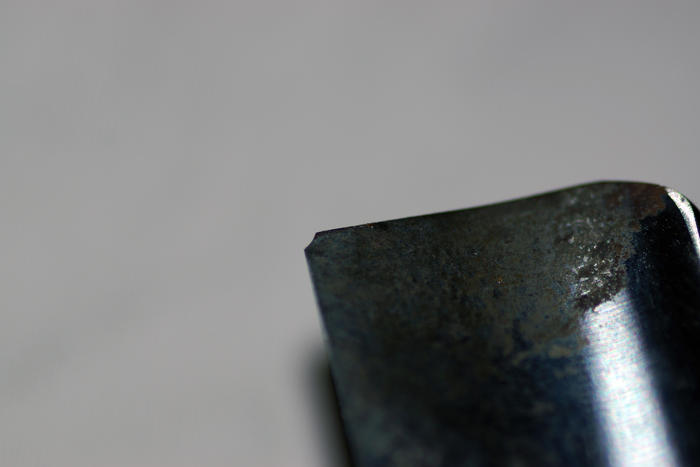
Just got my first ever Bresnick DD Satinwedge in the mail today, the blade looks like it's barely been used, no honeware or anything. There is a SLIGHT chip at the point of the toe though.... I don't want to necessarily 'round off' the point, but also don't want this tiny little chip to cause me any bleeding!I am positive that over time this will hone out, but who can wait that long? I want to shave with it now!I was thinking of taking it to the edge of one of my hones and very lightly correcting the malformation...Any advice would be, as usual, very appreciated!
-
10-25-2012, 05:45 PM #2< Banned User >

- Join Date
- Aug 2012
- Location
- Greenwood, Nova Scotia
- Posts
- 1,144
Thanked: 116
My apologies SatinEDGE not WEDGE!!!Also, sorry for the duplicate post... terrible internet permissions on the military base. Thanks guys

-
10-25-2012, 06:01 PM #3

Well, yeah you could do a japanese style stroke until it is corrected, brad (undream22) has a video on youtube where he does his version of breadknifing...but it's not really breadknifing. There's a couple of approaches you could take, but I would start with the lesser of the evils and try the japanese stroke with 1 or 2 pieces of tape at about a 60* angle, and gradually bringing the spine down til you are on the spine again, get a pre-bevel set, kill the edge, go to one piece of tape and set your bevel as usual....just one approach without grinding the crap out of the steel.
Mastering implies there is nothing more for you to learn of something... I prefer proficient enough to not totally screw it up.
-
10-25-2012, 06:03 PM #4

If you can at some point, load some pics b/c everyone's opinion of slight is different, you may not even have to go the route I described above, and can just set a new bevel and hone away if it is small enough
Mastering implies there is nothing more for you to learn of something... I prefer proficient enough to not totally screw it up.
-
10-25-2012, 06:03 PM #5

A picture is worth a thousand words in a case like this .

-
10-25-2012, 07:56 PM #6< Banned User >

- Join Date
- Aug 2012
- Location
- Greenwood, Nova Scotia
- Posts
- 1,144
Thanked: 116
I'm on the pictures right now, just got home from work and had to make dinner for the expensive italian wife/mother in law/baby boy/doberman

-
10-25-2012, 08:07 PM #7< Banned User >

- Join Date
- Aug 2012
- Location
- Greenwood, Nova Scotia
- Posts
- 1,144
Thanked: 116
As requested, here is the picture. It really is so minute when seen with the naked eye, I used my macro lens to get it as big and in focus as possible. Note the tarnish on the tip, the rest of the blade is immaculate and I'm certain it will come off with ease, it looks worse in the picture than it really is.

-
10-25-2012, 08:16 PM #8

Been there fixed that, start w/ flat japanese strokes til you are to the back side of the chip, switch tape if you use it. kill the edge, then set the bevel as usual. start at 1k or 800 grit stone and go from there. It'll come out no problem.
Mastering implies there is nothing more for you to learn of something... I prefer proficient enough to not totally screw it up.
-
10-25-2012, 08:21 PM #9< Banned User >

- Join Date
- Aug 2012
- Location
- Greenwood, Nova Scotia
- Posts
- 1,144
Thanked: 116
Are you suggesting removing the steel until the bevel is at the back side of the chip? I'd rather not lose that much steel. I'd prefer to round it right at that point and when honing brings me to it over time, let it happen.
-
10-25-2012, 08:26 PM #10Poor Fit

- Join Date
- May 2010
- Posts
- 4,562
Thanked: 1263
Just take the tip to the hone and round the tip to remove the chip. It's the only way to do it unless you want to waste alot of steel honing the entire edge out.
-
The Following User Says Thank You to Catrentshaving For This Useful Post:
brooksie967 (10-25-2012)


 6Likes
 LinkBack URL
 About LinkBacks


 Reply With Quote

