
Results 1 to 10 of 13
 3Likes
 LinkBack URL
 About LinkBacks
-
11-26-2012, 05:09 PM #1Junior Member

- Join Date
- Nov 2012
- Posts
- 10
Thanked: 0 Looking for experienced opinion on restoring etched Frederick Reynolds
Hey all,
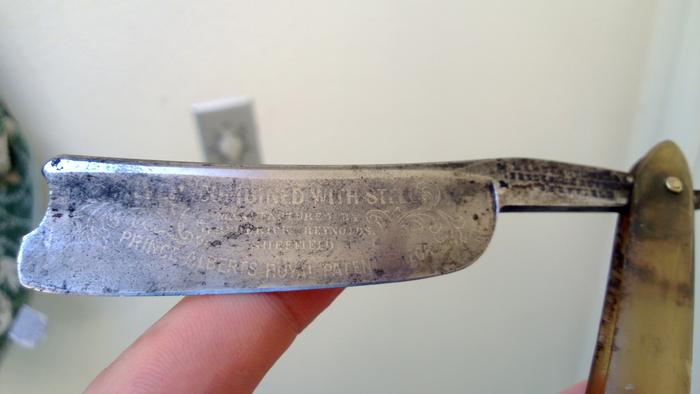
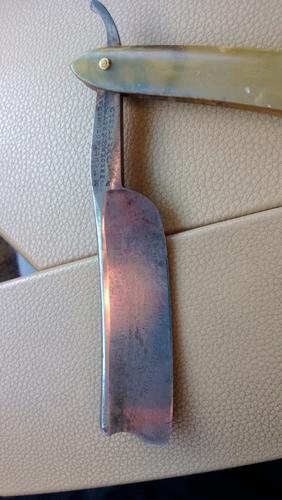
I picked up two vintage razors this weekend that I eventually want to use as daily shavers. One just needs to be sent out to be professionally honed. The F.R. I want to do a little restoration to first. Let me know if the pictures aren't showing enough, but I think the razor still has a nice shine to it, no deep scratches on the face, just dark grim or patina. So I really want to bring out the etching as much as possible. I'm hoping I can get some of your experienced opinions how to shine it up without losing any of the frosted etching on the blade. How fine of grit to start with? Or not to at all and just use metal polish? I'm new to restoring a razor and really excited to get to it. I'm practicing on some lesser-quality plain blades but want to start planning fort this one. I'd like to do this all by hand, but I did read you guys were experimenting with tumblers, which I do have (family is in the machining business).
Looking forward to hearing from you.
-
11-26-2012, 05:31 PM #2Just a guy with free time.
- Join Date
- Oct 2011
- Location
- Mid state Illinois
- Posts
- 1,448
Thanked: 247
http://straightrazorpalace.com/works...n-etching.html
http://straightrazorpalace.com/works...g-etching.html
http://straightrazorpalace.com/works...e-etching.html
Here's three places to start. The last one isn't about saving your etch, but about putting it back on after you're done.
-
11-26-2012, 06:09 PM #3At this point in time...


- Join Date
- Jun 2007
- Location
- North Idaho Redoubt
- Posts
- 27,101
- Blog Entries
- 1
Thanked: 13249
From the Pic: I say that first because I can't touch the blade
That looks like a Frosted etch, which is "On" the suface as opposed to the type that is engraved "In" the surface..
"On the surface" etch is the most delicate of them all, some come off with just a crosseyed look, let alone Buffing or Polishing, still to this date the Tumbler is the most gentle method I have found, or you can try cleaning around the etch with a Fiberglass pen or a Q-tip
-
The Following User Says Thank You to gssixgun For This Useful Post:
Geezer (11-27-2012)
-
11-26-2012, 08:53 PM #4Junior Member
- Join Date
- Nov 2012
- Posts
- 10
Thanked: 0
I read through the links regularjoe, I appreciate it.
Glen, you are correct, it is an "On" the surface etch. I'll probably try the fiberglass pen approach first.
So with the tumbler, do some "On" surface etching survive and some don't make it?.. just depending on condition I suppose.
I read through the whole tumbler thread, lots of information there (so many pages). But I didn't see many experience with the frosted etchings. So that's my big concern.
CheersLast edited by bigdinosaur; 11-26-2012 at 08:57 PM.
-
11-26-2012, 09:19 PM #5At this point in time...
- Join Date
- Jun 2007
- Location
- North Idaho Redoubt
- Posts
- 27,101
- Blog Entries
- 1
Thanked: 13249
The only Frosted Etch razors I have done that I distinctly remember are the W&B "Lather Well" and the tumbler did NOT pull them might have done a Masonic at some point in time too
-
11-26-2012, 09:31 PM #6Senior Member
- Join Date
- Jun 2011
- Posts
- 222
Thanked: 30
I have the same razor that I plan on cleaning up soon...I already made the decision to polish away the etching (mine looks much worse than yours).
-
11-26-2012, 10:32 PM #7< Banned User >
- Join Date
- Dec 2011
- Location
- Lakewood, WA
- Posts
- 533
Thanked: 56
Another good option if you have a steady hand ... is to use a dremel with the buffing attachments. You can modify the buffing wheels to any size just by cutting them. They work well but if you slipped your etching is a gonner.
-
11-27-2012, 12:29 AM #8Junior Member
- Join Date
- Nov 2012
- Posts
- 10
Thanked: 0
The tumbler sounds promising then. I guess I'd follow the same walnut media to corn cob media routine.
Johnny, yeah I probably would too if that was the case. I want to save mine while still making it look presentable.
Thanks for the idea, but I gotta say I never had much luck with the dremel. It would most likely be a goner lol.
-
11-27-2012, 03:01 AM #9Senior Master Tinker

- Join Date
- Jul 2012
- Location
- Deland, Florida
- Posts
- 233
Thanked: 81
From a man who has ruined a couple of "practice" razors using a Dremel, I think you are wise to stay away from it. I will never get a Dremel near a blade again.
As for the tumbler. I have the best success with Mother's Mag & Aluminum Polish to which I added some red jeweler's rouge I ground up. The Mother's will require "kneading" into the walnut medium or it will just be one big blob. Rubber gloves help. I have a large bag of corn cob medium but have yet to use it. A blade put through the walnut mix described above comes out so pritine I can not even imagine what the corn cob could add.
Have you looked at this thread: http://straightrazorpalace.com/forge...sty-razor.html . It may or may not help but it is simple and cheap and can do no harm if you follow instructions. Try for several days and see if you get some results. Even if you can not remove the pits with this process, which you can not, removing the black rust from the pits greatly enhances the appearance of the blade.
Just some thoughts for your consideration.
RandyTell me and I forget. Teach me and I remember. Involve me and I learn. Ben Franklin
-
11-27-2012, 03:19 AM #10Razor Vulture


- Join Date
- Oct 2010
- Location
- Lone Star State
- Posts
- 26,181
Thanked: 8619
Everyone gives excellent advise. I would recommend taking a #2 pencil to the areas I want to clean and leave the rest alone. A fine cleaning with a soft towell and light compound after. The pencil eraser works some too! Best it gets. Anything else will diminish the etching. Some manual labor will produce some great results. Takes a while!
 "Don't be stubborn. You are missing out."
I rest my case.


 Reply With Quote