
Results 1 to 10 of 20
 10Likes
 LinkBack URL
 About LinkBacks
-
04-27-2013, 08:20 PM #1Senior Member


- Join Date
- Mar 2013
- Location
- Tallahassee, FL
- Posts
- 354
Thanked: 57 Restoring a B.J. Eyre & Co Challenge, looking for some advice
Update/Edit -
So here is an update. I went to Home Depot and bought a filing kit and was able to file the pins down. I disassembled the razor and the first thing I noticed was how sticky the spacer was. It looked like it had sludge on it. The sludge was also around the pin hole of the razor.
Attachment 128842
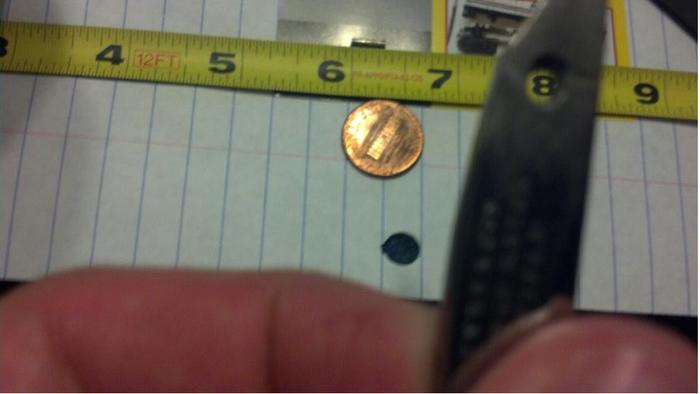
I put some Mothers near the tail and pin hole and started buffing away. I knew I would need to get some Mothers in the pin hole as well to get out any rusted metal. I found a leaf on the ground and started using the bottom of the stem to get the Mothers in the pin hole. Within a minute or so, I was literally scooping metal out of the hole with the leaf. The metal was so corroded it turned into the sludge I mentioned earlier. The crater that is in the handle is a little more than 1/8 of an inch, though the actual hole itself is a little smaller. Before I continue putting anymore work into it, I was curious if this would be a huge problem. I don't have many tools at my disposal. I haven't made scales before, nor have I tried repinning a razor. I imagine if I were to finish the restoration (which I would like to do), I would need to make the hole uniform so I could have a pin fit snuggly in there. Would I need to get a round file and slowly make the inner hole match the size of the crater?
Anyway, after an hour of Mothers and elbow grease/butter alternative, most of the active rust has come off. There is still some near the top end of the blade, so I think I'll need to grab the sandpaper. It isn't nearly as bad as I was expecting it to be, so I'll start on the higher end and work my way down if need be. Thank you everyone who has contributed thus far, your help is very appreciated.
Attachment 128844 Attachment 128845 Attachment 128846
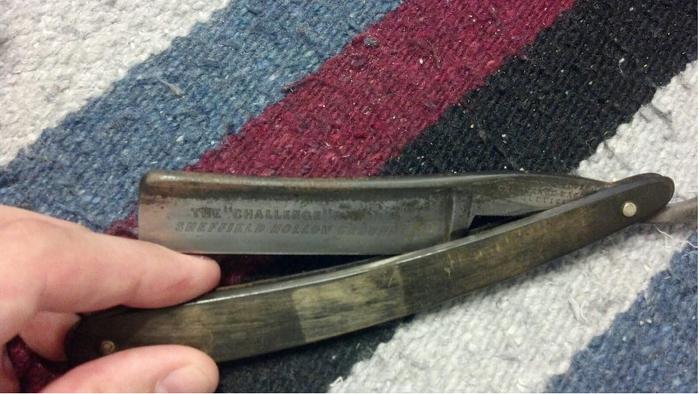
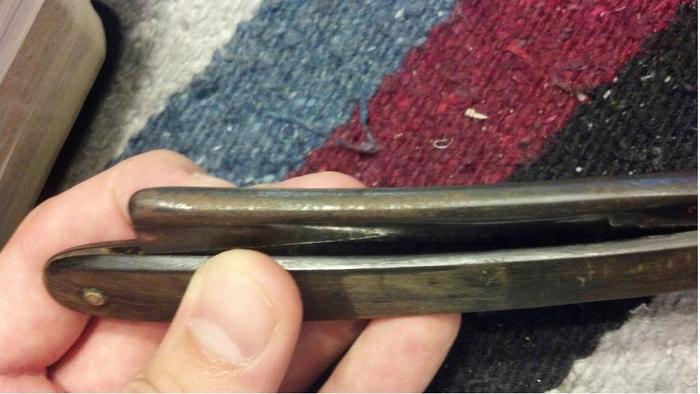
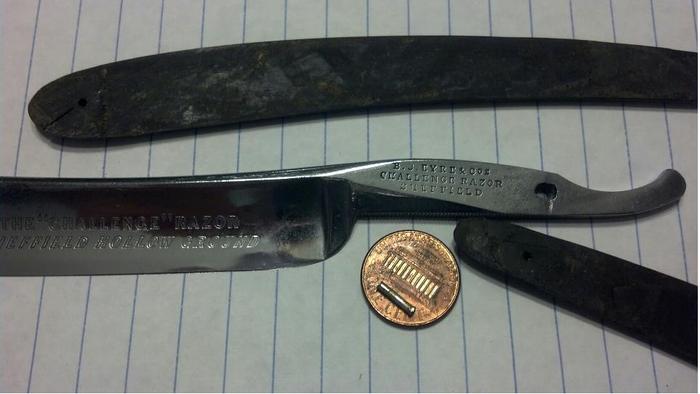
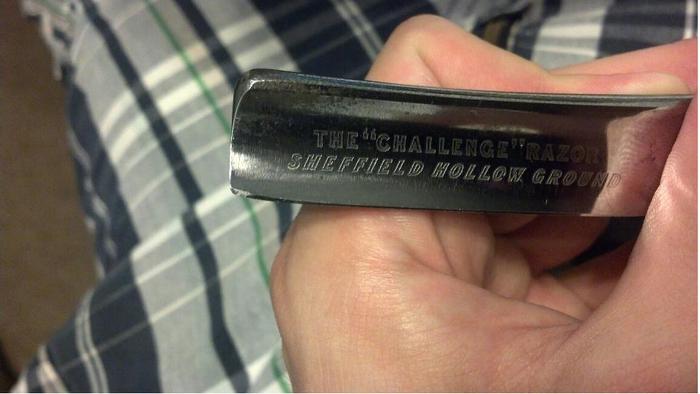
I was shopping around at the local flea market and came across this razor out of Sheffield. The man had it marked at $35, but after talking to him for a while about restoring it I was able to snag it for $20. There is a good amount of active rust on the spine. It isn't covering the entire top of the blade face and spine, but there is enough there to do some damage. The face and cutting edge of the blade are in pretty decent condition. The scales are original and there is a small crack by one of the pins. It measures out to a hair below 6/8. Out of the handful of straights I have, this is bar far the heaviest.
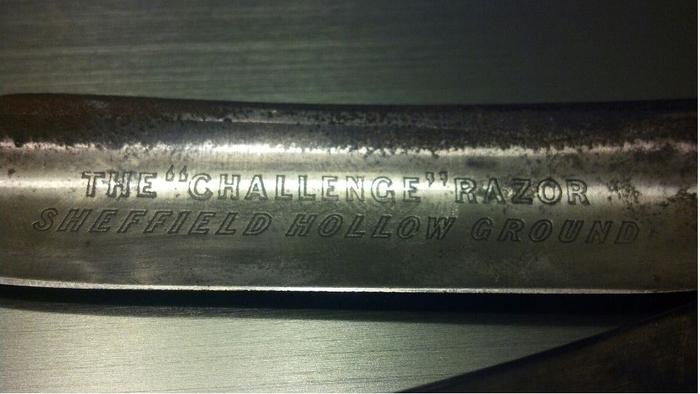
I don't have a drill press or a dremel, so I can't get the pins off just yet. I figured in the mean time I would get my 80 grit wet/dry sand paper and start getting the active rust off where I can. The stamp on the blade face isn't incredible deep, and I would like to preserve as much of it as possible. Would it be wise to run a course of Mothers and then start sanding, or should I just go for broke and go straight the the sanding process?
Though it has more rust than I would like (obviously), I felt that rust wasn't bad enough to warrant passing up on the razor. Any thoughts, comments, or suggestions are certainly welcome.
Last edited by Jonah; 04-28-2013 at 07:50 PM. Reason: This just in.
-
04-27-2013, 08:37 PM #2Senior Member
- Join Date
- Mar 2012
- Posts
- 273
Thanked: 43
I would suggest that you not start with 80 grit. I would start with no coarser than 220 and maybe even try 360 or 400.
You will need the 400 and finer grits anyway and you can see if they will work fast enough for you.
The deep scratches from 80 grit will take forever to get out.
Nice looking razor and I think it will prove well worth your time and effort to restore it.
It should shave well and hold a nice smooth edge too.
-
04-27-2013, 08:43 PM #3Senior Member
- Join Date
- Mar 2013
- Location
- Tallahassee, FL
- Posts
- 354
Thanked: 57
I have most/all the low range grits from 80-800 and I can get more if need be. I figured 80 was the starting point for most razors that have rust and pitting, though I could certainly be wrong. I hate asking this type of question when you can't get your hands on the razor, but do you think something along the lines of a 320 could cut through this stuff?
-
04-28-2013, 02:30 AM #4Member

- Join Date
- Nov 2011
- Location
- Montreal, Quebec
- Posts
- 57
Thanked: 10
Just star with higher grits and assess if you need lower grit depending on how much pitting you want to remove. Just remember, the lowest grit you you, the longer/harder it will be to back up to a shinny polished razor. If it is your first restoration I would suggest to be easy on yourself and not to remove all that 150 year old deep pitting.
baldy likes this.
-
The Following User Says Thank You to Jullmg For This Useful Post:
Jonah (04-28-2013)
-
04-28-2013, 02:48 AM #5
+1 on starting with a HIGHER grit.
80 will take FOREVER to get the scratches out!
You can always go down if it is not cutting through like you had hoped or expected.
Take it S L O W and have FUN!
GOOD LUCK
edit: Oh yeah... be CAREFUL around the etching if you want to keep it. DO NOT go near that with 80 grit!!!!!!!!!!!!!!!!!!!!!!!!!
-
The Following User Says Thank You to Chevhead For This Useful Post:
Jonah (04-28-2013)
-
04-28-2013, 03:38 AM #6Senior Member
- Join Date
- Mar 2013
- Location
- Tallahassee, FL
- Posts
- 354
Thanked: 57
I took a stab some weeks back at restoring an F.A. Koch http://straightrazorpalace.com/custo...e-restore.html and I have the general feel for the process. I'll probably start cranking on this guy tomorrow with a 300-400 grit and see how it goes. Originally Posted by Jullmg

I'll definitely be careful around the stamp on the face of it. It is engraved incredibly shallow, so I'll take my time on it for sure. I might be able to get away with a 600 or 800 grit on the face of the blade followed by some Mother's. Guess I'll find out tomorrow when I start on it. Originally Posted by Chevhead
-
04-28-2013, 03:40 AM #7
Hope it goes well for ya!
-
The Following User Says Thank You to Chevhead For This Useful Post:
Jonah (04-28-2013)
-
04-28-2013, 03:55 AM #8'with that said'


- Join Date
- Aug 2010
- Location
- Walla Walla in WA State USA
- Posts
- 11,260
Thanked: 4238
While I know that there is rust on the razor, why start low on the sanding? Try just using some MASS or Mothers Mag Wheel polish on it to see what you have before you begin!
If you dont like what you have after spending some time with the polishes, then start at about 400 grit on the spine, but Id advise using no lower than 600 grit on the blade, and only if you dont like the look of the blade after some time with the polish!
If you start using the polish with crumpled newspaper it goes faster as the paper has an abrasive in it! Also, dont give up on the polish when it turns black as its still able to work!!
Also if you put a dab of liquid soap such as dishwasher soap on the blade, then rinse off the residue from the polish, then dry it you will see a much better view of your progress as the residue blocks whats below!
A mirror finish isnt necessarily the best! Many out there like to leave a little history behind!
Have Fun!
-
The Following User Says Thank You to cudarunner For This Useful Post:
Jonah (04-28-2013)
-
04-28-2013, 07:13 AM #9Senior Member
- Join Date
- Mar 2013
- Location
- Tallahassee, FL
- Posts
- 354
Thanked: 57
I hadn't thought about using a newspaper to apply the polish. I had been using cotton rags up to this point. I'll see how that works out tomorrow and figure it out as I go.
-
04-28-2013, 03:56 PM #10'with that said'
- Join Date
- Aug 2010
- Location
- Walla Walla in WA State USA
- Posts
- 11,260
Thanked: 4238
You can also use some 0000 steel wool, but there again you may not want to get very aggressive! You may like what you find left behind! Originally Posted by Jonah


 Reply With Quote


