
Results 11 to 20 of 20
 10Likes
Thread: Divot in anvil size
 LinkBack URL
 About LinkBacks
-
06-06-2013, 05:19 PM #11Senior Member


- Join Date
- Apr 2008
- Location
- Essex, UK
- Posts
- 3,816
Thanked: 3164 I expect it depends on the washers you intend to use and how much you mushroom the pins over them, if you mean a shallow divot for resting the razor pivot pin in while peening over its opposite end during final assembly. Do you have a razor and a micrometer that you can take a reading from? Mine works out to around 3.54mm dia by 0.96mm depth, but yours may well be different.
 Originally Posted by medicevans

If you know a jeweller or a potter who has one of those little electric kilns, then they can be used for heat treating.
Regards,
Neil
-
06-06-2013, 05:31 PM #12Senior Member

- Join Date
- Jan 2008
- Location
- Sweden, Gotland, Visby
- Posts
- 1,888
Thanked: 222
Then one can always add a little touch to the pin heads by engraving the divot and a matching striker.
Neil Miller likes this.Hur Svenska stålet biter kom låt oss pröfva på.
-
06-06-2013, 06:17 PM #13Senior Member

- Join Date
- Jul 2011
- Posts
- 768
Thanked: 99
Yeah, it was really more tongue in cheek, making fun of myself. I have a set of calipers that will work fine for taking measurements from the four out five razors I have around. I don't know why I didn't think of that sooner. Lol Originally Posted by Neil Miller
Unless I can find an experienced heat treater in this forum or BladeForums that will do them cheaper, I'm planning on sending them to Peter's Heat Treating out east. They do really well with my knives.
-
06-07-2013, 04:23 PM #14Senior Member
- Join Date
- Mar 2011
- Location
- Corcoran, Minnesota
- Posts
- 665
Thanked: 170
I am not so sure that you need to heat treat your anvil. One of the rules of blacksmithing is, you never hit anything heat treated with something heat treated. Hammers are heat treated, therefore anvils are not. Tools like punches are heat treated on the business end, but the end you strike with the hammer is not. For that matter, most blacksmith hammers are only heat treated on the face - the rest is left untreated. To heat treat a punch, I just heat the tip to critical temp (non magnetic) and quench in oil. The rest of the punch never gets close to critical temp. When I temper, I start heating the middle of the punch with a propane torch and watch as the colors move toward the tip, cooling in oil when I get to peacock blue, or whatever Rockwell color I'm going for. If you still want to heat treat your anvil, make sure any holes and/or divits are done first - your can't drill heat treated steel easily. Good luck, and keep us informed about your progress. Your anvil is a work of art - my razor anvil is a piece of railroad track with a polished top.
Last edited by skipnord; 06-07-2013 at 04:26 PM.
Lemur likes this.
-
06-08-2013, 11:17 AM #15Senior Member
- Join Date
- Jul 2011
- Posts
- 768
Thanked: 99
Anvils are heat treated. Usually to low 50s Rc. If they weren't the corners would mushroom over, and the faces would ding.
I'm not using these little things to move hot metal, regardless. They are for pinning razors and pocket knives. They have been used for over 200 years in the cutlery industry, often being referred to as "stiddies", "stiddy", or "steady rest".
-
06-08-2013, 12:47 PM #16Senior Member
- Join Date
- Apr 2008
- Location
- Essex, UK
- Posts
- 3,816
Thanked: 3164
Ah yes, stiddies. More pictures of vintage stiddies here.
There are also some new, wonderfully precise ones, just like yours, pictured on that page. They were made by Great Lakes Waterjet, Inc, sometime prior to that 2009 thread.
Regards,
Neil
-
06-08-2013, 01:57 PM #17Senior Member


- Join Date
- May 2011
- Location
- Merthyr Tydfil South Wales UK.
- Posts
- 5,601
Thanked: 1413
I use a big 40lb block of steel I picked up from the scrap yard, works perfectly. after I finish peening the razor I punch a hole out of a strip of masking tape the exact same size as the washer, I then place directly over the pin head and use a 2000 grit wet & dry paper and a smooth and polish to a high finish, finally a cotton rag with a little brasso.
Jamie.

Last edited by celticcrusader; 06-08-2013 at 02:02 PM.
spazola likes this.Wherever youre going never take an idiot with you, you can always find one when you get there.
-
The Following User Says Thank You to celticcrusader For This Useful Post:
spazola (06-08-2013)
-
06-08-2013, 02:31 PM #18
No divot, just a flat jewelers anvil.
Use the most basic tools possible. It will make you a better craftsman. Til shade is gone, til water is gone, Into the shadow with teeth bared, screaming defiance with the last breath.
To spit in Sightblinders eye on the Last Day
-
The Following User Says Thank You to Bruno For This Useful Post:
Southbound (06-02-2019)
-
06-08-2013, 03:21 PM #19Senior Member
- Join Date
- Jan 2011
- Location
- Roseville,Kali
- Posts
- 10,432
Thanked: 2027
Exact same way I do it.Love the Anvil Jamie,Just perfect for Throwing in the duffle bag in case you have to tighten a pivot whilst on the Road Originally Posted by celticcrusader
celticcrusader likes this.
-
The Following User Says Thank You to pixelfixed For This Useful Post:
celticcrusader (06-08-2013)
-
06-08-2013, 03:33 PM #20Senior Member
- Join Date
- Jan 2011
- Location
- Roseville,Kali
- Posts
- 10,432
Thanked: 2027
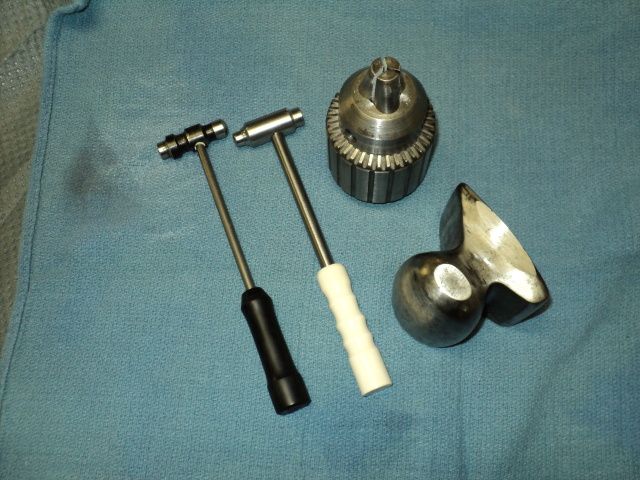
My Anvil ,Body workers Dolly,3 bux at autozone,grind and cleanup the flats,no divot,Home made hammers,The jacobs, I cut the pins,chuck them,file the ends,throw on a washer,TAP TAP TAP,start the mushroom, shove it thru the scales,cut to size and proceed.
 celticcrusader likes this.
-
The Following User Says Thank You to pixelfixed For This Useful Post:
skipnord (06-08-2013)


 Reply With Quote


