
Results 11 to 20 of 22
 12Likes
 LinkBack URL
 About LinkBacks
-
01-26-2014, 10:32 PM #11Senior Member


- Join Date
- Apr 2013
- Location
- Houston, TX
- Posts
- 199
Thanked: 28
 Originally Posted by pixelfixed

Yes that was my question. Charlie drilled a deeper hole, but he used a smaller spur. I guess I'll need something smaller if I want to set the spur in any knot hole smaller than 25mm or so, or I can just tap the spur in a guide hole, as you mention, to save the material and drill a hole later.
I got the part about catching the crack in the cedar and it unravelling into the tool rest. How far back should I move it?
-
01-26-2014, 10:58 PM #12Senior Member

- Join Date
- Jan 2011
- Location
- Roseville,Kali
- Posts
- 10,432
Thanked: 2027
Try say 3/8-1/2 inch.Is a huge amt of info on the web about woodturning.tools, techniques etc.Ck it out.
One thing I really want to stress to you as a beginner.Running a lathe can be dangerous,be carefull.irish19 likes this.CAUTION
Dangerous within 1 Mile
-
The Following User Says Thank You to pixelfixed For This Useful Post:
RADisorder (01-26-2014)
-
01-27-2014, 04:12 AM #13I love Burls....... and Acrylic


- Join Date
- Mar 2012
- Location
- Baden, Ontario
- Posts
- 5,475
Thanked: 2284
You ever hear of a dummy block? I use to use one all the time, like in this photo.
That's just a scrap piece of wood that I glued my African blackwood to. Allowing me to use a basic face plate secured with wood screws into the dummy block. Bring the tail stock up into the piece until you have it shaped. Then remove it to bore the desired size hole for your knot to go into. Just take your time with turning the knot hole though. The glue I used is a CA glue with a spray activator, so it sets up instantly. Hot glue also works. Sand it going through your grits, and cut it off with a parting tool. I like to leave a few milometers of scrap wood on the end and sand it off until flush.
As for some other tips, keep your RPMs low until you have it round, then increase it to a level you feel comfortable with once it is round.
Always keep your tool rest close to the work piece, but not too close. I like a 3/8 space for example. This means you'll have to constantly adjust as you work. Keep the height of the tool rest so that your tool is at the equator of the work piece, or slightly higher.
Keep your tools sharp. If you have to press the tool against the work piece for it to cut, your tool is dull and needs sharpening.
Make sure all the leaver locks are snugged tight before you turn on the machine. I've forgot to tighten my tool rest completely before and it hit the work piece and destroyed it.
Watch the dust from those exotic woods, they can cause lung problems. Wear a mask.Last edited by HARRYWALLY; 01-27-2014 at 04:14 AM.
Burls, Girls, and all things that Swirl....
-
The Following 2 Users Say Thank You to HARRYWALLY For This Useful Post:
Hirlau (01-30-2014), RADisorder (01-27-2014)
-
01-30-2014, 12:05 AM #14Senior Member
- Join Date
- Apr 2013
- Location
- Houston, TX
- Posts
- 199
Thanked: 28
Woodworkers Guild is a nice site with some good videos. Originally Posted by walleyeman
I found this epoxy for only $54 for a gallon, shipped. I'm wondering if anyone has tried one of these marine epoxies to make micarta/acrylic handles that's 2 parts to 1? I know all the micarta making material will be much harder than wood, but I'd really like to use this stuff for both handles and scales. Just looking from some comments about what to expect from anyone who has used that type of material or acrylic.
I liked seeing the tabletop sharpening wheels on the woodworker's guild. I sharpened my gouge on the side of a small grinder, but I'm sure I'd do better with one of those tabletop models.
-
01-30-2014, 12:11 AM #15Senior Member
- Join Date
- Jan 2011
- Location
- Roseville,Kali
- Posts
- 10,432
Thanked: 2027
Epoxy has a shelf life,a gallon is alot of epoxy Originally Posted by RADisorder
CAUTION
Dangerous within 1 Mile
-
01-30-2014, 12:37 AM #16Senior Member
- Join Date
- Apr 2013
- Location
- Houston, TX
- Posts
- 199
Thanked: 28
Ah, I knew it is temperature sensitive, but didn't know it had a shelf life. I got a small envirotex kit last time for scales and burnt through it so fast I wished I'd had more. I might go with the half gallon of envirotex from Amazon then - it's not that much more. Originally Posted by pixelfixed
Have you used the stuff for handles much, did you like it?
-
01-30-2014, 11:01 PM #17Senior Member
- Join Date
- Apr 2013
- Location
- Houston, TX
- Posts
- 199
Thanked: 28
Originally Posted by pixelfixed
Originally Posted by pixelfixed
The piece did come off eventually. I'd always been wearing goggles and a respirator, but I was wearing a new harbor freight deluxe face screen when it came off. It was running it's lowest around 700rpm, so it didn't seem to fly off too fast. It was a jolt to feel it happen through the gouge though. Originally Posted by WillN
Originally Posted by HARRYWALLY
I will probably make a dummy block (I do have a small faceplate to attach it to). Not sure if I will use this piece, but I read that I can use the cedar without stabilizing it. Would probably soak it in linseed oil and use spar varnish and/or finish it with CA. Have about enough for two more brushes left if I want a different shape.
I was pretty happy to see slivers of wood this time, since I sharpened the chisel. My technique isn't that great yet though, because the hone has facets in it. Not sure if I'll continue with my current setup for awhile or get one of those worksharp type sharpening tools.HARRYWALLY likes this.
-
02-17-2014, 01:21 AM #18Senior Member
- Join Date
- Apr 2013
- Location
- Houston, TX
- Posts
- 199
Thanked: 28
How long does CA finish stink? Or, can you coat it in anything that will help with the smell?
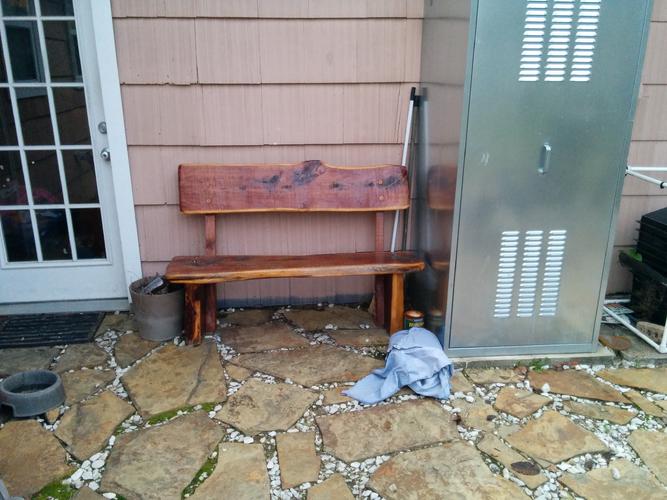
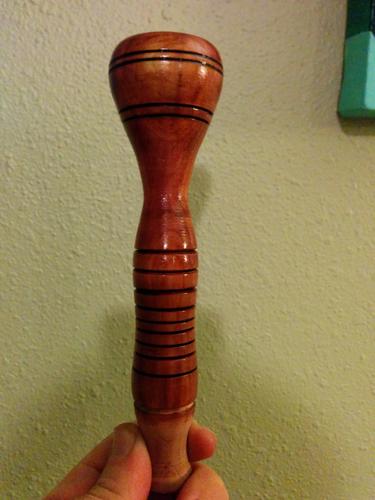
Anyway, here's the bench with the leftover wood I've been using:
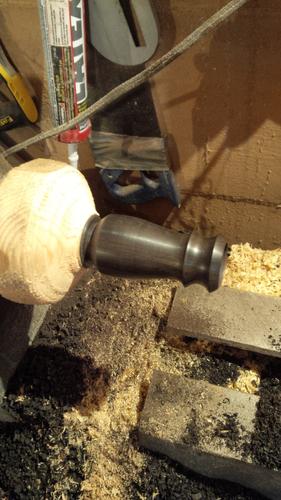
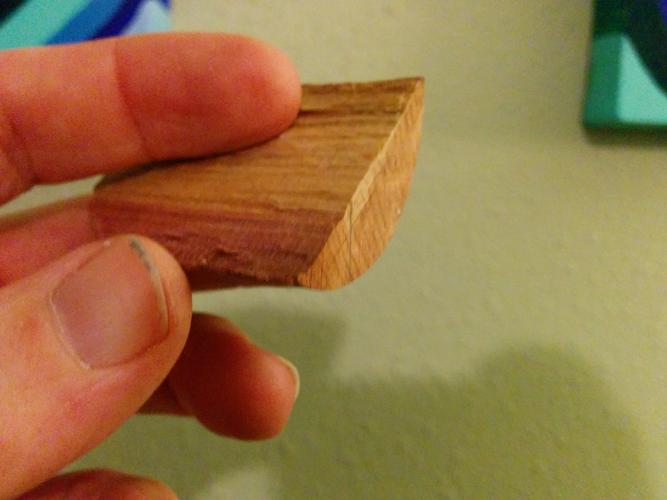
And the knot I ordered finally got here. The base is about 29mm and the loft about 64mm - pur tech synthetic:
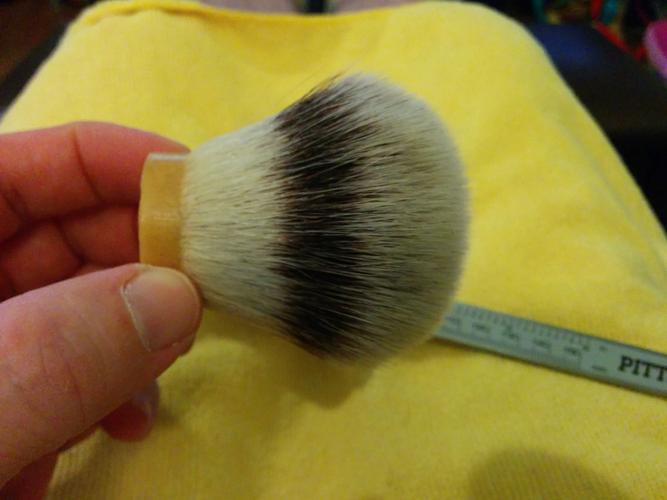
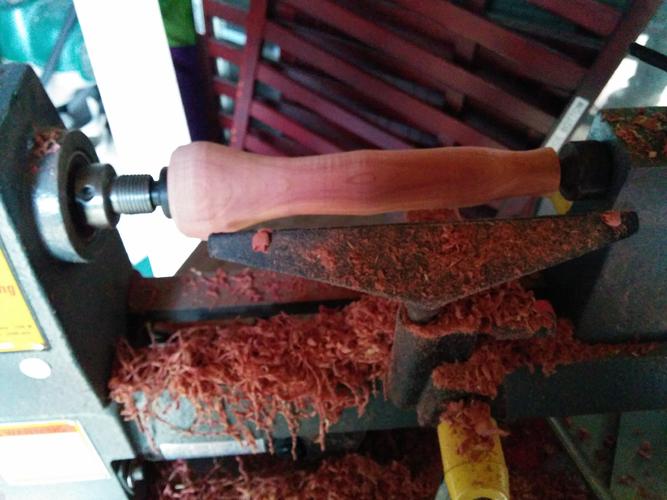
So, I fit the hole to the knot and put it back on the lathe to burn some rings and CA finish:
 HARRYWALLY and Deeter like this.
-
02-17-2014, 12:32 PM #19Senior Member

- Join Date
- Nov 2011
- Location
- West Palm Beach, Florida
- Posts
- 790
Thanked: 179
I have epoxy (marine) from 15 years old, call the manufacturer and was told it doesn't have a shelf life for strength, but the activator may turn darker, making it darker than when fresh. The pump quit working, but the epoxy still mix good and hardens fine. This is the same epoxy I use for my brush and fishing rod building (handle). Originally Posted by pixelfixed
Yes, a gallon for brush building is a lifetime supply! I usually wait till I have 3 or more knots to set, just to mix a tiny amount and still have left over. Double O
-
02-17-2014, 01:07 PM #20Senior Member
- Join Date
- Apr 2013
- Location
- Houston, TX
- Posts
- 199
Thanked: 28
Oh, that's a misunderstanding. I'm not talking about buying a lot of epoxy to set knots. I did end up buying a half gallon of envirotex to mold entire handles and scales. Originally Posted by Double0757
Last edited by RADisorder; 02-17-2014 at 01:13 PM.


 Reply With Quote