
Results 1 to 10 of 45
 89Likes
Thread: Hot & Shiny WIP
 LinkBack URL
 About LinkBacks
-
05-11-2015, 11:11 AM #1Senior Member


- Join Date
- Jun 2013
- Location
- Gladstone QLD AUSTRALIA
- Posts
- 3,246
Thanked: 804 Hot & Shiny WIP
Finally scavenged about 90% of the parts for my mini forge
& since it was available I decided on a full stainless option would be nice
So started building today
body is 6"x15" long sched 10 pipe cut the hole for the burner also ( forgot to take a pick)
6mm end plates with 80mm opening & 100mm wide back door flap cut & drilled

Pieces of 6mm plate for a cover door with 1" slot (was 2 shims cut) and my lugs so the ends can be bolted to the body
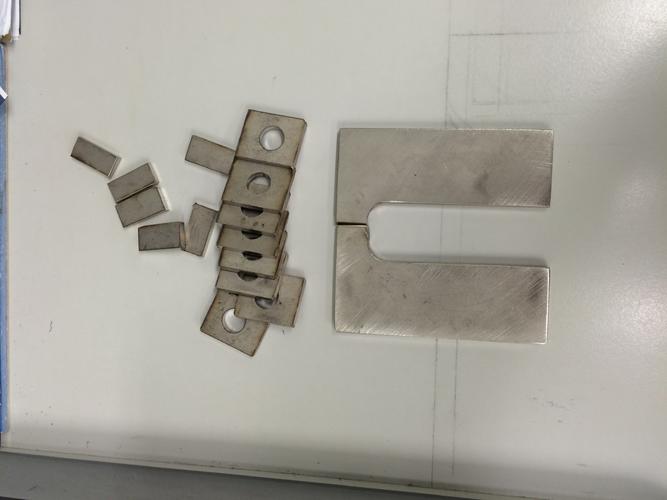
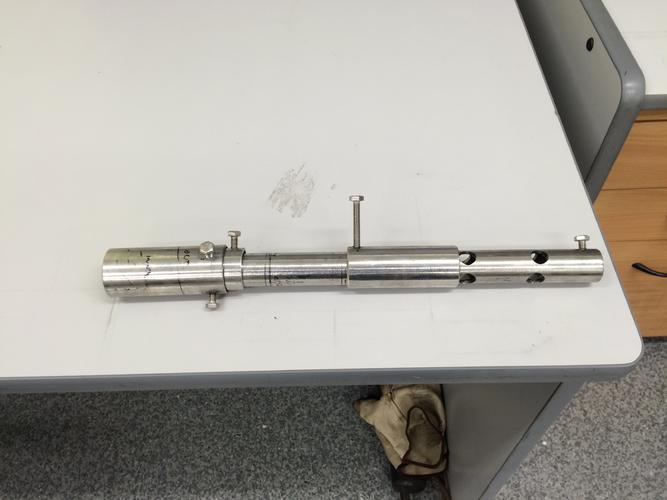
cut drilled & tapped burner body, guide end, stab in & throttle slide pieces
still have to slot the throttle air vents
burner body is 3/4" sched 40 pipe
tip & throttle slide is 1" shed 40 pipe
stab guide pipe is 1&1/4" shed 5 pipe
Other bits and pieces in my office for most of it ready to go (no pics) including valves & bits for an idle loop & gas supply mig tip jet set up,
also from a long time work associate a piece of Superwool 607 blanket 1" thick 2'x4' and some refractory cement getting saved from a shut down next week
The best bit is the total cost to date is not $300 not $100 but ZIP ,nada yes that's it $0 only my time which means more coin for my grinder build to come.
Now My question for those who have already tread this path is:
do you think the 3/4" pipe burner is going to be too big for my size forge at a 3"x15" volume forge or should I drop down to a 1/2" body burner ??
hope you enjoy
regards DionSaved,
to shave another day.
-
05-11-2015, 02:32 PM #2Senior Member

- Join Date
- Oct 2010
- Posts
- 26,211
Thanked: 8626
I know nothing about this, Dion, but that is nice work. Cannot wait to see it done!
 Nothing more to say........
-
05-11-2015, 05:21 PM #3Senior Member

- Join Date
- Jul 2014
- Location
- Denver CO
- Posts
- 4,680
Thanked: 811
What do you expect the finish ID of your forge to be? I assume you are lining it. Also what size orifice are you going to use on the burner? I just built a 3/4 burner with a .030 mg tip accelerator and I can hardly believe how powerful it is. I have not really experimented much with it turned down or with an .023 tip.
EDIT; Just re read your post and saw that you did state the finished size as 3" x 15". I have no experience with a 1/2" burner, but I suspect it would be more appropriate for your mini forge.Last edited by bluesman7; 05-11-2015 at 05:30 PM.
Substance likes this.
-
The Following User Says Thank You to bluesman7 For This Useful Post:
Substance (05-11-2015)
-
05-11-2015, 05:25 PM #4Senior Member

- Join Date
- Jan 2014
- Location
- Ukraine
- Posts
- 684
Thanked: 239
I want to see the finished product.

-
05-11-2015, 09:43 PM #5Senior Member
- Join Date
- Jul 2014
- Location
- Denver CO
- Posts
- 4,680
Thanked: 811
I used a piece of 1-1/4" pipe for my nozzle. 1" seems like it would be too small to me on a 3/4" burner.
-
05-11-2015, 10:09 PM #6Senior Member
- Join Date
- Jun 2013
- Location
- Gladstone QLD AUSTRALIA
- Posts
- 3,246
Thanked: 804
thanks mate, I intend to make it so I can change tips out so may start with the smaller & try them before I mount it to the forge anyway. Originally Posted by bluesman7

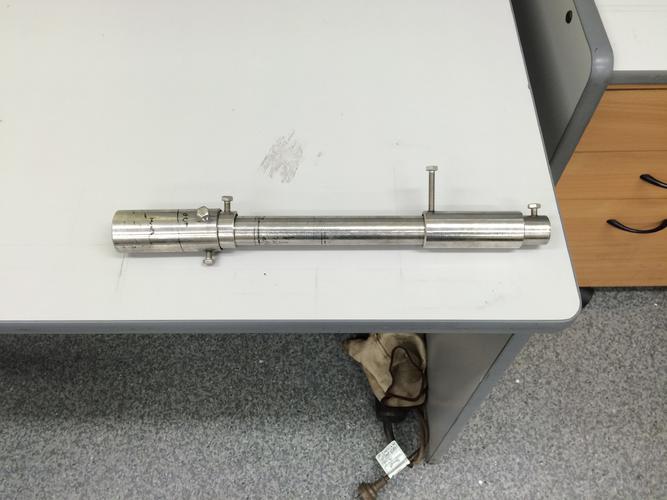
also do you know if the length of the burner pipe has any effect on performance ??
I have it at 8" of pipe from the shortest point of the throttle holes to the burner pipe end this is square cut
Then the throttle slots will be 4 off at 1/2" x 2 1/2" long this make it 80% of the internal circumference is open x 2 1/2" long
The nozzle tip is adjustable & 2" long this is square cut
The outer mount tube is 3 1/2" long and will be shaped to suit the inner wall of the forge
thanks for any info in advance.Saved,
to shave another day.
-
05-11-2015, 10:17 PM #7Senior Member
- Join Date
- Jun 2013
- Location
- Gladstone QLD AUSTRALIA
- Posts
- 3,246
Thanked: 804
was your tip conical or just square cut Originally Posted by bluesman7
I have seen some machined on the inside to 5° helps as well as some that just use a 3/4" to 1" reducer for the tip and nothing else ?Saved,
to shave another day.
-
05-11-2015, 10:19 PM #8Senior Member
- Join Date
- Jul 2014
- Location
- Denver CO
- Posts
- 4,680
Thanked: 811
Mine is 7" here. I've only built the one so I don't know how much effect that extra 1" will have. As I said I used an 1-1/4" nozzle and I find it runs well with 1-3/8" overhang. This keeps the primary flame wide and short. Originally Posted by Substance
Substance likes this.
-
05-11-2015, 10:27 PM #9Senior Member
- Join Date
- Jul 2014
- Location
- Denver CO
- Posts
- 4,680
Thanked: 811
Mine is not flared. It is just a straight bore with a step at the end of the 3/4" mixing tube. I gather that the idea here is to reduce the velocity and that the step actually helps by introducing turbulence into the larger diameter. Originally Posted by Substance
Substance likes this.
-
05-12-2015, 01:46 AM #10Hones & Honing


- Join Date
- May 2005
- Location
- Saint Paul, Minnesota, United States
- Posts
- 8,023
- Blog Entries
- 1
Thanked: 2209
Very, very nice!
Randolph Tuttle, a SRP Mentor for residents of Minnesota & western Wisconsin


 Reply With Quote