
Results 31 to 40 of 74
 59Likes
Thread: electrolysis for rusty razor
 LinkBack URL
 About LinkBacks
-
09-25-2012, 02:07 PM #31Razor Vulture


- Join Date
- Oct 2010
- Location
- Lone Star State
- Posts
- 26,144
Thanked: 8616
Sounds like some razors are cooking! Yes, battery chargers are common and avaliable in 6 and 12 volts with many amperage outputs. Perhaps this process would hold more interest if they were used instead of an elaborate power source which would be unattainable to most. This way, the results could be used by anyone, if desired.
Looking forward to the results!
-
09-25-2012, 04:22 PM #32Senior Member

- Join Date
- Apr 2012
- Location
- Diamond Bar, CA
- Posts
- 6,553
Thanked: 3215
Guys how about some more Pics for us non electronical types... or Crayola drawings.
Thanks
Marty
-
09-25-2012, 09:22 PM #33Just a guy with free time.
- Join Date
- Oct 2011
- Location
- Mid state Illinois
- Posts
- 1,448
Thanked: 247
Here's some pics. Here is the rig, the razor (before), and two of the razor after 10 hours. I haven't taken any more pics today. It's still bubbling, so I'm going with Randy's guidance, that it'll quit when it's done.

It's working, but when judging the finished product, you'll have to keep the first pic in mind. This poor razor was a lost cause to begin with.
I'll post another pic tomorrow evening. I figure whatever I get in 24 hours is enough to tell me what I need to know. Overall though, I'm fairly impressed.baldy likes this.
-
The Following User Says Thank You to regularjoe For This Useful Post:
Euclid440 (09-26-2012)
-
09-27-2012, 01:10 AM #34Just a guy with free time.
- Join Date
- Oct 2011
- Location
- Mid state Illinois
- Posts
- 1,448
Thanked: 247
This is 24 hours after start up. And some worn out 600 grit wet dry on a rotary tool.
Lessons learned: Nails are not the best anode.
Surface area of the anode is KEY.
I like this for removing the bulk of the nasty. But would follow up with standard greaseless buffing.
I think more people oughta give it a shot. It's so much cheaper than buffing compounds, and if followed up with a tumbler, the effect is astounding. I don't use a tumbler..doh.
I'll be lookiing forward to seeing other people's results.WadePatton likes this.
-
09-27-2012, 01:23 AM #35Chasing the Edge

- Join Date
- Aug 2012
- Location
- Middle Tennessee
- Posts
- 920
Thanked: 117
sorry i bluffed my way through the electronics sections of the exams. i'd have to go look it up and repost what i founded.*
quick question otherwise-this tumbling, is vibratory media an option-you know a cartridge case cleaner with corncob or walnut hull media?
*brain cell activity: a "wall wart" charger will give you really low amperage at whatever voltage is posted on the label. just split the wire and add clips. (i'm good with the mechanical aspects (he's smarter than he looks)). and it's not like you don't have 12 leftover, lost, or extra ww chargers in a nook somewhere. for the gentlest approach.
-
09-27-2012, 01:30 AM #36Razor Vulture
- Join Date
- Oct 2010
- Location
- Lone Star State
- Posts
- 26,144
Thanked: 8616
I wonder about using different metals for an anode? Aluminum, bronze, brass, copper? Even if the anode is destroyed, it might do the best job. A pile of resistors can be had cheap as well as rectifiers/diodes. Some serious record keeping and timely work and a good multimeter seem to be involved. It seems we are after the black stuff. That would be cool to get rid of! Curious

Last edited by sharptonn; 09-27-2012 at 01:36 AM.
-
09-27-2012, 03:15 AM #37Loudmouth


- Join Date
- Jun 2005
- Location
- Etobicoke, ON
- Posts
- 7,171
Thanked: 64
What about using steel pot scrubbing pads? They would give you a lot of surface area per volume taken.
-
09-27-2012, 04:45 AM #38Sinner Saved by Grace

- Join Date
- Jul 2012
- Location
- Corning, CA
- Posts
- 598
Thanked: 133
When I have used this method for cast iron. I used a new spool of re-bar tie wire, wrapped in a perforated insulator, as an anode.
If you want to get really fancy you could line the container with one of the various anode materials. Chromed steel works well to jump start the process on reluctant subjects.
Eagerly looking forward to more results. Thanks for the experiments.
-
09-27-2012, 02:33 PM #39Senior Master Tinker

- Join Date
- Jul 2012
- Location
- Deland, Florida
- Posts
- 233
Thanked: 81
I am in the process of working on some of the blades you sent me and will be posting pics soon. As for record keeping, I set up a spread sheet to document everything I do to a particular blade. I have recently started another tank for my 12 volt 10 amp battery charger. I am happy to say it did not melt the blade. More on that latter. Originally Posted by sharptonn

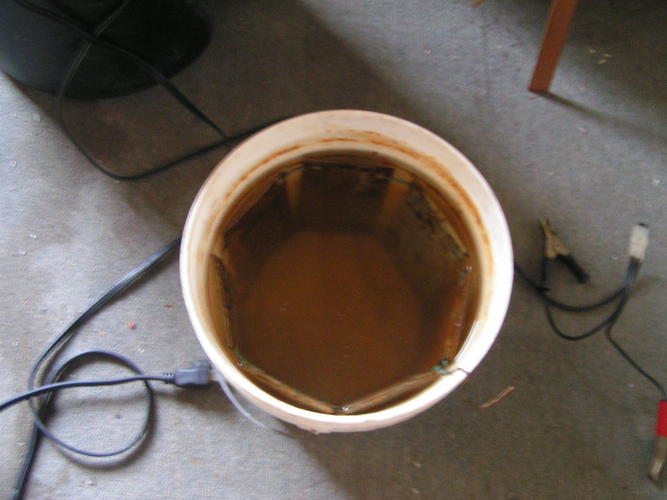
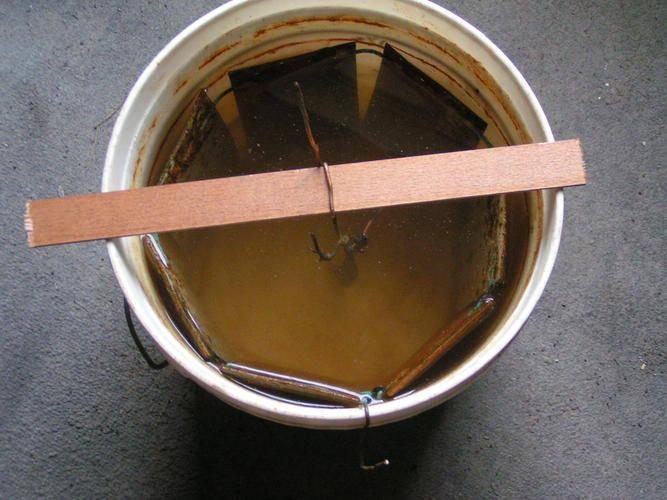
Here are two pics of my tank set ups. The first set up was posted earlier but I took some more pictures after cleaning out the old crud so you can see things better. Tank one consists of seven rafter nailing plates soldered together with copper wire. The anode and cathode leads are also copper. I use a simple piece of wood with a copper wire wrapped around it that spans the tank to hold the blade in the solution.
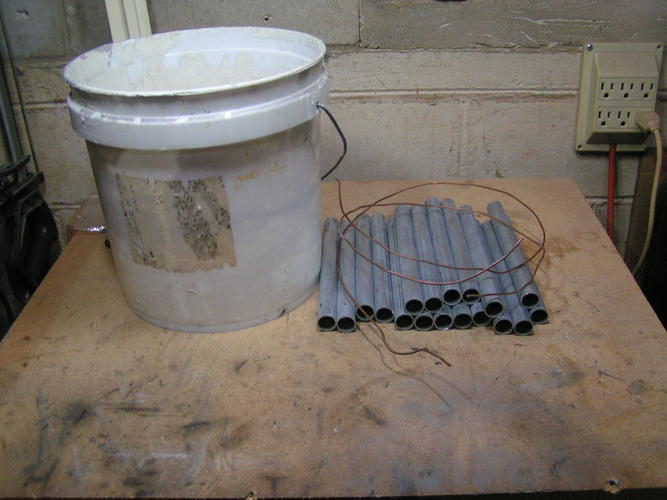
The second tank is made of 18 pieces of galvanized steel I cut from electrical conduit. The thin zinc layer was sanded of with some 80 grit sandpaper. Each piece was tested for continuity and then drilled at the top and bottom for threading through some copper wire. The wire I am using is some scrap 12 gauge electric wire. No fun stringing the pieces on the wire. I might just wrap the wire around the pipe the next time. As always, after assembled, everything was tested for continuity.
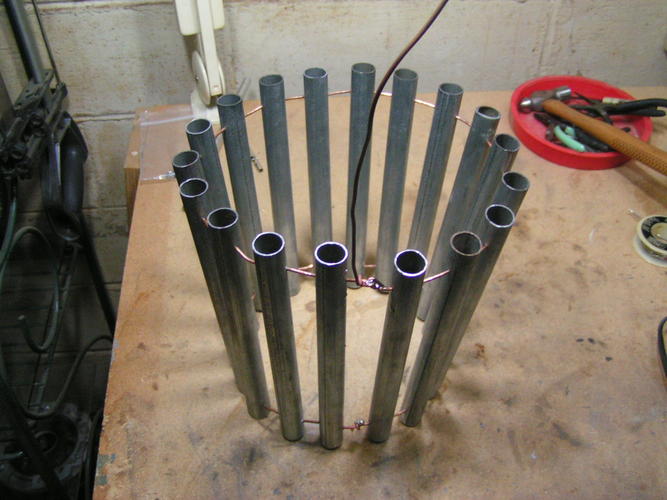
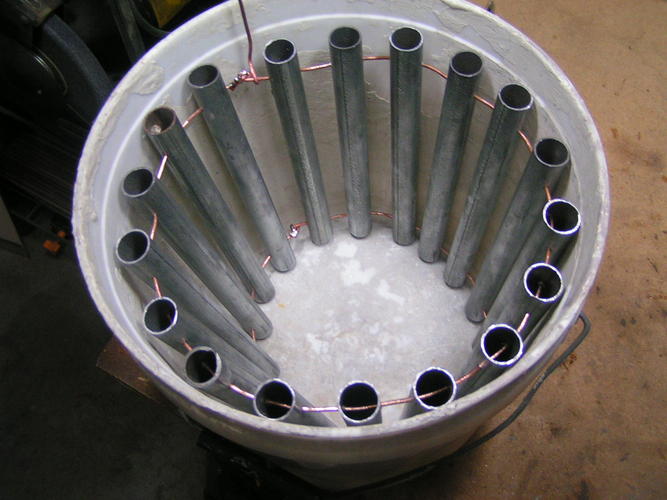
It is important that the mass of the anode in comparison with the object to be cleaned is as large as possible. It is also very helpful if the anode surrounds the object as this process is "line of sight" only. That is, only the surface of the object facing the anode will be cleaned. If you do not surround the object, you will have to turn it periodically and do the remaining sides for as long as you did the original side.
Two caveats: First, do NOT use stainless steel as an anode. It gives off harmful and potentially lethal chemicals due to its composition when subjected to electrolysis. I will gladly point you to a article on the subject if you are interested in more details or you can look it up on the internet. Second, conduct this process out doors or in very well ventilated room. The process gives off hydrogen and chlorine as a by product. There is a video on YouTube where a guy collects some of the hydrogen in a jar and then sets a match to it. WHOOSH!!! Image what would happen in an enclosed room where you are conducting your experiments and after ten or more hours of collecting the hydrogen, you enter the room and light up a cigarette. You got it! Crispy critter time! Sparks and open flames need to be kept away from the process!
I will post more soon. I'm finishing up some other commitments I made. I am still ongoing with experiments, but taking photos, culling through them and getting them posted is something that will have to wait a day or two.
RandyTell me and I forget. Teach me and I remember. Involve me and I learn. Ben Franklin
-
09-27-2012, 02:46 PM #40Senior Master Tinker
- Join Date
- Jul 2012
- Location
- Deland, Florida
- Posts
- 233
Thanked: 81
RJ: I think it will be helpful if each member describes the set up he is using and the voltage/amperage of the power source. This way, maybe we can cull out what is working and what is not. Eliminating or documenting as many variables as possible will help us all in trying to find the "best" set up. In your photo, it looks like you are using some kind of metal container. Do you have the anode attached to the container? You mentioned something about a nail. Are you using a nail as the anode? It looks like the inside of the contained has some type of coating. Is this true? And finally, what are the specs for your power source? Thank you for your post. It is encouraging to see others trying this process. Originally Posted by regularjoe
RandyLast edited by WhiteLion; 09-27-2012 at 02:47 PM. Reason: spelling error
Tell me and I forget. Teach me and I remember. Involve me and I learn. Ben Franklin


 Reply With Quote