
Results 51 to 60 of 74
 59Likes
Thread: electrolysis for rusty razor
 LinkBack URL
 About LinkBacks
-
10-04-2012, 12:56 PM #51Maniac, Mechanic, Mastermind


- Join Date
- Sep 2012
- Location
- Minneapolis, MN
- Posts
- 43
Thanked: 11 A Little Home Lab
Gents, I finally came into possession of a Henckels, probably circa 1920, that made a great candidate both for electrolysis and (drum roll) - experimentation.
The blade is in pretty rough shape and I'm not sure it's salvageable as a restoration project.
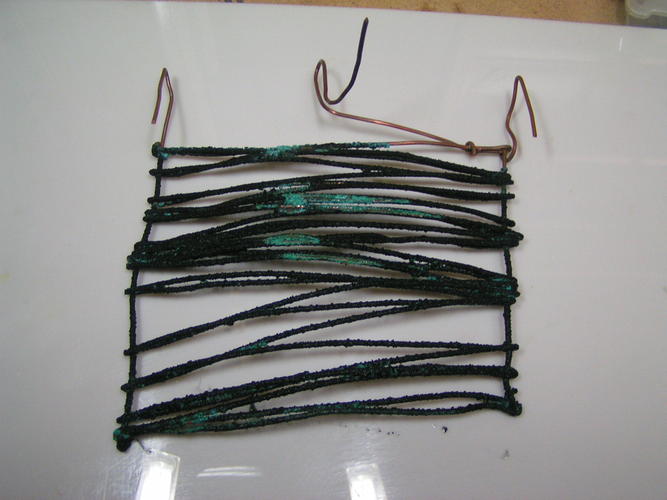
There was some discussion of using other metals which oxidize, but are not necessarily steel. Copper came up. I decided to give this a go. I'm using an old laundry soap container (it was a about gallon and a half before I cut the top off), Arm & Hammer Super Washing Soda, copper wire, 1/2" copper pipe (cut to about 4") and a Schumacher SE-82-6 battery charger that provides three DC options, 12V/6A, 12V/2A trickle, 6V/6A. It was like thirty bucks, works great on the car, the motorcycle and apparently electrolysis of small things.
So I put the lab together:
Because I'm impatient and this whole thing's for fun, the charger is running at 12V/6A.Do to budget cuts the light at the end of the tunnel has been turned off; we apologize for any inconvenience.
-
10-04-2012, 01:11 PM #52Maniac, Mechanic, Mastermind
- Join Date
- Sep 2012
- Location
- Minneapolis, MN
- Posts
- 43
Thanked: 11 Fifteen Minutes Later
That's right, just like WhiteLion, this really kicked off in fifteen minutes:
Sorry these pictures aren't as great, but I assure you, the rust was really flying off...
Thrilled by my results in such a short timeframe, I shut the whole process down, made a clean solution and removed the oxidation from the copper pipe (positive side).
I fired it back up and decided to let it run all night (about six and a half hours)...
Turns out, I've copper plated a good portion of the blade where all the rust has come off.
So, yeah, it seems that perhaps using copper as the sacrificial anode (scrap metal piece) may not provide the desired results. The rust removal was fantastic and the blade really does look a lot better. Certainly a lot smoother, although there is some apparent pitting. Even if I hadn't plated it, it would need fresh solution, a good anode cleaning and probably another night.
After work tonight I'm going to find a different piece of scrap to use, some sort of steel/carbon steel and toss the whole thing back in to cook.
Questions or comment, lemme know, otherwise I'll put up more tomorrow.FiReSTaRT likes this.Do to budget cuts the light at the end of the tunnel has been turned off; we apologize for any inconvenience.
-
10-04-2012, 04:46 PM #53Senior Master Tinker

- Join Date
- Jul 2012
- Location
- Deland, Florida
- Posts
- 233
Thanked: 81
Kit - First of I want to thank you for your interest in this topic and participation in these 'experiments". Some input I've garnered on the power supply - higher voltage does not seem to make much if any difference. My one amp PS draws only about 8 of it's twelve volt cap in the process. The ten amp PS draws only 11 volts of its twelve volt capacity during the process. What does seem to vary is the amperage. To date, my conclusion is that the amperage draw rises in direct correlation to the size of the anode, the anode material and the distance between the anode and cathode. A large anode closely set to the cathode using steel plate sends the amperage up considerably. On the 1A charger the amperage draw rises to 1.45A before the charger shuts off. It then will cool down and recycle again and again. The 10A charger on the other hand will gradually continue to increase feeding the draw demanded. At about 2 amps of draw, the cathode and anode become slightly warm. At 3 amps of draw the cathode and anode become noticeably warmer. I have not gone beyond that point at present. Originally Posted by falingore

Simply changing the anode material to copper from sheet steel substantially reduces the amperage draw. Using copper in the same set up used for the sheet steel, the amperage draw was only about .5 amps.
You are correct Kit that this process should be fun. But caution is warranted as you are experimenting with this process. Last night was the first time I did an overnighter. I had allowed the process to run all day and I periodically tested both the voltage and amperage draw. I knew it was safe. Had I let the process go overnight with the sheet steel and 10A charger before I understood how it was incrementally drawing more amperage as time passed I could have had a real fire hazard. An inexpensive mltimeter would be a great addition to your experimenting. I can explain its use if need be. Originally Posted by falingore
Have fun but be safe. Geezer likes this.Tell me and I forget. Teach me and I remember. Involve me and I learn. Ben Franklin
-
The Following User Says Thank You to WhiteLion For This Useful Post:
falingore (10-04-2012)
-
10-04-2012, 05:38 PM #54Senior Master Tinker
- Join Date
- Jul 2012
- Location
- Deland, Florida
- Posts
- 233
Thanked: 81
I too ran a test on copper. Unlike you, I used 15 feet of 14 gauge copper wire I stripped 6" at a time. What a pain! Then I looped it back and forth to fit my Tupperware container. Another pain in the arse!!! After 24 hours I have reached the same conclusion as you: copper is NOT the way to go. It oxidizes way to quickly and seems to draw very little amperage. Here was my set up: Originally Posted by falingore

I pictured both sides of the cathode because I want to make a point and clarify an earlier statement of mine. Contrary to internet lore, the line of sight argument does not seem to be a valid requirement for the process to work. In my most recent experimentation, I have found both sides of a blade and the anode seem to process equally well with only one side on the razor and anode facing each other. What that means to users is that they can use smaller containers and need far less material for the anode. I also like hanging my blade horizontally in the jig I posted earlier as this cuts down on the depth of the container needed.
I am also going to put my thumb down on copper for a far more important reason. When falingore posted that his blade seemed to have been tinted by the copper, I thought he must have mixed up and reversed the charger leads. After coffee and the newspaper, I went out to examine my own copper experiment that had run for 24 hours. The blade now definitely has a copper patina and I did not mix up the anode and cathode. I hope you can see it in the picture.
The look is not all that bad but who wants a copper razor blade? Will it tarnish? Like it or not, I presently have a blade with a copper patina and will find out if it tarnishes.
I am in the process now of testing a brass anode. One thing I have found is different anode material act differently. Sheet steel seems to "atomize" all rust and the water remains clean. No gunk floating to the top or resting on the bottom. I am going to experiment further with steel using smaller pieces to see if that affects the draw of amps so my charger is not taxed and forced to cycle on and off. Copper oxidizes the anode terribly and leaves a lot of black oxizidation in the water. Brass, so far seems to foam on the top and I will report more on that later as the process has only begun.
At present, I have 10 blades with all brown rust removed which was easy peasy. I am now limiting my experiments to those blades trying to get at the black rust. I have "reduced" black rust on blades but have yet to eliminate it totally.
I am currently using "Washing Soda" instead of baking powder as the internet lore is that it works better. My conclusion on that is pending. You can make your own "Washing Soda" from baking soda. If you can not find washing soda, this is the way to make your own (even if you can find it, baking soda is less expensive than washing soda). To convert baking to washing soda, spread it on a baking sheet or place it in a bowl (depending on the quantity you want to make). Bake in a 400 degree oven for 20 minutes if using a baking sheet. If using a bowl, you will need to stir it a couple times to get uniform drying so extend your drying time to 30 minutes. You can actually see the difference. Baking soda is soft and tends to clump on your finger tip. Washing soda is more crystalline and separates into individual crystals on your finger tip. If you have an open cut, the baking soda does not affect it. The washing soda will sting. I found out the hard way as I had a small cut I didn't even know was there until some washing soda got into it.
I'll report more later. Have fun but be safe!
RandyTell me and I forget. Teach me and I remember. Involve me and I learn. Ben Franklin
-
10-04-2012, 05:51 PM #55Maniac, Mechanic, Mastermind
- Join Date
- Sep 2012
- Location
- Minneapolis, MN
- Posts
- 43
Thanked: 11
Randy --
Thanks for the input and the forewarning regarding the heat issue. I don't know where my multimeter is at the moment. I'll dig around tonight and see if I can find it. If not I can pick up a cheap one tomorrow. I'll post a few more specifics that I noted over the course of the process:
Distance between cathode and anode averaged three inches, the razor was hanging vertically, but the toe was just resting on the bottom of the bucket. This distance didn't change throughout the course of the night that I'm aware of.
When first plugged in, the charger showed an output of 2/2.25 amps, based on the lousy indicator built-in. Over the next ten minutes, the indicator gradually fell to the 1 amp mark, where it stayed. I was in the garage for an hour doing other things and did not hear the charger shut-off or cycle during that time. It showed the same 1 amp indication as I headed in for bed and when I went out this morning before work, it was still running at 1 amp, with very slight rise in temperature.
My inclination, and please correct me if I am wrong, is that after the amperage drop leveled, I had hit "maximum" oxidation on the copper and deionization of the solution from a resistance standpoint. I'll try to elaborate that. Ohm's Law, V=IR. For the sake of this experiment at this point, I assume my charger does output a consistent 12V. Then I and R become relationally variable. As the copper anode oxidized, and the sodium carbonate solution deionized, the electrical resistance increased. Increased resistance with equivalent voltage implies lower current (amperage). After ten minutes I reached the maximum resistance potential of the anode and solution mixture?
I understand that's hugely oversimplified and will find a multimeter to provide more accurate measurements, but that's what I took away from this.
Also, side note, I hadn't expected the copper-plating. It makes sense now, but is something I hadn't considered at all last night.Do to budget cuts the light at the end of the tunnel has been turned off; we apologize for any inconvenience.
-
10-04-2012, 06:40 PM #56Senior Master Tinker
- Join Date
- Jul 2012
- Location
- Deland, Florida
- Posts
- 233
Thanked: 81
Kit, Ohm's law is way over my head!!! I am certainly glad you are here to help explain some of the technical aspects of this process. I can only report what I visually see and can measure with a multimeter. I will defer to you to explain to the members what is happening technically. Have you considered testing your theory? That is, take the razor out once the amperage drops and take pictures. Put it back in the same vat and continue the process for 24 hours and see if there is any difference? That might tell us if you theory is correct. Oh, and by the way, I guess you don't need any help from me to use a multimeter. Originally Posted by falingore

Will you explain why the copper-plating makes sense to you? It would have been the last thing in the world I would have expected to happen and I still do know understand why it did. Can we use this process for electroplating the blades???
Have fun and be safe.
RandyTell me and I forget. Teach me and I remember. Involve me and I learn. Ben Franklin
-
10-04-2012, 08:08 PM #57< Banned User >
- Join Date
- May 2012
- Location
- Forest Park
- Posts
- 282
Thanked: 44
Total vat time: 21 hours.
Total work time with greaseless compound to achieve equivalent effect: 3 minutes.
I leave it to you as to which one is worth pursuing
-
10-04-2012, 08:17 PM #58Razor Vulture


- Join Date
- Oct 2010
- Location
- Lone Star State
- Posts
- 26,144
Thanked: 8616
I think a greaseless compound thread has been done several times. IIRC, this thread is about electrolysis. Originally Posted by sheffieldlover
Purchasing a NOS, perfect razor is also fast and easy. Alas, not electrolysis either. The idea is to remove rust, not grind it away along with the metal. JMHOLast edited by sharptonn; 10-05-2012 at 02:19 AM.
-
10-04-2012, 09:40 PM #59Maniac, Mechanic, Mastermind
- Join Date
- Sep 2012
- Location
- Minneapolis, MN
- Posts
- 43
Thanked: 11
I'll do a brief overview of a couple of things and then dig out some chemistry texts I have buried away after college if the population wishes for a more in-depth explanation.
To directly answer the plating question, yes, this is the exact process used for electro-plating. The solution may vary depending on the metal used, but I know a number of folks who have used this process to zinc plate motorcycle bolts.
The first thing to note is that I am going to make a number of assumptions about simple things, my copper tubing is pure copper, the tap water I'm using is just H2O, etc. I know these to be incorrect, but for the sake of simplicity and sanity I'm making them anyway.
An interesting fact about copper oxidation, unlike ferric(ous) oxidation, creates a protective barrier from future oxidizing. Steel/iron will rust all the way through. Copper will only rust until the metal is superficially covered/oxidized, then it will cease. Last fun fact, the washing soda (NaCO3), actually does nothing except make the solution electrical. The sodium carbonate dissolves in water to form Na++ and CO3-. Basically, these charged anions and cations are used to transport the different chemicals between terminals.
Rust is iron oxide (Fe = iron),((OH)2 = oxide). The iron has a charge of +2, the oxide a charge of -1. They combine then at Fe(OH)2, for a neutral state. So the electrons released from the positive terminal reduce the rust into Fe++ and 2(OH)-. The 2(OH)- joins up with the positive copper, creating the copper oxide. The iron snags the two electrons the copper released and returns to a 0 charge state, often ending up as a particulate in the solution, usually too small to see.
The water also electrolyzes and creates oxygen at the anode and hydrogen at the cathode, at a ratio of 2 hydrogens per oxygen (H2O).
Now, in our case, and after looking at your blade, we ran out of rust per say. At least easily accessible rust. The reaction always takes the easiest path. We have the sodium and carbonate ions from the dissolution in water. The copper 2+ joins with the carbonate anion (- charge) as a transport mechanism. At the negative terminal it regains the two electrons it lost on the positive side, only now it's stuck to the steel. We hit a balance point in the reaction where either we are actually out of rust, in which case there was no more OH for the copper to join up with. or it is easier electrically and chemically to plate the copper onto the steel than it is to try to dissolve more rust.
After digging into this farther, it seems the absolutely best possible sacrificial anode for rust removal would be neutral iron. Or steel with an iron content as high as you can possible find.
That was rather long and, in retrospect dry, but to the best of my knowledge the chemical and electrical reactions are correct. I can balance the math on here if people really want me to, but it's not going to be a fun read.Last edited by falingore; 10-04-2012 at 09:44 PM. Reason: Grammar
regularjoe likes this.Do to budget cuts the light at the end of the tunnel has been turned off; we apologize for any inconvenience.
-
10-04-2012, 10:11 PM #60Just a guy with free time.
- Join Date
- Oct 2011
- Location
- Mid state Illinois
- Posts
- 1,448
Thanked: 247
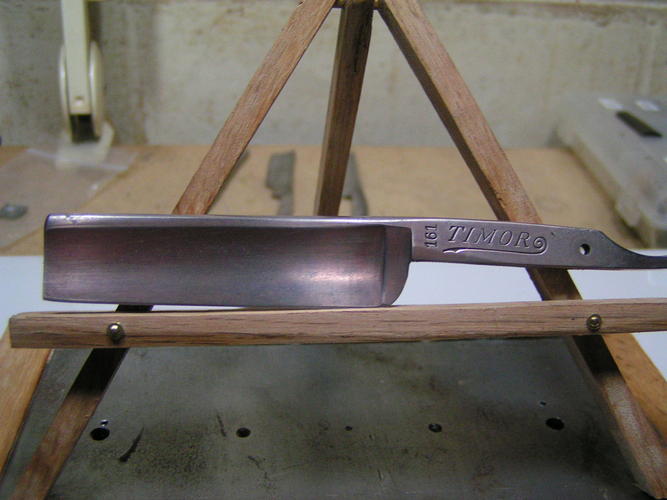
Just some more pics. I'm all out of rusty razors now, so I guess my experiments are over for the time being. I think the end result is pretty nice. I have suspicions that I may have used sandpaper on the William Revitt prior to the "after" pic. I didn't know what it was when I'd bought it. It came with a Boker, that had ONE good scale that I wanted. lol. Been waiting a year and a half for that half a scale set. Anyways..electrolysis...It's really great for me. It preserves ALL the original lines of a razor. It does leave some staining, and it's not fast. I've been using it on all my second hand tools, and it's really great for that too. Both razors were scrubbed with a green scratchy pad under water after removal from the vat. You can see some evidence of that in the Torrey after pic.
Thanks to all who were interested. I'll keep coming back to see what else has happened.
Just wanted to make it known I'm not affiliated with Shavingstyle in any way. lol. It was just the piece of paper sitting there when I took the pic.
Randy, I'm pretty certain this is exactly the process used to electroplate. There's a youtube video of a Dovo getting it's goldwash. IIRRC, it's a very similar setup.Last edited by regularjoe; 10-05-2012 at 12:10 AM.


 Reply With Quote


