Results 1 to 10 of 61
Hybrid View
-
07-27-2015, 09:19 PM #1Member

- Join Date
- May 2015
- Location
- Australia
- Posts
- 33
Thanked: 1 My first honing attempts with photos
Little background. I purchased my first ever straight razor, a brand new 4/8 Thiers Issard, honed shave ready and I managed to shave with it perhaps 10 times before the edge degraded. Most probably due to my stropping.
Just last month I bought a USB microscope and Welsh slate "Dragon's Tongue" to learn to hone with.


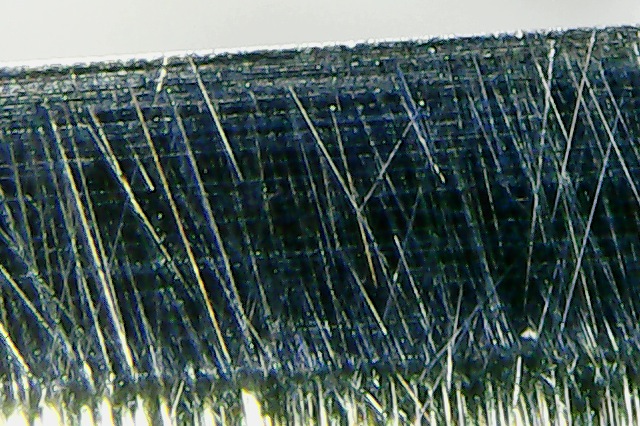
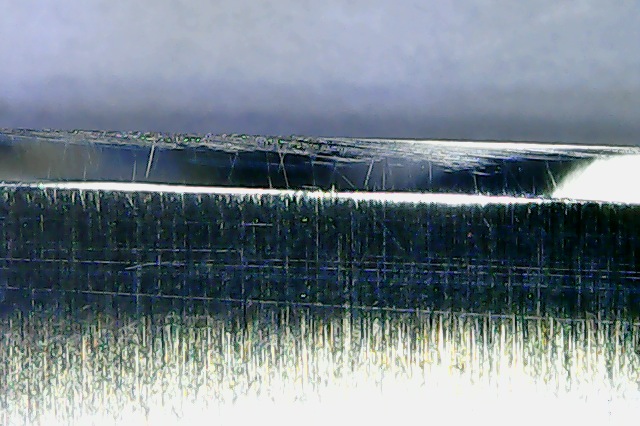
^^^50x and 500x magnifications of the edge after my ten shaves and before any honing attempts.
For my first hone I tried the drmatt357 coticule method under running water. It seemed to improve the edge but not enough to shave with it.

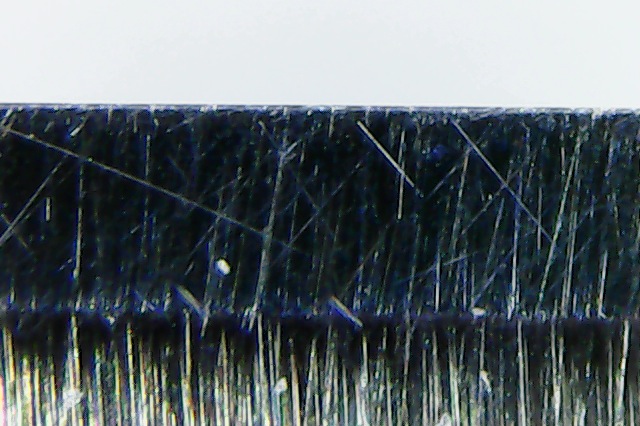
^^^After my first hone. 500x magnification.
Tried another time but this time following the Lynn Abrams one stone method on youtube. Starting with heavier slurry and progressively diluting it. No change in edge. Saw more youtube videos and tried the Lynn Abrams one stone method third time and fourth time. Took again microscope photo and saw some changes that I'd like to hear experts opinion on.

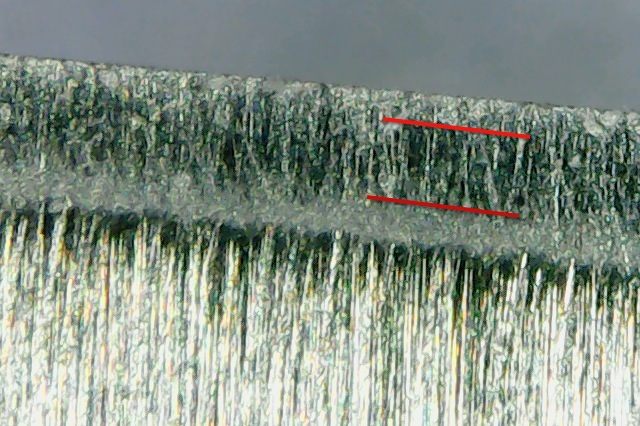
^^^After fourth hone. 500x magnification.
Is the darker area between the red lines where I am removing material? Why is this uneven? Am I using too much pressure so the edge is flexing? Has the razor been honed with taped spine before and I should do that too?
I have another razor and Feather AC to shave with. I promised I will not buy more until I have learned the basics of honing.... and I am really desiring to purchase a nice Ralf Aust with dark wood scales.
In an attempt to avoid too much of trial, error and frustration, maybe someone could point me to the right direction in my studies.
Many thanks in advance!
-
07-27-2015, 09:46 PM #2

Well, one thing I would like to point out is that you are using a method that has a higher degree of difficulty. The bevel in the last photo looks to be in complete, meaning you still have a bit of the old polish left over from the original bevel and maybe from your other honing attempts. If it were me I would restart with a 1,000 grit hone to clean up the bevel. Also, TIs can be tricky to hone.
From their stillness came their non-action...Doing-nothing was accompanied by the feeling of satisfaction, anxieties and troubles find no place
-
The Following User Says Thank You to Mephisto For This Useful Post:
elmoensio (07-28-2015)
-
07-27-2015, 09:56 PM #3

Ask for help there in Norway and suck up the pride, honing is easy , till it ain't to quote a great one,, all you should have needed was a refresh , 6-10 laps to start ,, very light laps if your hone is a finisher,, I don't know if your stone can go back as a one stone hone without a few hundred laps, but really there are a couple guys in Norway. Tc
“ I,m getting the impression that everyone thinks I have TIME to fix their bikes”
-
The Following User Says Thank You to tcrideshd For This Useful Post:
elmoensio (07-28-2015)
-
07-28-2015, 06:25 PM #4Member

- Join Date
- May 2015
- Location
- Australia
- Posts
- 33
Thanked: 1
That's what I thought too, all it needs is a refresh. Well, too late for that now. I understood that all natural stones can be used for one stone hone, heavier slurry equals lower "grit" number. Right now, I want to put in the hours to learn honing, not give up after only four attempts.
-
07-28-2015, 06:15 PM #5Member

- Join Date
- May 2015
- Location
- Australia
- Posts
- 33
Thanked: 1
-
07-28-2015, 06:44 PM #6Member

- Join Date
- May 2015
- Location
- Australia
- Posts
- 33
Thanked: 1
JOB15, Maladroit and RusenBG
Good advice as well. I will for sure use the marker, 50x magnification as I don't have jewellers loupe and loooots of patience with light pressure and many laps.
I don't want to invest in more stones at the moment as I truly believe the problem is in the hand that holds the stone, not in the stone. For me it seems that I was just too heavy handed and impatient in my honing attempts.
Had I known that I need to learn to shave, strop and hone all at once...
-
07-28-2015, 07:11 PM #7

Honestly I think if I looked at some of the razors that have been in my rotation with 500x I would be horrified since they have been heavily used for a long time. I looked at one at 200x and was shocked that the edge looked the way it did and shaved the way that it did. Usually once I have a razor honed to my standards I try not to look at it and only touch it up when it starts to lessen the quality of the shave. Looking at a razor under high magnification can show you all sorts of things that you don't want to see that might not even affect the shave. A pretty bevel doesn't necessarily mean a shave ready razor.
-
The Following User Says Thank You to JSmith1983 For This Useful Post:
elmoensio (07-29-2015)
-
07-28-2015, 07:56 PM #8
-
The Following User Says Thank You to JOB15 For This Useful Post:
elmoensio (07-29-2015)
-
07-28-2015, 08:53 PM #9

The steel is hard and they can have geometry issues. Nothing insurmountable, but they can give you fits. My first razor that I attempted to hone was a TI. I finally relented to having a member near me hone it. I am glad I did it, because it came back with a really nice edge. If this is a new a TI there is nothing wrong with having it sent out for honing. I speak only from my own experience and I wish to save you the frustration. However, if you wish to continue working on it, please use tape if you are not doing so already. Another alternative is to by a less expensive vintage razor or some people have recommended a Gold Dollar to practice on. At any rate, I am not trying to discourage you, I wish luck and good shaves.
From their stillness came their non-action...Doing-nothing was accompanied by the feeling of satisfaction, anxieties and troubles find no place
-
The Following User Says Thank You to Mephisto For This Useful Post:
elmoensio (07-29-2015)
-
07-29-2015, 02:34 AM #10Senior Member


- Join Date
- Apr 2012
- Location
- Diamond Bar, CA
- Posts
- 6,553
Thanked: 3215
Welcome, you have just learned, it’s not as easy as watching a video.
Send the razor out for honing and learn to maintain it on a good synthetic finish stone. OR…
Read Coticule.be, Straight Razor Honing from the Sharpening Academy.
Your razor can be honed with a Coticule, but it is one of the most difficult way to learn to hone. Do buy a 60X lighted loup, ($2-5) and if you want to learn more, read The Beginers Guide to Honing, in the Library, and the first 3 threads in the Honing Forum.
Jumping in blind, never has good results, fortunately, all is not lost… It can be fixed.
-
The Following User Says Thank You to Euclid440 For This Useful Post:
elmoensio (07-29-2015)


 39Likes
 LinkBack URL
 About LinkBacks


 Reply With Quote


