
Results 21 to 30 of 65
 81Likes
Thread: Stabilizer correction
 LinkBack URL
 About LinkBacks
-
01-22-2021, 12:45 PM #21Senior Member


- Join Date
- Oct 2019
- Location
- Kingsville On, Canada
- Posts
- 2,435
Thanked: 207 Just ordered one, not from chefs knives to go and cost me a few more bucks, 400/1K
 Originally Posted by Euclid440
 - - Steve
You never realize what you have until it's gone -- Toilet paper is a good example
-
01-22-2021, 12:50 PM #22Senior Member
- Join Date
- Oct 2019
- Location
- Kingsville On, Canada
- Posts
- 2,435
Thanked: 207
I just ordered a cheap diamond plate. I don't use the 220 side of my Norton 220/1k but I still don't like that I gouged it so deeply on just one stabilizer. Originally Posted by STF
outback likes this.- - Steve
You never realize what you have until it's gone -- Toilet paper is a good example
-
01-22-2021, 04:12 PM #23Senior Member
- Join Date
- Oct 2019
- Location
- Kingsville On, Canada
- Posts
- 2,435
Thanked: 207
I have another quick question about diamond plates.
How should I use it, dry, water, oil?- - Steve
You never realize what you have until it's gone -- Toilet paper is a good example
-
01-22-2021, 04:15 PM #24Senior Member


- Join Date
- Feb 2013
- Location
- Haida Gwaii, British Columbia, Canada
- Posts
- 14,450
Thanked: 4829
The short answer is yes. If you use it wet, then the scarf clears out more easily. I sometimes use windex. It does darken the blade though, I primarily use windex on blades that I am or have darkened. A little thing I learned from Charlie.
It's not what you know, it's who you take fishing!
-
The Following User Says Thank You to RezDog For This Useful Post:
STF (01-22-2021)
-
01-22-2021, 04:55 PM #25Home of the Mysterious Symbol


- Join Date
- Dec 2019
- Location
- New Orleans LA
- Posts
- 854
Thanked: 123
That is how I would do it. Just round off the heel, and the edge stops making contact as it gets near the stabilizer. Originally Posted by PaulFLUS
@STF, I am pretty much the Gold Dollar guy around this forum and TBH I don't care for the Titans, due to the grind. They use four different grades of steel and they vary from pretty good to excellent. But the natural bevel angle is waaaaaaay big, like a ZY. That razor will hone, though. Over on B&B there is a guy named rbscebu who has put several 7 day sets together out of those Titans, and he loves them, uses Method honing on them including the post shave balsa maintenance, and says they are a delightful shave, and he can tell you all about them. I really ought to get him to come join up on this board. Anyway due to the grind and the steel hardness, they are not the easiest razor to hone to a science fiction sharp edge. On the other hand, this is no delicate rose petal of a razor, either, and it responds well to more heavy handed technique.
First, knock back the heel the way Paul showed you. It's not a $900 razor so don't be skeered of messing it up. You won't. OTOH, don't let power tools overheat the steel. Remember that right at the bevel, the steel is thin enough to overheat quite suddenly. You go 3 seconds of contact and maybe you are fine, but then go 3.5 seconds and get the BSOD, the Blue Stain of Death, which tells you that you pushed the temper too far and that part of the razor has lost its hardness. But really that IS a good job for dremel or belt sander/grinder (not an ordinary bench grinder, though!) I like to use the sanding drum attachment for the Dremel. It cuts really fast and is controllable.
Okay, with the heel knocked down, do a sharpie test. The edge from the factory is straight, However, that is not a real edge. In reality, the razor has a slight smile. And so, you can go and go and go and force the straight edge on the razor, and nothing wrong with that. Or you can use a SLIGHT rolling X stroke and gitter done quicker. Now most relatively new honers overdo the roll, and exaggerate the smile even more. You don't want that. They will desperately attempt to make absolutely sure that heel and toe are sharp. No need for that. The slight roll is what you want for that razor. And the best way to do a slight roll is to hone in hand, and let the weight of the razor roll the stone underneath it as you x-stroke. You will probably be amazed at how natural that is.
As I said, crude grind, heavy bevel angle, and hard steel. No sense pussyfooting around. Raise a burr by honing one side only, with firm pressure, with a coarse stone, maybe 200 grit and no finer than a 320. Sandpaper on your acrylic lapping film plate works well for that, but with sandpaper always bump up to the next finer grit compared to what stone you would use. Trust me on that. The same grit sandpaper, with it's scattering of proud abrasive particles, will make mincemeat out of your razor. So fine it up a grade or even two. I mention sandpaper because when you don't do this a lot, it makes sense to set up a disposable "stone" instead of buying something you will seldom use.
Anyway back to that burr. It does NOT have to go all the way end to end. You just want about half the edge to have a burr you can detect by feel. However many strokes that took, flip the razor and hone the other side the same. The burr should be now on the opposite side, and easy to feel. Go a dozen regular laps with light pressure to remove the burr. If you look carefully at your edge now, you will see fresh bevel reaching the edge on most of the blade, ideally mostly in the central portion, and some parts where the newly ground bevel does not go all the way to the edge, or the two bevel faces do not meet fully. That's okay. The heavy lifting is done now. If you go for a full bevel with very coarse grits you are simply wasting steel, because all the while you are progressing upward in grit to reduce scratch depth, you are still removing steel. This is why you stop short of a full burr. So anyway, now move up to 600 grit. You can go for a burr again if you wish, but I would just hone with moderate pressure using regular x stroke laps, remembering to let the stone roll under the razor, stone in hand. Hone until the bevel is set along almost the entire edge and your 320 grit scratches are gone gone gone. You can't get them out later when you are already a couple of grits up in the progression. EACH STAGE should eliminate the coarser scratches of the previous stage and in turn, leave its own not quite as coarse scratches. Done? Good. Now move up to a 1k or 2k stone and bring that bevel home with fairly light pressure. Watch the honing water. When it all gets scooped up on the blade and the blade seems like it sucks the stone dry, you are pretty nearly there. Lighten up to just the weight of the razor, add your favorite finishing strokes such as extra short x strokes, pull strokes, whatever, and test your bevel. You should be tickled pink at what you got, even though the bevel angle is very heavy on this razor. If not, try a couple dozen laps on the 600 and some more 1k or 2k work.
Remember, this razor has a very obtuse bevel angle. Don't be afraid of thinning that spine!!! You do yourself no favors by taping the spine on this razor!
Once the bevel is set, this blade will respond well to AlOx lapping film 9u, 3u, then 1u grits, or a Naniwa or Shapton progression, but not Kings, Bear Moo, Sharp Pebble, or similar. It's not Swedish steel but it is still pretty hard stuff. OTOH diamond plates on steel this hard require a lot of finesse or you will get chipping.
Once your razor is treetopping, you can go for the brass ring and do the balsa progression. Diamond in balsa isn't the same as a diamond plate, and the balsa, if prepared and used properly, will make your Titan shave a lot better than it deserves to shave. One reason rbscebu loves his Titans is because he used Method honing right from the start, and never learned any other way. And so of course his edges are good. If he was doing the more pedestrian style of rock honing and stopping at 10k or 12k with no further refinement, he wouldn't be quite so enamored with those razors. What I am getting at, is if you really pull out all the stops honing your Titan, it will shave pretty good. If you hone it just like most guys might a vintage American or Solingen blade, the Titan may be a bit too "gentle" for you.
For all that, I really prefer a Gold Dollar. Better grind, way lower price. But that's just me. If Titan took the same steel alloys and made 16.5 to 17 degree razors, they would probably impress me a lot more.
<EDIT> Oops, looks like I am a little late to the party! Glad you got your Titan to shave!Last edited by CrescentCityRazors; 01-22-2021 at 05:07 PM.
-
The Following User Says Thank You to CrescentCityRazors For This Useful Post:
STF (01-22-2021)
-
01-22-2021, 05:39 PM #26Skeptical Member

- Join Date
- Nov 2016
- Location
- Colorado Springs
- Posts
- 10,548
Thanked: 2194
I use it dry when shapi g a heal or fixing a stabilizer. Splash water on my stones and use the 400 side for lapping my stones. I really have never used the 1k side of mine much. Just dont go trying to lap an Arkie or slate of any kind with it.
RezDog likes this.It's just Sharpening, right?
Jerry...
-
The Following User Says Thank You to Gasman For This Useful Post:
STF (01-22-2021)
-
01-22-2021, 06:25 PM #27Senior Member
- Join Date
- Oct 2019
- Location
- Kingsville On, Canada
- Posts
- 2,435
Thanked: 207
Thanks for the useful information, Originally Posted by CrescentCityRazors
My Titan did shave and pretty well, if it were one of my usual vintage razors i might say it felt like it needed a bit of a refresh but considering that I couldn't set the bevel at all before yesterday I'm not going to complain.
I did try the stabilizer/heel correction as Paul suggested but I can see that I didn't do it quite right as Euclid440 pointed out so I will do it again by drawing round a coin again. I'm just waiting for my diamond plate tomorrow because I am not impressed at the deep gouge I made in my Norton 220.
I will be setting the bevel again after the correction and will try to do as you suggested. I am setting the bevel again because whether it need it or not, it's practice and I need it.
I think I already know the answer because you pointed out that this Titan has hard steel but I was considering going to my Trans Ark for half an hour or so after the 12K Naniwa, what do you reckon?
If I don't tape the titan spine and let it wear thinner, won't it change the bevel angle and do I care?- - Steve
You never realize what you have until it's gone -- Toilet paper is a good example
-
01-22-2021, 11:14 PM #28Home of the Mysterious Symbol
- Join Date
- Dec 2019
- Location
- New Orleans LA
- Posts
- 854
Thanked: 123
You will be centuries on your Arkie with this thing, depending on which of their 4 alloys were used for this model. Okay that's exaggerating but it will take some time to get anywhere. Originally Posted by STF
Unfortunately, honing normally without tape will NOT change the bevel angle appreciably. Making the bevel angle more acute would actually be a good thing. So anyway, like I said, I would NOT tape the spine even if you normally do as a matter of course. Saving the spine is definitely not a concern. You will never see one of these razors where the spine has been worn too thin for the blade width.
You already set the bevel but think that maybe you didn't quite get it. Fair enough. Have you looked at the edge in a very bright light, preferably with a loupe? You should be able to see the edge has either a single facet per side, being the bevel itself, or that it has two or more facets, one the bevel and the other the factory "edge". Usually the bevel will first appear a ways back from the cutting edge. As you hone and remove steel, that bevel facet will expand toward the edge. Finally it will go all the way and the bevel surface will intersect with the bevel on the other side, forming your edge. Then, we say that the bevel is set. It can be set at some part or parts of the blade, and not elsewhere. That is an incomplete bevel. Very likely, if you doubt your bevel but the razor shaved, that is what you have.
What I am getting at, is that the heavy lifting is probably done, and there is probably no reason to hit very coarse stones. You might go down to your bevel setter but I wouldn't go below 1k grit unless your loupe tells you otherwise. (TIP: get a Belomo 10x Triplet, after you check out the reviews.) You might also enjoy using a USB microscope. A cheapie will do fine. 100x to 200x is more than enough and at any rate is probably around 50 to 75x. But being able to take pics is really cool and you can show what you got, for evaluation. But anyway yeah, have a good good look at your edge before you consider going back below 1k grit.
Now if you are having a hard time recognizing whether the bevel is fully set, go to the website in my sig, the GrowleyMonster one. There are two articles there that might help you. What I am going to suggest has been denounced as treason, sacrilege, and blasphemy all rolled up into one sinister tangle of lies, but the fact of the matter is, it works. This is called the Burr Method.There is an article on the Burr Method and also what I call the Hybrid Burr Method. If you don't like what I have to say on the subject, you are in good company, but you may enjoy the pics, anyhow, of complete and incomplete bevels. And I will not go into great detail here, except to say you can raise a burr along the entire length of the razor by honing on one side with firm pressure, and then however many strokes that took, apply the same number to the other side, which should give you a burr on the opposite side. The burr will always be deflected UPWARD off the hone. If the burr is raised along the entire razor, then honed off, your bevel is set. If you are afraid of wasting steel, raise a burr along only about 90% of the blade, and after honing the burr off, keep honing until your loupe or scope tells you that you have improved those last bits of edge to be equal to the burr honed part.
When honing off the burr, your honing water will tell you when you are done or nearly done. It will flood the bevel and leave none of itself behind as the razor travels along the stone. Your pressure should be much lighter when honing the burr off, than when putting it on. The weight of your hand is plenty, even with a hard steel. Gradually lighten the pressure. Do a dozen pull strokes on each side. This clears the edge. To do a pull stroke, lay the razor across the hone as if you are fixing to take a normal stroke, but instead of moving the razor along the hone from one end of it to the other, pull the razor by the tang across the hone about 3/4". Flip the razor and do the same to the other side. That's one. Do a dozen, very light pressure. It should feel like you aren't accomplishing anything. This can slightly round the apex so you want to peak it back up. Do a couple dozen short x stroke laps, the lightest pressure you can manage. The stroke distance must be very short. Just imagine that you are honing on a stone that is only four inches long and you got the idea. After all that, do your usual bevel tests. It should be pretty good. Should slice grapes or charry tomatoes with only a tiny bit of pull on the razor, ALMOST a push cut. It should shave arm hair not like a pocketknife, but like a razor, effortlessly. Lather up a cheek, strop the razor, and try a couple strokes on your face. It should shave without being excruciating. And this is still the 1k level. So right away you have your edge about half cooked, with just your bevel setter.
Now start your progression. Remember that each stage MUST totally obliterate the coarser scratches of the previous stage, with its own finer scratches. At the 4k level you should start to faintly feel "stiction", which is when the razor and stone are so perfectly matched that water surface tension sucks them together and you feel resistance to motion consistent with the stone sucking the razor down tightly against it. You can finish each stage of the progression with the same pull strokes and short x strokes as the 1k stage. Light pressure, the weight of a finger or so. Finally on your finishing stone, you will finish with just the weight of the razor.
There are ways to up your game, on the finisher. You could apply shave lather to the stone. The lather forms a buffering layer between stone and steel, reducing scratch depth so that the stone works like a much finer one. You want it to feel like the razor is just floating in the lather and not really touching the stone. You can also use dish soap, thinned with water to the correct consistency, or even a few drops simply added to the water on the stone.
Done? Perform your favorite sharpness test, be it treetopping, HHT, TPT, whatever. Strop, and shave. You should see a major improvement.
Gitter done and then I will tell you how to up the sharpness even more, but get your 12k edge up to snuff, first.STF likes this.
-
The Following User Says Thank You to CrescentCityRazors For This Useful Post:
STF (01-23-2021)
-
01-23-2021, 09:38 PM #29Senior Member
- Join Date
- Oct 2019
- Location
- Kingsville On, Canada
- Posts
- 2,435
Thanked: 207
Hello again, Originally Posted by CrescentCityRazors
I read the content about honing on your site and your advice in this thread.
I drew round a coin and ground to the line on a 400 diamond plate (it came today).
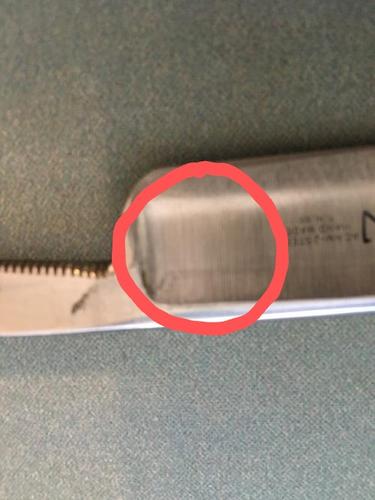
As I was correcting the stabilizer I seem to have made two marks on the heel end of the edge, they look like chips but are probably small grind marks.
Anyway, I started with a Norton 220 and worked it to lose enough steel to remove the two grind marks I had made in the edge.
I thought they were now small enough that the rest of the bevel set progression would take care of them.
I worked one side of the 220 until I had a good burr and then worked the other side.
I removed the burr with pull strokes and short x strokes. All was looking OK but the scratch pattern was frightening.
I moved to 600 wet n dry and worked it with slight rolling x strokes until the 220 stria was gone, it took a while. I then got rid of the fin edge as before.
I went to a 400 diamond plate with washing up liquid and worked it with rolling x until the 600 were gone.
I went to 1K Norton, now I was back in my comfort zone if there is such a thing for me yet.
I did rolling x until the 400 were gone, now it is going to be set well and sharp.
NO! I have spent a whole morning on this thing, it is about as sharp as a broken window and still has two chips.
I don't understand it, I haven't even progressed past 1K. The way I see it I have a couple of options, start all over again or bin it or sell all my stones and buy a Phillishave. Whatever I do I have decided never to do more than refresh my razors because they shave right now and I would like to keep it that way.
I have the right hump with myself.
I just don't get why I can't set the bevel , it's not rocket science for christsakes!
I don't expect to create Outback or Gssixgun edges for a long time yet but surely I should at least set a bevel!
It shaved yesterday so I should have probably left it alone, that'll learn me.Last edited by STF; 01-23-2021 at 09:47 PM.
- - Steve
You never realize what you have until it's gone -- Toilet paper is a good example
-
01-23-2021, 11:38 PM #30Senior Member
- Join Date
- Sep 2020
- Location
- Austin, TX
- Posts
- 653
Thanked: 56
Take a deap breath.... In..... Out.... In.... Out.
Relax, you'll get there. You bought what you knew was a problematic razor and are having problems with it. Should be expected, really.
That said, I'll let the smart people talk specifically about your chips. I think there are a number of things to consider about that that have nothing to do with your bevel setting abilities.If you're wondering I'm probably being sarcastic.


 Reply With Quote