
Results 11 to 20 of 48
 62Likes
Thread: Blade correction
 LinkBack URL
 About LinkBacks
-
06-28-2021, 07:14 PM #11Senior Member


- Join Date
- Mar 2021
- Location
- Cranston, RI
- Posts
- 336
Thanked: 7
Please pardon all the question thy are just part of my learning process.
When you guys say "reshape the Heal" Do you mean to grind the heal like this?
Last edited by Audels1; 06-28-2021 at 07:16 PM.
RezDog likes this.
-
06-28-2021, 07:25 PM #12Senior Member


- Join Date
- Dec 2012
- Location
- Egham, a little town just outside London.
- Posts
- 3,857
- Blog Entries
- 2
Thanked: 1083
Lord Voldemort? Originally Posted by STF


-
06-28-2021, 08:18 PM #13Senior Member
- Join Date
- Jun 2013
- Location
- Pompano Beach, FL
- Posts
- 4,048
Thanked: 636
You could but that would change the geometry of the blade.
jfk742 likes this.
-
06-28-2021, 08:21 PM #14Senior Member
- Join Date
- Mar 2021
- Location
- Cranston, RI
- Posts
- 336
Thanked: 7
Are you talking about grinding the spine or reshaping the heal? Originally Posted by bouschie
-
06-28-2021, 10:39 PM #15Senior Member
- Join Date
- Apr 2012
- Location
- Diamond Bar, CA
- Posts
- 6,553
Thanked: 3215
The blade looks to have been heavily sanded and buffed and the spine is no longer straight or is warped or twisted, the bevels will be uneven as a result. Most razors are warped and most bevel are not perfectly even.
Use a rolling X stroke, heal leading and keep the heel on the stone at least half-way across the stone to hone the heel. The Rolling X will also hone the toe, Ink on the bevel will tell you if you need to lift and how much, to hone the toe.
Two layers of tape would have made a smaller bevel. You cannot hone a curved edge with a straight stroke. You can grind the spine, but why, just hone the heel and toe.
-
-
06-28-2021, 10:54 PM #16Senior Member
- Join Date
- Mar 2021
- Location
- Cranston, RI
- Posts
- 336
Thanked: 7
I did use a rolling X stroke but maybe I didn't roll it enough. I will re-bevel with 2 layers and try to keep an eye of the rolling part better. Originally Posted by Euclid440
I only brought up grinding the spine as an option to using tape to build up certain areas of the spine to make it straight and flat and having to remember what blade had tape and where the tape goes.
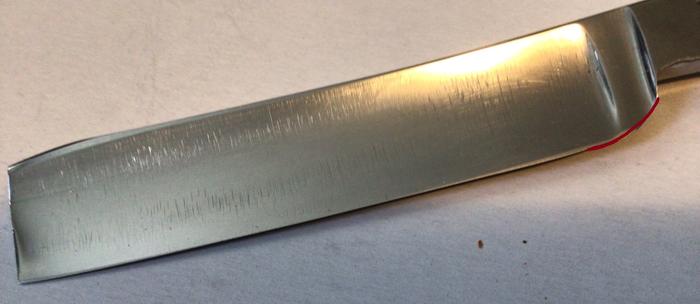
How about re-shaping the heel? Is the picture on the right track or am I way off?
-
06-28-2021, 11:26 PM #17At this point in time...


- Join Date
- Jun 2007
- Location
- North Idaho Redoubt
- Posts
- 27,149
- Blog Entries
- 1
Thanked: 13249
You can use the "Grind the Spine" idea WITHOUT grinding the spine
One layer of tape
Grind the spine until you hit steel in the high spots and leave tape in the low spots
Apply the next layers of tape OVER that first layer
How many layers is determined by the angle needed to correct it
Now do NOT remove that first layer while honing and hone as normal
You have a nice even spine and nice even bevel
Yeah it is a Tape Trick !!! You can thank me later"No amount of money spent on a Stone can ever replace the value of the time it takes learning to use it properly"
Very Respectfully - Glen
Proprietor - GemStar Custom Razors Honing/Restores/Regrinds Website
-
-
06-28-2021, 11:34 PM #18Senior Member
- Join Date
- Apr 2012
- Location
- Diamond Bar, CA
- Posts
- 6,553
Thanked: 3215
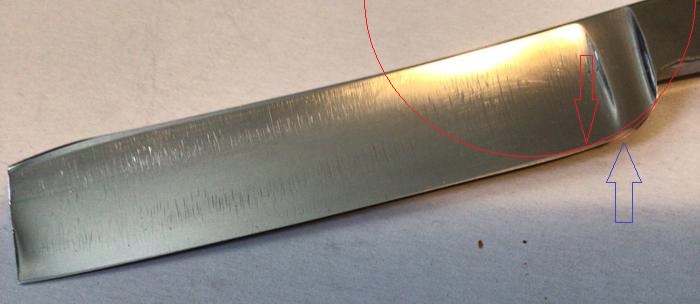
Yes, you are on the right track but will need to be more aggressive with the cut. The goal is to move the heel corner, (where the straight edge stops and starts to curve) forward of the stabilizer about a ¼ inch.
The razor looks to have lost a lot of blade width. The wide stabilizer will cause an issue and you will need to put a sever curve into the heel to move the heel corner well forward of the stabilizer. Blue Arrow is where corner ends now, Red Arrow where it needs to be to avoid stabilizer. It may look a bit wonky but should take an edge.
It also looks to have a frown, caused by honing on the stabilizer. Removing the frown will remove even more blade width.
Fixing beaters is exactly what you want to do to learn how to make these repairs. Just take your time, the metal is thin and comes off quickly.
Did you use a heel forward X stroke? You must keep the heel on the stone at least halfway or you will not hone the heel. To hone the toe, you will likely need to lift the heel off the stone a bit to hone around the curve of the toe. Get a red sharpie and ink the bevel, with colored ink you can easily see your progress without magnification.
-
The Following User Says Thank You to Euclid440 For This Useful Post:
Audels1 (06-28-2021)
-
06-28-2021, 11:45 PM #19Senior Member
- Join Date
- Mar 2021
- Location
- Cranston, RI
- Posts
- 336
Thanked: 7
Ok now my head is spinning.. Originally Posted by gssixgun

I get grinding the high spot out of the first layer of tape. But then do I grind the 2nd layer then the 3rd if it needs it? I am completely lost. I feel like I am in the middle of Lake Ontario without a GPS...lolRezDog likes this.
-
06-28-2021, 11:53 PM #20Senior Member
- Join Date
- Mar 2021
- Location
- Cranston, RI
- Posts
- 336
Thanked: 7
If by heel forward you mean leading my strokes with the heel. Then yes .( I assume you are talking about the wedge) Lol I really should have made these separate post. Originally Posted by Euclid440


 Reply With Quote
