
Results 21 to 30 of 42
 5Likes
Thread: Honing Progress pictures
 LinkBack URL
 About LinkBacks
-
09-02-2010, 04:37 AM #21The Great & Powerful Oz


- Join Date
- May 2008
- Location
- Bodalla, NSW
- Posts
- 15,636
Thanked: 3751
Nice pics Tim & clearly shows smooth bevels don't mean anything if the edge is crumbling. I wonder if you could hone past that area. The pitting may be less deep as you go.
The white gleam of swords, not the black ink of books, clears doubts and uncertainties and bleak outlooks.
-
The Following User Says Thank You to onimaru55 For This Useful Post:
FatboySlim (09-02-2010)
-
09-02-2010, 08:51 AM #22Housebound Bum !

- Join Date
- Feb 2010
- Location
- Chesterfield UK
- Posts
- 413
Thanked: 104
Exactly what ive found ! in my early days of honing, about a month ago Originally Posted by gssixgun

 , i could very easily get a lovely polished bevel but my edge was no where near sharp even tho it looked it .....
ian
-
09-03-2010, 12:13 AM #23W&B, Torrey, Filarmonica fanboy

- Join Date
- Aug 2008
- Location
- Atlanta
- Posts
- 605
Thanked: 252
I don't know, I'll keep trying. I can always use the honing practice. I like Gencos very much, and wanted to save this one, it's nice. The apparent fuzziness of the body of the razor in the pics isn't excessively poor focus, it's due to serious staining and corrosion on the body of the razor itself. Originally Posted by onimaru55
Very true! There seems to be limited correlation between finely polished bevels and sharpness of edges, once the deep low-grit scratches have been removed. Also, looking at bevels at 150X is pretty humbling. With my new toy, I've taken a bunch of reference shots of razors I've honed, some of which turned out very sharp, others less so. The polish of the bevel seems to have limited influence. Originally Posted by ianp1966
The top photo is a Wade & Butcher 6/8ths full hollow that is only moderately sharp, but has a near-mirror bevel:
Next is a Taylor Eye Witness 1000 in 6/8ths that is almost foolishly sharp, one of the sharpest razors I've ever managed to hone up, and a smooth joy to shave with. The bevel looks like nothing particularly special, but the edge is great:
I think microscopes are useful for diagnosing problems that affect the approach to honing (crumbling steel, double bevels, wire edges, chipping, uneven wear, etc.). But so far, I haven't been able to take a microscope photo that I can say "this is what a sharp razor looks like under a microscope." And I admit that a 30X loupe or handheld microscope would find the same problems as the 150X USB microscope, for less money and hassle (but no pictures!).
That said, I've still had a whole lot of fun looking at my razors (and honing stones) with this thing since I've gotten it. Looking at still pictures of my honing and polishing is different than looking through a live microscope. It's like the difference between looking at yourself in the mirror, and looking at a picture of yourself. Humbling.
-
09-21-2010, 05:54 AM #24illegitimum non carborundum


- Join Date
- Jan 2008
- Location
- Rochester, MN
- Posts
- 11,552
- Blog Entries
- 1
Thanked: 3795
I'm late to the party on this thread but I just found it. I'm intrigued that no one pointed out the obvious problem with the honing sequence photos. Maybe others are too polite but I have never suffered from that affliction. Originally Posted by FatboySlim
The photos show the following steps of the honing process
Photo 1 initial state of the bevel
Photo 2 after 1k
Photo 3 after 5k
It was concluded that the blade had a crumbling edge, or deterioration issues. I disagree with that assessment. It might be true, but there's no way to know until the bad edge is fully removed. The 1k bevel setting should have continued until a good edge was produced, but it wasn't. Photo 2 shows that chipping remained, so there was no reason to move on to the 5k, after which the chipping still remained. Without a proper bevel reset, all the higher grit honing is a waste of time.
-
The Following User Says Thank You to Utopian For This Useful Post:
FatboySlim (09-22-2010)
-
09-21-2010, 01:56 PM #25Senior Member
- Join Date
- Jul 2010
- Posts
- 120
Thanked: 14
I assume that with a crumbling edge, if you just continued on the 1k in an attempt to get a "fresh" edge, the same chips would just continue down into the metal? Or would it be possible for completely new chips to start forming just from the honing process?
I have still yet to run into one of these deteriorating blades, so I'm trying to make a mental note for the future.
-
09-21-2010, 02:17 PM #26illegitimum non carborundum
- Join Date
- Jan 2008
- Location
- Rochester, MN
- Posts
- 11,552
- Blog Entries
- 1
Thanked: 3795
Yes, that would be a true crumbling edge, but you have to at least try to hone out the chips before you can find that out. That's why I wrote that it might still have a crumbling edge but there was no way to know yet. In this photo series the same chips remained throughout the series. That's not crumbling, it's an unfinished bevel set. Originally Posted by thorxes
Even if an edge IS crumbling, the solution is to hone in a little farther with the 1k. Pitting that you see on the side of a blade can also be at the edge and a straight un-chipped section of an edge can suddenly reveal an apparent chip when you hone into the steel far enough to expose the pit. Sometimes the edge is so corroded that you just need to hone deeper in to reach good steel.
Early on I found the microscope to be an excellent learning tool for honing. Then from talking to others who did not use one, I came to believe that it was a crutch impeding my progress in learning proper sharpness assessments. I've come to find that it is an helpful tool for me to make sure that I have a bevel fully set, because I can see the entire edge--I know that I have formed a perfect "V" along the entire length of the edge and I can see any chipping that might remain. A razor with this sort of chipping may feel sharp but it will be less comfortable.Last edited by Utopian; 09-21-2010 at 02:25 PM.
markdfhr likes this.
-
The Following User Says Thank You to Utopian For This Useful Post:
markdfhr (11-06-2011)
-
09-22-2010, 04:21 AM #27W&B, Torrey, Filarmonica fanboy
- Join Date
- Aug 2008
- Location
- Atlanta
- Posts
- 605
Thanked: 252
Point taken Utopian, and not impolite. I'm just happy the post was read and thought about. I kind of hope people question what they see in my posts, as it stimulates discussion and learning. I sometimes question microscope photos, but held off posting until trying it myself.
I had written off the edge of the razor based on it's condition before any honing (perhaps prematurely), and was just using it as guinea pig to show bevel scratch patterns. I didn't mean to leave the impression that one should try to remove chips and crumbling with progressively higher grits. A sound starting edge would have made the bevel photo sequence more credible and meaningful, in hindsight.
Onimaru55 did suggest that I should have kept going at the lower grits to see if I could get to clean steel. I still have the same razor, so I'll do that by this weekend, and try to put together another sequence where the last one left off. This could actually be a useful sequence in itself, specifically showing the effect of a Naniwa 1K on removing chips over several sets of passes.
-
The Following User Says Thank You to FatboySlim For This Useful Post:
Utopian (09-22-2010)
-
09-22-2010, 04:32 AM #28illegitimum non carborundum
- Join Date
- Jan 2008
- Location
- Rochester, MN
- Posts
- 11,552
- Blog Entries
- 1
Thanked: 3795
I'm glad you did not take it as a personal criticism. I actually thought your photos were much more consistent than most and I'm sure that is not easy to do. Also, I thought your photos did a good job of showing the change in the bevel from step to step.
If you are willing to go to the trouble, maybe you could show the progression of progress during the bevel reset? That is, a photo maybe every 20 circle or so.
-
09-22-2010, 09:16 AM #29The Great & Powerful Oz
- Join Date
- May 2008
- Location
- Bodalla, NSW
- Posts
- 15,636
Thanked: 3751
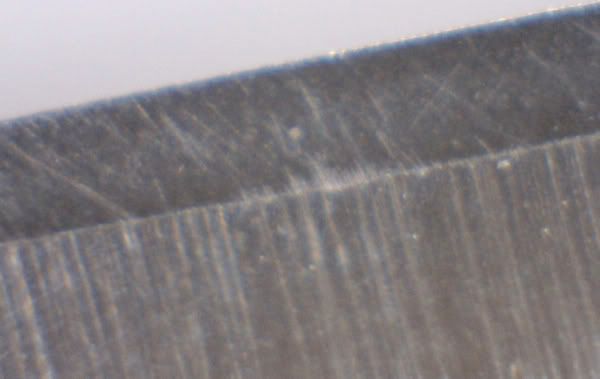
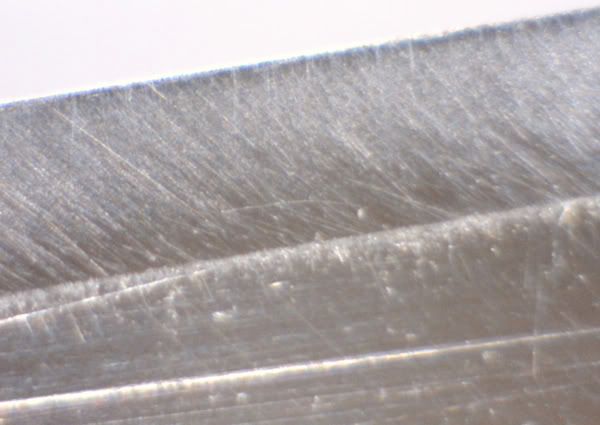
Just to back up Utopian's theory. Here is one that had a crumbly edge which took some 1k work to clean up. Before & after pics. The finished edge still seems a little toothy to my eye but the shave test was good.
The white gleam of swords, not the black ink of books, clears doubts and uncertainties and bleak outlooks.
-
The Following User Says Thank You to onimaru55 For This Useful Post:
thorxes (09-22-2010)
-
09-22-2010, 01:09 PM #30Member


- Join Date
- May 2005
- Location
- Virginia
- Posts
- 5,726
Thanked: 1486
When I first started honing I found it difficult to achieve a bevel edge without some chipping in it. I eventually started moving to higher grits to build bevels and also found that dropping the blade on the hone was a chief contributor to the edge chips.
I've always wondered if crumbling edges were just a myth proported by the 1K bevel crowd.oneshot1k likes this.


 Reply With Quote