
Results 31 to 40 of 42
 5Likes
Thread: Honing Progress pictures
 LinkBack URL
 About LinkBacks
-
09-23-2010, 01:22 AM #31The Great & Powerful Oz


- Join Date
- May 2008
- Location
- Bodalla, NSW
- Posts
- 15,638
Thanked: 3751 "Horses for courses" but I would think using high grit stones for bevel setting would see you spending a lot of time flattening your stone if doing a lot of restoration work & using a synthetic hone ... I guess it depends on your "high grit stone" A fast Coti or J'nat would certainly do it.
 Originally Posted by AFDavis11
 The white gleam of swords, not the black ink of books, clears doubts and uncertainties and bleak outlooks.
-
09-26-2010, 06:27 PM #32W&B, Torrey, Filarmonica fanboy

- Join Date
- Aug 2008
- Location
- Atlanta
- Posts
- 605
Thanked: 252 Genco 5/8ths microscope pics part 2, images 1 - 4
OK, here is my promised follow-up posting of a digital microscope image sequence of trying to clean up the chipped/crumbling edge on the same Genco razor I posed an earlier sequence of.
The images were taken with a self-lit Celestron USB microscope at approximately 150X, with the blade laid nearly flat against a sheet of white typing paper. The area covered by the images is approximately 7/64" or 2.78 mm across. All images are exactly as I captured them with no enhancement, scaled down to 600 X 480. The razor is a Genco 5/8ths with considerable staining and pitting. I used a Sharpie marker as a reference to keep me in the same approximate area of the razor edge throughout the sequence.
This is not intended as a tutorial on how to restore an edge, hopefully others could do it a lot better and qucker with a lot less effort. This is just pictures to record my experience. Criticism, suggestions, and comments are very welcome, they're why I'm doing this on a rainy weekend.
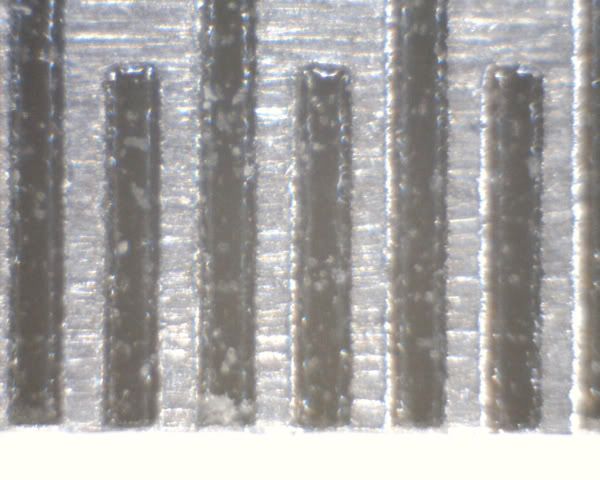
Image 1: For scale, the edge of a steel ruler showing 1/64 inch increments

Image 2: The Genco 5/8ths razor, starting where I left off in the last sequence, with the edge as it was before starting this sequence. My Sharpie reference line on the blade is the black blob on the lower left.

Image 3: Same edge, after 6 sets of 50 light circular passes on each side, (total 300 on each side). Each set of 50 strokes on each side was followed by 10 x-strokes. To my surprise, the Naniwa 1K had zero effect on the chipping. I took shots every 50 passes, but only posted this shot after 300.
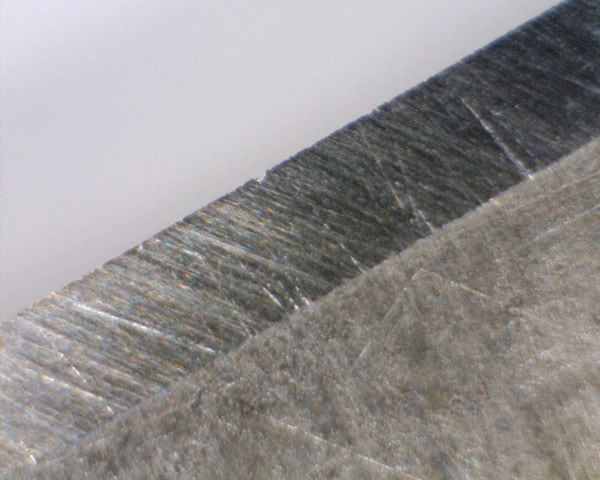
Image 4: I gave up on the Naniwa 1K, and moved to a DMT 1200. This is after 200 light circular passes identical to those on the Naniwa 1K, but with much more effect.
-
09-26-2010, 06:40 PM #33W&B, Torrey, Filarmonica fanboy
- Join Date
- Aug 2008
- Location
- Atlanta
- Posts
- 605
Thanked: 252 Genco 5/8ths microscope pics part 2, images 5 - 8
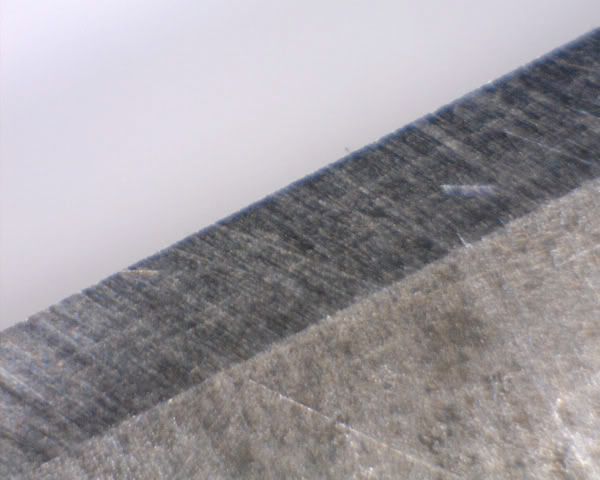
Image 5: After 300 light circular passes (sets of 50 on each side, followed by 10 x-strokes after each set of 50) on the DMT 1200. The edge looked pretty clean to me at this point, so I moved on to a Norton 4K.
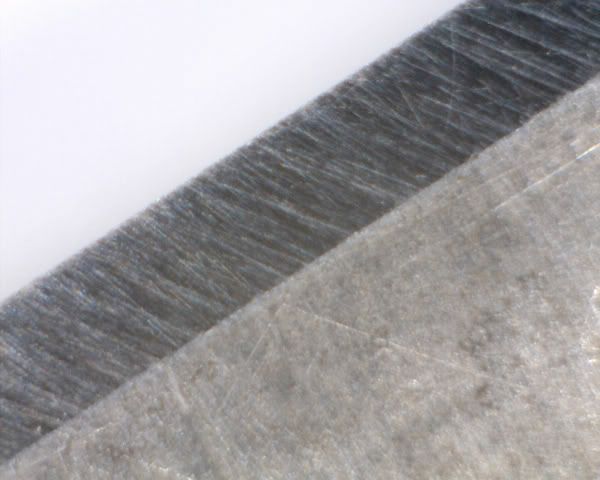
Image 6: After 100 light circular strokes on the Norton 4K. This looked sound to me, so I decided to move on directly to an Asagi, with heavy slurry.
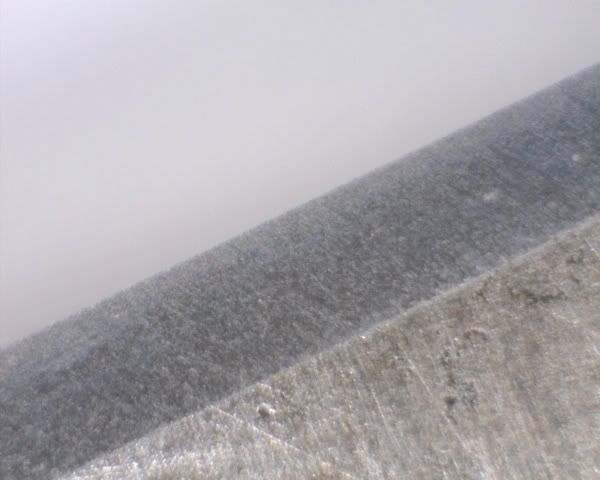
Image 7: After 200 X-strokes on a Nakayama Asagi 3 x 5", starting with heavy slurry on the first 50-75 strokes, finishing with slurry diluted to almost plain water.
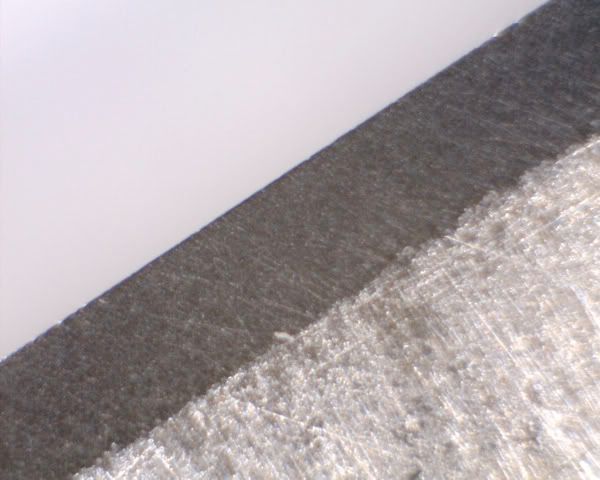
Image 8: After 25 passes on an SRD hard felt strop with SRD 15 Carat 0.5 micron diamond spray. I normally only use this to refresh razors, but I wanted to take an image of the effect, since I was taking a bunch of images.
-
09-26-2010, 06:49 PM #34W&B, Torrey, Filarmonica fanboy
- Join Date
- Aug 2008
- Location
- Atlanta
- Posts
- 605
Thanked: 252 Genco 5/8ths microscope pics part 2, images 9 - 11

Image 9: After 25 passes on a CrOx balsa wood strop.
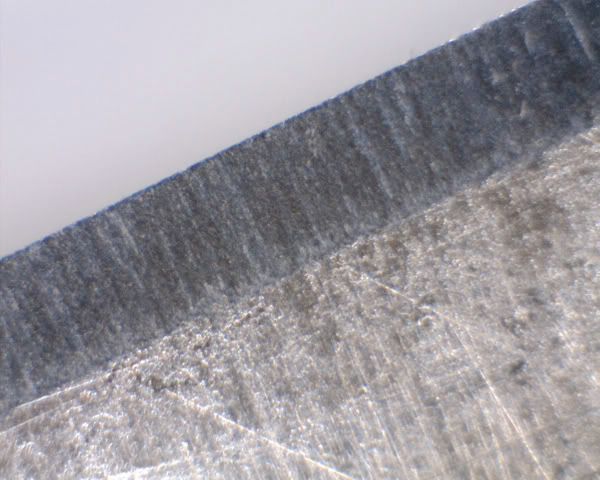
Image 10: After 50 passes on SRD fabric webbing "linen" strop
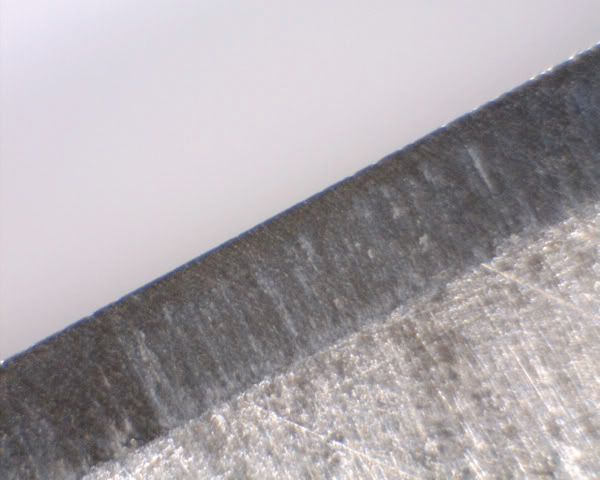
Image 11: After 100 passes on SRD 3" Long Bridle strop
After a lot of strokes and removing a lot of metal, the major chipping and crumbling was removed. But micro-chipping at the very edge persists. This may be the steel, my (lack of?) honing skills, or both. The edge easily passes HHT, but I haven't yet shaved with it. It wouldn't be the first razor I'd reach for...
-
-
09-26-2010, 07:20 PM #35illegitimum non carborundum


- Join Date
- Jan 2008
- Location
- Rochester, MN
- Posts
- 11,552
- Blog Entries
- 1
Thanked: 3795
First, THANK YOU for this second series. You have made this an excellent thread and your photos are great.
Clearly the photos gave you the insight of how much more work you needed to get that bevel/edge completed.
Second, I think you needed to go a little farther on the DMT 1200.
The miniscule deformations were still there when you switched to the 4k. Maybe if you had done another 50 to 100 more strokes it would have been clean and straight. Then I would have gone on to the 1k and then the 4k.
The Gencos have hard steel. I think you've found that out if you didn't know it before. I suspect that it will shave much better this time. Whether or not you would get significant improvement from removing that last bit of deformation at the edge, I don't know, but I doubt it.
Nice job and thanks again!
-
The Following User Says Thank You to Utopian For This Useful Post:
FatboySlim (09-26-2010)
-
09-26-2010, 08:08 PM #36W&B, Torrey, Filarmonica fanboy
- Join Date
- Aug 2008
- Location
- Atlanta
- Posts
- 605
Thanked: 252
Thanks Originally Posted by Utopian
 If the photos are bad, at least they're very consistently bad.
LOL, hey, I seriously thought about it! But after well over 600+ strokes on the Naniwa 1K and DMT 1200, I was wondering if this had become a chicken-vs-egg thing. Was the occasional tiny micro-chipping leftover bad steel still needing removal? Or was it actually being caused by my continued work with the DMT 1200 at that point? The edge was easily shaving leg hair well above the skin after the DMT1200 passes. I decided to move on and see how the edge would shake out with the Norton 4K and the Asagi with slurry. I didn't want one of my later image captions to read: Originally Posted by Utopian
Image 25. After 2000 strokes on the DMT 1200, yet still seeing slight microchipping on the Genco....um, 4/8thsBelieve me, it's well on it's way there. But those Gencos can sure seem to take a joke. They may be America's answer to a Reynolds wedge.

-
09-27-2010, 01:09 AM #37The Great & Powerful Oz
- Join Date
- May 2008
- Location
- Bodalla, NSW
- Posts
- 15,638
Thanked: 3751
Have asked my self this question many a time .... But if there are sections of clean steel on the edge interspersed with the microchips there's a chance you can smooth out the rough spots. If you don't see reduction in chip size as you progress there is a problem. At the point you're at now my go to stone might be a coticule with slurry. If that doesn't work maybe accept the inevitable or start again Originally Posted by FatboySlim
 You're earlier pics clearly show micro pitting in the bevel & as you know they are chips waiting to happen.
It's already been said but razors that have suffered a lot of corrosion often need drastic bevel work to restore a pristine edge & its not always possible to save them but on those I may start with DMTC or Shapton GS 220. Starting at 1k is a test of patience I would surely fail.
Another scenario is if the steel was poorly tempered or not tempered at all you will have little control on when a microchip pops up. On those you can even get a clean edge at 1k then chip out at 8k
Waiting on the shavetest report The white gleam of swords, not the black ink of books, clears doubts and uncertainties and bleak outlooks.
-
09-29-2010, 12:54 AM #38W&B, Torrey, Filarmonica fanboy
- Join Date
- Aug 2008
- Location
- Atlanta
- Posts
- 605
Thanked: 252
OK, shaved with the Genco yesterday. Overall, the shave was better than expected. HHT or no HHT, I still got a slight pulling sensation during the first pass shave. This seemed to settle out after a little bit, and the rest of the shave was good, fairly smooth, and effective.
The good shave end result made me feel like the edge was still usable, and could be improved with some tuning. Below is the Genco post-shave, with no stropping following the shave:
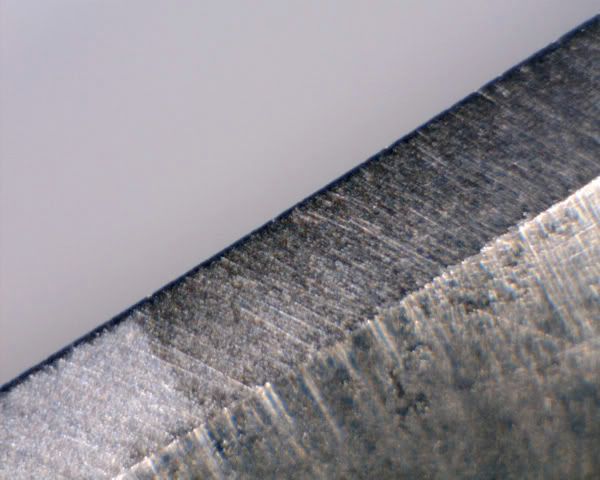
Image 1: Genco 5/8ths post-shave, no stropping.
There's still some chipping visible at the edge. Onimaru55, I'm like you, and felt that I'd rather try a coticule with heavy slurry to take those out, than to start over at the 1K. But after 100 x-strokes on a coticule with fairly heavy slurry, the chipping still persisted:
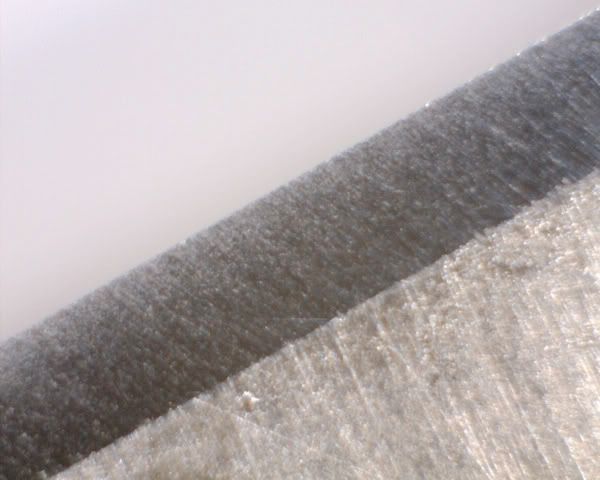
Image 2: Genco after 100 x-strokes with heavy slurry. Still some microchips.
So Utopian, I sucked it up and started over with the DMT 1200. You're correct, it took about another 100 x-strokes to clean it up. Onimaru55, I think you're right that the DMT 1200 isn't as brutal on edges as I thought. I did cheat a bit, in that I switched from light circular strokes to "half X" or "chisel" style strokes, with some moderate pressure. I took the picture below against a darker background, to better see the very edge. I think this is as clean as I can get it at my present skill level, at 1K.
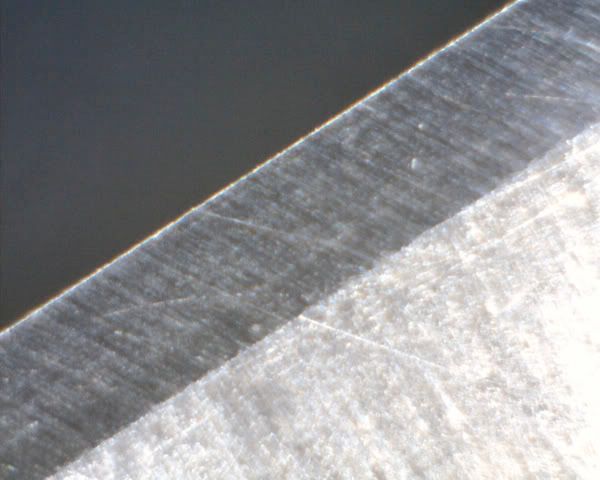
Image 3: After 100 x-strokes on the DMT 1200
As a "control edge" for comparison, this is a fully-finished edge on a new Iwasaki razor I recently honed.
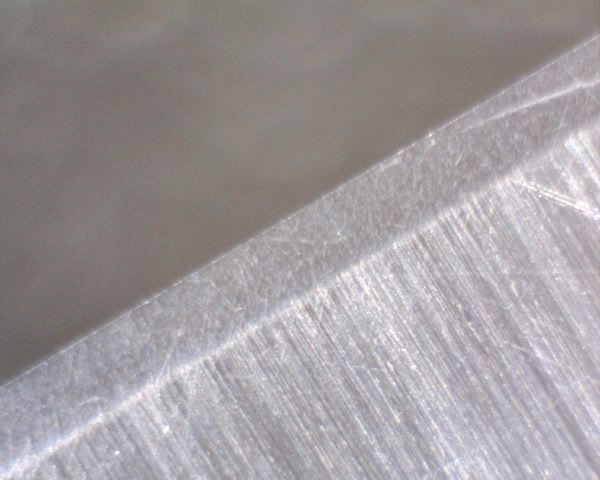
Image 4: Iwasaki edge, finished on a Nakayama Asagi with slurry, and stropped
Thank you for your feedback and suggestions, I learned a lot playing with this the past several days.
- Knowing I was working with a damaged edge, I should have gone straight to the DMT, and used chisel strokes and some pressure to save me a lot of effort and strokes. The Naniwa is much gentler, for a non-damaged edge
- Again, as usual, I tried moving to higher grits when basic problems would have been better addressed at lower grits before moving on
- The DMT 1200 is not as harsh a cutter as I thought, some damaged edges might better be handled with a lower grit hone
- Removing microchips with slurry can work, but takes more effort than I thought, especially with Japanese naturals
- Diamond-sprayed stropping has a much more dramatic effect on the bevel and edge than I expected.
- Linen stropping does have an effect on the edge, changes are visible via a microscope.
-
The Following 3 Users Say Thank You to FatboySlim For This Useful Post:
onimaru55 (09-29-2010), pinklather (10-07-2010), Utopian (09-29-2010)
-
09-29-2010, 01:26 AM #39The Great & Powerful Oz
- Join Date
- May 2008
- Location
- Bodalla, NSW
- Posts
- 15,638
Thanked: 3751
Congrats on the Genco. That DMTE edge looks much healthier tho looks like you got close with the coti. I guess the diamonds are unrivalled speed wise but the coti finish is nicer if you can compromise on speed. Looks like you'll have a sweet shaving Genco for your trouble
 The white gleam of swords, not the black ink of books, clears doubts and uncertainties and bleak outlooks.
-
The Following User Says Thank You to onimaru55 For This Useful Post:
FatboySlim (09-29-2010)
-
09-29-2010, 02:18 AM #40what Dad calls me

- Join Date
- Feb 2008
- Location
- Kansas city area USA
- Posts
- 9,173
Thanked: 1677
WOW! What great pics, I applaud you for not only the pics but for your tenacity and success! Many times after dealing with a crumbling edge the razor will pull and then settle down, I have no idea why but as the shave goes on it will smooth out. I have even seen it improve on the 2nd or 3rd shave.
I have even seen a smooth bevel crumble again while test shaving.
Congrats, someone should put this in the wiki or stickie or whatever that is, the pics were phenomonal as well as the results, what a great learning tool.It is easier to fool people than to convince them they have been fooled. Twain
-
The Following User Says Thank You to nun2sharp For This Useful Post:
FatboySlim (09-29-2010)


 Reply With Quote