
Results 11 to 20 of 21
 21Likes
Thread: Homegrown 7 day razor rack.
 LinkBack URL
 About LinkBacks
-
10-13-2013, 02:44 AM #11

That is really COOL!
I LIKE it A LOT!
-
10-13-2013, 02:48 AM #12Senior Member


- Join Date
- Nov 2012
- Location
- Across the street from Mickey Mouse in Calif.
- Posts
- 5,320
Thanked: 1184
That is a nice rack!
MikeB52 likes this.Good judgment comes from experience, and experience....well that comes from poor judgment.
-
10-13-2013, 02:58 AM #13No that's not me in the picture

- Join Date
- May 2013
- Location
- Los Angeles South Bay
- Posts
- 1,340
Thanked: 284
Hey that's cool. Reminds me of a bunch of surfboards stacked up. It flows well.
I love living in the past...
-
10-18-2013, 02:17 AM #14Senior Member

- Join Date
- Mar 2013
- Posts
- 378
Thanked: 117
That looks great, the form fits the scales contour very well. Enjoy!
A veteran is someone who, at one point in their life, wrote a blank check, made payable to the United States of America, "for an amount up to and including my life".
-
11-26-2013, 03:17 PM #15Senior Member

- Join Date
- Jan 2013
- Location
- Pennington, NJ
- Posts
- 274
Thanked: 36
Off hand, do you know what shape and pull weight you went with for the rare earth magnets? There seems to be a lot of options for the magnets, and I want to try this project. I have never used these magnets, so I don't want to go too strong or too weak.
-
11-26-2013, 05:36 PM #16Str8Faced Gent.


- Join Date
- Aug 2013
- Location
- Orangeville, Ontario
- Posts
- 8,456
- Blog Entries
- 1
Thanked: 4207
Hi, I used single 7 mm Neodymium magnet spheres behind the felt, one per razor space on the upper support. The kind used for building shapes and such. They are rated for like a 2-3 lb pull. They gt stronger when you link them up.
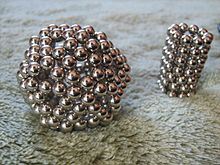
Got them here. CHEERLINK 7mm Neodymium Iron DIY Educational Toys Set - Silver (64 PCS) - Free Shipping - DealExtreme
I drilled 1/4" dia holes in the back face of the rack pockets deep enough to hold the magnetic spheres in some epoxy with the outer radius of the magnets just raised from flush.
Then when the felt was laid in the rack pockets it basically hides the very slightly raised surface and still holds the razor shafts quite firmly. If I were to knock over the rack, the blades would fall, but when held I can hold the rack at a 45 deg angle and the razors remain in the rack. It feels quite safe on the counter and the razors have not exhibited any magnetic memory.
I have the template I created for this project saved and might scan it and add it to this thread for others use.
Rack ended up being 12" end to end and really makes it easy to manage my blades with wet hands.
Cheers.
-
11-26-2013, 05:45 PM #17Senior Member

- Join Date
- Jun 2013
- Location
- Bronx
- Posts
- 158
Thanked: 36
Very nice work.
LuisThere's nothing more solemn than truth. There's no greater grievance to a tomb than hypocrisy, or a greater tribute to death than truth
-
11-26-2013, 07:25 PM #18Senior Member
- Join Date
- Jan 2013
- Location
- Pennington, NJ
- Posts
- 274
Thanked: 36
Thanks so much for the info. If you do upload the template, I for one would definitely use it. I like the piece very much.
-
11-26-2013, 10:09 PM #19Junior Member
- Join Date
- Nov 2013
- Location
- Sweden
- Posts
- 7
Thanked: 0
Looks nice! I've been thinking of making something similar.
-
12-30-2013, 03:27 AM #20Str8Faced Gent.
- Join Date
- Aug 2013
- Location
- Orangeville, Ontario
- Posts
- 8,456
- Blog Entries
- 1
Thanked: 4207
So as promised, I scanned my template and saved it as a PDF file to share on here, but I have no idea how to choose files on here, or if we even can.
So, plan B, I have saved the image as a jpeg and if you print it out full scale on letter size paper, that should work. I taped my cut out to some bristle board before moving it to the lumber myself, made it easier to fine tune the layout.
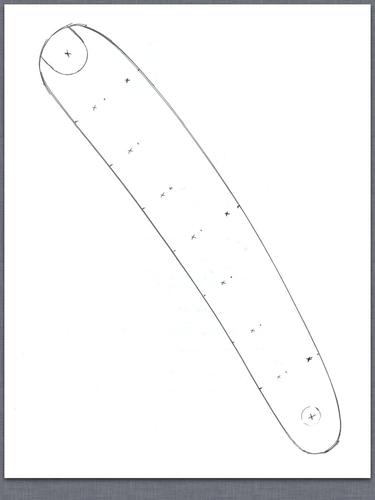
Key points:
I have indicated centerlines on the form for where I set my slots and detents for the blades.
I used 5/16 dowel for my rack set at an 8 deg angle. The key there is that the dowels hide behind the first third and seventh space and whatever dowel you use, ensure that at least it's dia spacing is maintained between the edge of the scale and the drill locations.
I used a 1/2 mill for my razor slots, also set to 8 deg rearward angle to allow for the blades to rest full width, but a drill press would have worked too.
Brush slot on end was set with a 7/8 end mill and cut out. DE sits in a 1/2" hole.
Hope it helps some folks out and would love to see other rack versions when they are done.
Cheers gents, and happy new year to all of you!MattCB likes this.


 Reply With Quote