
Results 21 to 29 of 29
 89Likes
Thread: Project. My first horn scales
 LinkBack URL
 About LinkBacks
-
12-30-2016, 07:52 PM #21Senior Member

- Join Date
- Jul 2016
- Location
- Addison Michigan
- Posts
- 627
Thanked: 115
Would Old Fishing Sinkers Work??????????Ty
-
12-30-2016, 08:39 PM #22KN4HJP

- Join Date
- Feb 2015
- Location
- Chesapeake, Virginia
- Posts
- 932
Thanked: 261
Sure, as long as they are a soft enough alloy to upset and not crack or crumble. I use the lead balls because I traded my .54 cal Jäger rifle and found a stash of ball for it I otherwise have no use for. Originally Posted by Addison
 "Every normal man must be tempted at times to spit on his hands, hoist the black flag, and begin to slit throats." -H. L. Mencken
-
12-30-2016, 09:30 PM #23Skeptical Member


- Join Date
- Nov 2016
- Location
- Colorado Springs
- Posts
- 10,548
Thanked: 2194
Ill try hammering on one of these and see what happens. As long as it dont crack or crumble i guess ill be ok.
Addison likes this.It's just Sharpening, right?
Jerry...
-
12-30-2016, 09:44 PM #24Skeptical Member
- Join Date
- Nov 2016
- Location
- Colorado Springs
- Posts
- 10,548
Thanked: 2194
Here it is as of now but I'll be doing more so it will change a little.

Scales dont look as nice in this pic. Well, maybe after I do it over the pic will trun out better.It's just Sharpening, right?
Jerry...
-
The Following User Says Thank You to Gasman For This Useful Post:
Dieseld (12-30-2016)
-
12-30-2016, 10:03 PM #25Giveaway Guy


- Join Date
- Nov 2016
- Location
- Reading MI
- Posts
- 4,784
Thanked: 1586
Looking real good
Addison likes this.Look sharp and smell nice for the ladies.~~~Benz
Imperfection is beauty, madness is genius and it's better to be absolutely ridiculous than absolutely boring ― Marilyn Monroe
-
12-30-2016, 10:56 PM #26Senior Member

- Join Date
- Apr 2012
- Location
- Diamond Bar, CA
- Posts
- 6,553
Thanked: 3215
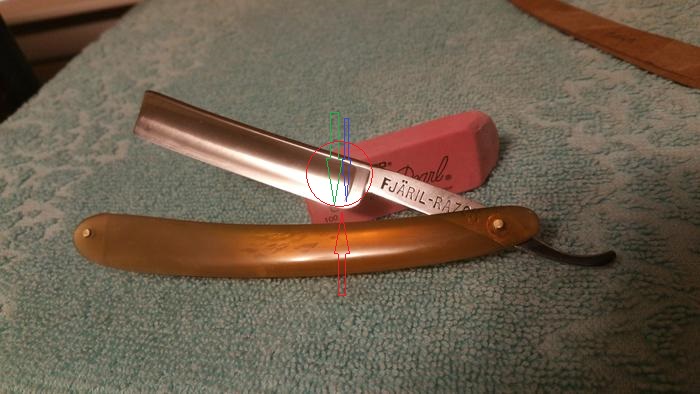
Looks good, but I would take just a bit more off, to move the corner forward just a bit more, where the green arrow is.
The red arrow is where the edge ends now, and may be enough, but still might hit. You want to be well in front of the start of the stabilizer, blue arrow.
You can put some sharpie ink on the spine, the edge and the stabilizer, ink all of the stabilizer. Then hone on a high grit hone and see if you are hitting any of the stabilizer. Check also that you are making good contact on the spine and edge at the heel. A stroke or two will tell the story.
-
The Following User Says Thank You to Euclid440 For This Useful Post:
Gasman (12-30-2016)
-
12-30-2016, 11:38 PM #27Skeptical Member
- Join Date
- Nov 2016
- Location
- Colorado Springs
- Posts
- 10,548
Thanked: 2194
@Euclid440 Thanks for the pic.
Didn't think I needed to go that far forward but if you say so. I thank you for the picture and pointing this out to me. I knew it was a bit under the stabilizer but didn't think it was too bad. Now I know and have a better idea on what SHOULD be done. Thanks again. I'll get my stones next week and will work on this next weekend. I think it will all turn out great when done and wont need anything besides some shave soap for then on. Well, maybe a touching on the stones now and then but I'll be happy to know its done and done correctly!It's just Sharpening, right?
Jerry...
-
01-07-2017, 03:59 AM #28Skeptical Member
- Join Date
- Nov 2016
- Location
- Colorado Springs
- Posts
- 10,548
Thanked: 2194
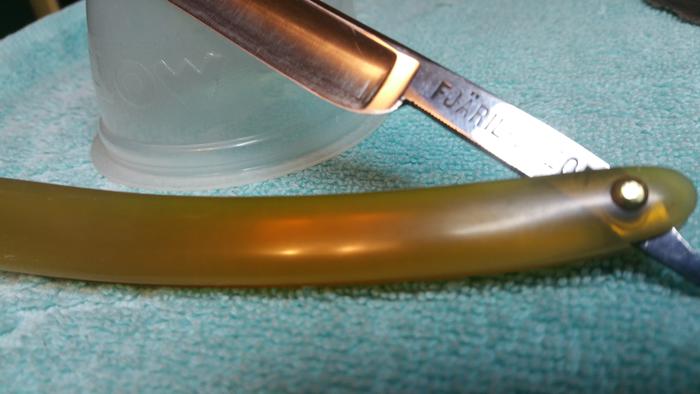
Here it is after grinding the heal some. I need to work on this thing some more but I need to learn to hone before I go any farther I'm afraid. Its a long trip but its fun learning. Hope this heal repair is close to what you were saying. Originally Posted by Euclid440
 It's just Sharpening, right?
Jerry...
-
01-08-2017, 03:54 AM #29Senior Member
- Join Date
- Apr 2012
- Location
- Diamond Bar, CA
- Posts
- 6,553
Thanked: 3215
Yup, looks good, should be much easier to hone now.
Dieseld likes this.


 Reply With Quote