
Results 1 to 10 of 17
 3Likes
 LinkBack URL
 About LinkBacks
Hybrid View
-
10-16-2013, 03:08 PM #1Senior Member


- Join Date
- Sep 2013
- Location
- Perkasie Pennsylvania
- Posts
- 121
Thanked: 5
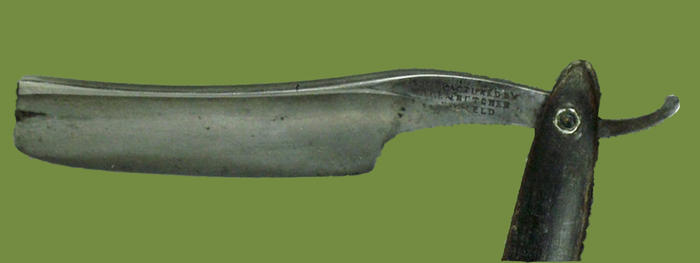
I did some photoshop editing to get an Idea ow what I'm after these are edits to the sale images. I will do an actual scan of the blade and use that scan to edit and create a scale drawing or printable image that I can use as a template.
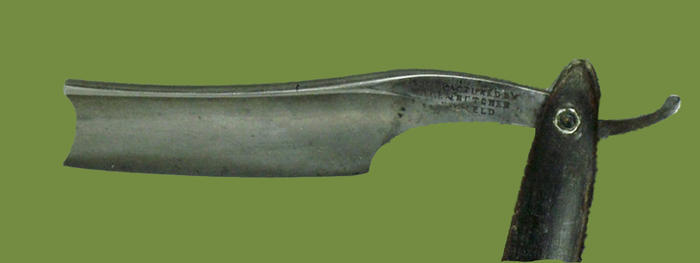
Again these are simple before and after renderings from some pics just for fun I changed the background to a solid color for better contrast. I think I shortened the blade a bit to much but that's why I did this to get the best design!
Here is Before:
Here is after
 "The blade must always be respected"
-
10-16-2013, 03:13 PM #2At this point in time...


- Join Date
- Jun 2007
- Location
- North Idaho Redoubt
- Posts
- 26,987
- Blog Entries
- 1
Thanked: 13234
How long is the edge to start with ????
-
10-16-2013, 03:16 PM #3Senior Member
- Join Date
- Sep 2013
- Location
- Perkasie Pennsylvania
- Posts
- 121
Thanked: 5
I don't know yet I got this off ebay yesterday and it is shipping today. I will have this by Friday. Originally Posted by gssixgun

But on a side note I do want to shorten the cutting edge. I want to have a small blade to play with!"The blade must always be respected"
-
10-16-2013, 03:20 PM #4At this point in time...
- Join Date
- Jun 2007
- Location
- North Idaho Redoubt
- Posts
- 26,987
- Blog Entries
- 1
Thanked: 13234
Wait until it is in hand, you will know oh so much more

-
10-16-2013, 03:40 PM #5Senior Member
- Join Date
- Sep 2013
- Location
- Perkasie Pennsylvania
- Posts
- 121
Thanked: 5
Oh absolutely...I just wanted figure out what I will need to get started so I can get my supplies this week and hopefully start working this weekend. I have test fit pins and final pins, 3 sets of wood scale blanks (ash cut to 1/8" thick book matched), and Tung oil already ordered and on its way. Originally Posted by gssixgun
I thought straight razor shaving was supposed to save me money!
I am supposed to start building a pergola for the wife's hot tube this weekend. So SWMBO has priority during the daylight hours but the night is mine!Last edited by Fort; 10-16-2013 at 03:45 PM.
"The blade must always be respected"
-
10-16-2013, 03:51 PM #6At this point in time...
- Join Date
- Jun 2007
- Location
- North Idaho Redoubt
- Posts
- 26,987
- Blog Entries
- 1
Thanked: 13234
Straight Razor shaving saves money about the same as reloading does with shooting
 RickyBeeroun222 and Speedster like this.
-
10-16-2013, 10:01 PM #7Senior Member


- Join Date
- Apr 2012
- Location
- Diamond Bar, CA
- Posts
- 6,553
Thanked: 3215
Trace the blade profile on a piece of cardboard, cut out the shape and reverse the cardboard so the toe on the cardboard is on the heel of your razor, trace on to the blade with a Sharpie. That is what you would have to remove to make the smile even.
Holding the razor in a vice padded with leather or dense foam, edge straight up, now you can shape the edge by hand or with a Dremel. If you use a Dremel, dunk in water the minute it begins to get hot. The thin edge will heat quickly.
After my initial post on your project, I read an article in this months November/December Fine Wood Working titled Develop Your Own Design by Michael Fortune, on his design process. Fortune is a designer, furniture maker.
It is an interesting article and one that while is a different medium, the design process is or could be easily adapted. Too often we see the results of bad, poor or no design or rushed construction. I see it frequently in Automotive customization and Home remodeling, where something just doesnt look quite right.
Fortune uses a process of creating multiple Drawings, Foam Core or wood scale models, Full size Foam or Particle Board mock ups tweaking the design along the way.
One of his best recommendations is Then, after letting a few days pass, I review the pictures on my laptop. Two things typically happen with a bit of time passing. An Idea that initially appeared strong will drop out of favor, and an idea that seemed so-so will propel me in an interesting direction.
Nothing is lost in taking as much time as needed in the design process, making drawings, models and full size mock-up before you start cutting.
Make full scale cardboard mockups of the existing blade and any modifications you plan on making, as suggested mark the changes on the blade to ensure what you plan, can be done.
Also be aware that removing that much steel from the toe will change the balance of the razor in your hand.


 Reply With Quote