Results 1 to 10 of 81
Thread: 10Pups restores a Reaper.
-
10-28-2013, 07:31 AM #1Senior Member


- Join Date
- Nov 2012
- Location
- Across the street from Mickey Mouse in Calif.
- Posts
- 5,320
Thanked: 1185 10Pups restores a Reaper.
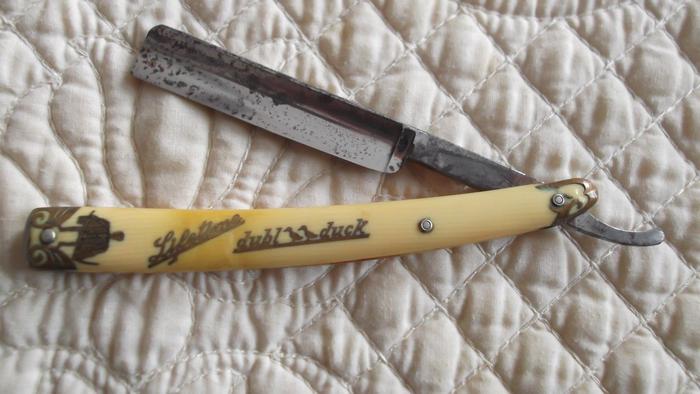
Okay so I have restored a few Ducks now and I just got this Reaper that needs a lot of work. I posted in new acquisitions but here it is again for this thread.
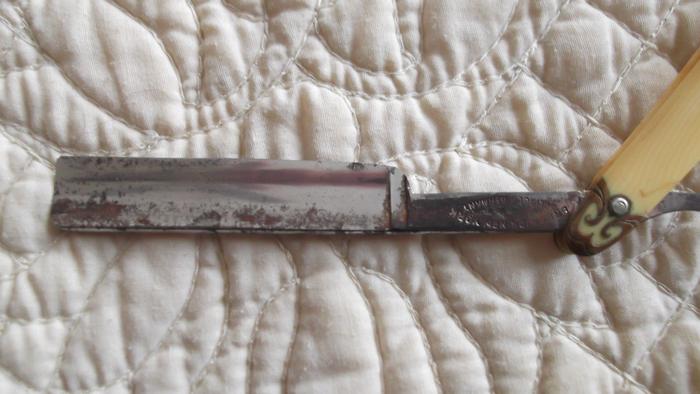
These are straight from the bay shots and very close to what I have in my hand.


The pitting under those spots is not real bad but enough that I have lost the original grind marks.
Sanding this thing has been scary because it seems so light and delicate for some reason. Maybe in my head but I am going slow with this one. I am almost done with the first grit (400) and I haven't unpinned it yet because I thought I would try to save the original scales. The more I sand the more I convince myself this is all from cell rot. But ummm is this even celluloid ? There are a couple other issues with the scales. The big dark patch around the Lifetime brass. And it is on both sides in the same spot. Blue magic didn't affect it one bit and if I sand then the brass is in the middle of it all. PITA. The last issue I have with the scales is the broken brass bolster on the pivot end. My new friend Wolfpack says he has an extra he will give me so if I replace that I think it is the last straw for these old scales. I don't think I could get the old one off without messing up the scales. Maybe, and I will try when I unpin it. The scales also have a small warping action but the razor closes nice and center.
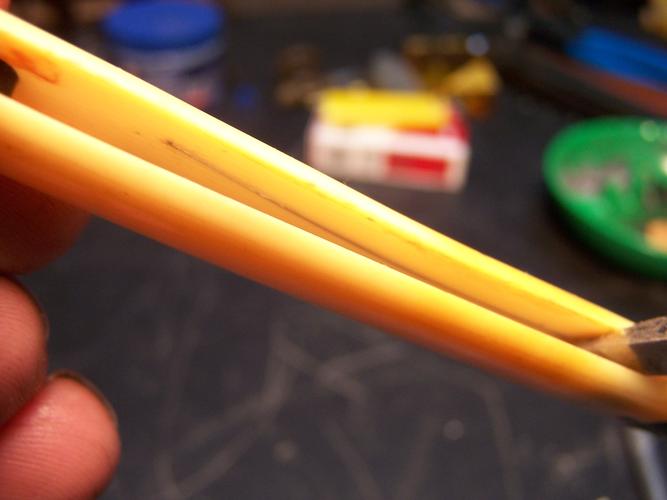
Now I have seen Glen's restore shots with the brass all laid out but when I looked into the scales on this one I see something odd.
Is this a brass bar connecting all the brass on the front ? Is it there to hold the brass in place while the scales set in a mold? Maybe just a piece of scrap that fell into the mix ? It's at about the same angle and length as the front brass. I hope I don't have to make a slot in new scales to set the brass. It may make it easier to place them but how the heck would it not show. Especially if I make them in a clear.

I guess we will find out down the road.Good judgment comes from experience, and experience....well that comes from poor judgment.
-
10-28-2013, 07:44 AM #2

Cant wait to see where you take this one, looking forward to more

-
10-28-2013, 07:53 AM #3

Looking forward to the rest of the thread!
Thanks for putting it up here for us to follow you on the journey.It is just Whisker Whacking
Relax and Enjoy!
-
10-28-2013, 09:22 AM #4

Good luck with this one, but to me and this is only my personal point of view I wouldn't want to invest my time and effort into it, as I believe the effort will out way the financial return, sure you could clean it up a little, after all when you start replacing scales and losing detail and originality then the razor can no longer really be described as being a grim reaper.
“Wherever you’re going never take an idiot with you, you can always find one when you get there.”
-
10-28-2013, 09:58 AM #5

Dubl Ducks often have cell rot, but to me it seems like yours does not. The spots look like water spots to me, as cell rot would definitely have affected the lower part of the blade and ruined the edge.
As for the brass bar, on the picture it looks like a simple discolouration to me. However, if it is a piece that accidentally went into the mould, you have quite a unique razor there!
I look forward to the final result!I want a lather whip
-
The Following User Says Thank You to Laurens For This Useful Post:
10Pups (10-28-2013)
-
10-28-2013, 12:10 PM #6

One Word:
BLACK
Would look AWESOME against the shinning brass!
Ed
-
10-28-2013, 01:31 PM #7

I am currently restoring a DD, not a reaper though. Dang that blade is thin. I didnt go below 400. Did not get rid of all the pitting.
Good luck with this one.
-
The Following User Says Thank You to souschefdude For This Useful Post:
10Pups (10-28-2013)
-
10-28-2013, 01:56 PM #8At this point in time...


- Join Date
- Jun 2007
- Location
- North Idaho Redoubt
- Posts
- 27,160
- Blog Entries
- 1
Thanked: 13249
Restore vs Rebuild
The scales are going to decide for you they are Catalin BTW, a form of Celluloid the way I understand that stuff, I can tell you it is pretty fragile stuff..
If the scales are shot there is little you can do to bring them back, I just did a Reaper Restore a month or so ago and saved the scales, at least for awhile seems that I end up doing more Rebuilds then Restores with those scales
-
The Following User Says Thank You to gssixgun For This Useful Post:
10Pups (10-28-2013)
-
10-28-2013, 04:57 PM #9Senior Member


- Join Date
- Nov 2012
- Location
- Across the street from Mickey Mouse in Calif.
- Posts
- 5,320
Thanked: 1185
Catalin...That's the word I was looking for thanks. I had it in my mind that all Ducks have Cell scales but I knew I saw another name for it. And it is looking like a rebuild. I went to sanding on the dark spots and this pointed smell came out of them. I have sanded on some of the pearl type scales and never got that smell. Then there is the repair of that brass piece. I think the decision has been made already. I am not going through all this nerve racking work again

Chev.... something dark is definitely in the future for this razor.
Lauren.. We will find out what the heck that is. It is not just a stain in my view.
souschefdude...... It is a real pain to sand these things. Sometimes the pits will drive you nuts. I have made some things that help support the blade and to hold the paper, if your determined to get them out. These tools will show up soon in this thread.
Celtic ... I do share your point of view on one hand. I think I got a heck of a deal on this one in the first place and I look at it much the same as an old Ford. You can bring the coup back to original if you can find the parts and want to pay for them or go ZZ Top on it and make a hot rod. This is going to be a hot rod for me. And if it turns out the way I hope, you couldn't to buy it from me at gun point :<0)
If I had the time to learn to edit movies I would make a vid of this process. I have a ton of them now and will take more and I may make a DVD some day or post it to my Tube channel. For now I will do the best I can with stills and descriptions.
There are a few reasons why I post this stuff. The obvious need help and to help. But as I sit and sand I start to think, I better not let this go or somebody will spot it. The fact that your looking over my shoulder at each step makes me stick to the "do the best I can" attitude. So, thanks for that :<0)Good judgment comes from experience, and experience....well that comes from poor judgment.
-
10-28-2013, 10:51 PM #10Senior Member


- Join Date
- Nov 2012
- Location
- Across the street from Mickey Mouse in Calif.
- Posts
- 5,320
Thanked: 1185 Vid 1 My hand sanding method.
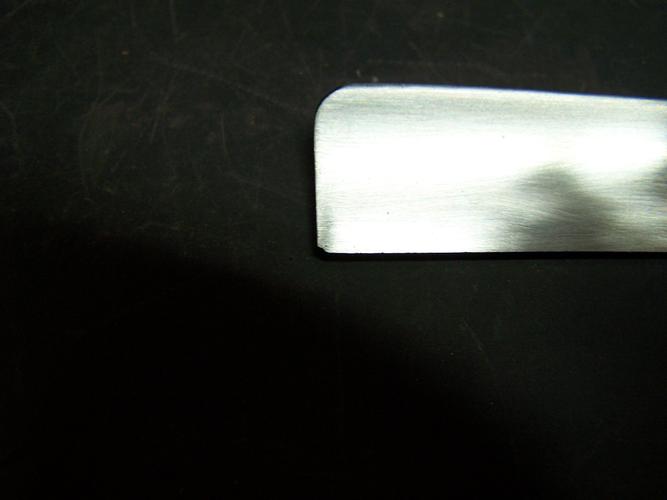
I got a better pic of the chip in the toe.

And I made a short Vid of my hand sanding method. This is the basic, cheapest way to clean up a blade with some tips that make it safer and faster for me. Hope you enjoy it .
1 warning >>> You will see my digits get perilously close to the edge at times. I get cuts a lot more than I should and the 1 method I show using the edge of the block should be done with extreme care. You may want to avoid some of my moves all together and if not remember I warned you :<0)
Good judgment comes from experience, and experience....well that comes from poor judgment.
-
The Following 11 Users Say Thank You to 10Pups For This Useful Post:
AirColorado (11-04-2013), bruseth (11-02-2013), Chevhead (07-18-2015), crouton976 (11-18-2013), GMK45 (11-10-2013), Hirlau (10-30-2013), irishguy (10-30-2013), nipper (11-09-2013), Raol (10-29-2013), RezDog (10-29-2013), Rockabillyhelge (12-02-2013)


 130Likes
 LinkBack URL
 About LinkBacks


 Reply With Quote


