
Results 31 to 40 of 81
 130Likes
Thread: 10Pups restores a Reaper.
 LinkBack URL
 About LinkBacks
-
11-02-2013, 05:59 AM #31Huh... Oh here


- Join Date
- Oct 2011
- Location
- Tri-Cities TN
- Posts
- 2,270
Thanked: 358 Lost my hammer on the last one I tried to remove the scales on one that had those,
 Originally Posted by 10Pups

now the darn thing is 8oz to heavy (head and handle gone) on the wedge side.
I almost went in after it... I really liked that peening hammer
Last edited by pfries; 11-02-2013 at 02:47 PM.
Laurens likes this.It is just Whisker Whacking
Relax and Enjoy!
-
11-02-2013, 06:42 AM #32
Nice Video again 10Pups!
Doesn't look TOO BAD to do...
I am guessing the fitting of the brass back onto the scales is the hard part.
Shaping them perfectly and such has to be a PAIN!
-
11-02-2013, 11:33 PM #33Senior Member


- Join Date
- Nov 2012
- Location
- Across the street from Mickey Mouse in Calif.
- Posts
- 5,320
Thanked: 1185
Cleaning the brass for the next set can be a pain/slow but yeah, the fun parts have ended. Granted making the scales is fun but the fitting slows it down. After the first 5 or so it goes quicker because you start to get an eye for what needs to be done. I will show you as I go :<0) The brass is not always perfect either so that will be another topic in 2 parts probably. If I don't keep skipping things trying to get a video of it.
Chevhead likes this.Good judgment comes from experience, and experience....well that comes from poor judgment.
-
11-07-2013, 06:00 AM #34Senior Member
- Join Date
- Nov 2012
- Location
- Across the street from Mickey Mouse in Calif.
- Posts
- 5,320
Thanked: 1185
Well my new scale colors showed up today. I traced the pattern onto the acrylic and cut them out on a scroll saw like any other scale you would make. I went ahead and sanded right to the line which should still be a little bigger than final but not much. Drilled the pin holes. After shaping the outline of the scales I have learned to put some sort of bevel on the edges. I separated a pair of horn once and then sanded the bevel on the wrong side of one of them. pfffffff (donkey ears grew)
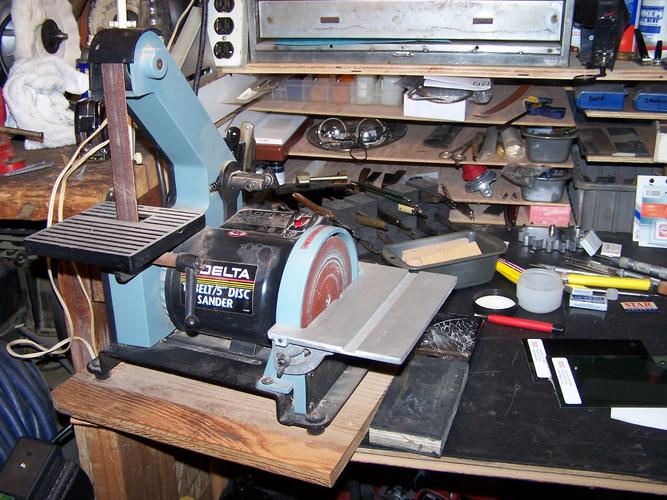
I picked up a little 1X30 belt grinder cheap so I gave it a spin. Didn't like it at first because there is a lot less room to maneuver the scales into shape. I have a 2 X 42 I also grabbed off of craigs list that I have been using but if I get used to the little guy the 42 will turn into a 2 X 72.
Here is the little guy I picked up for 30 bucks. one thing ..it's quieter. 120 grit belt.
I don't know about the disk. It might make a better buffer.
Roughed out to the lines.
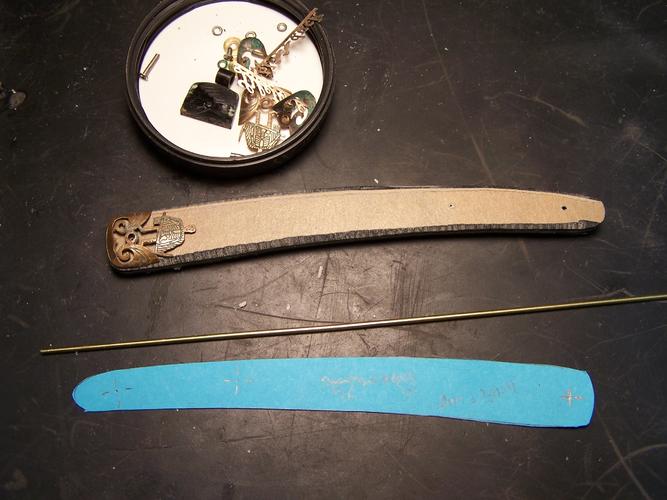
I then took the brass and staked it out on the scales. I drew a line around the brass and did some fine shaping.
So the outside of the scales now matches the edge of the brass. I 'll make it match perfect by hand before moving on to shaping the radius part of the scales. This will finish one dimension of the fit and give me something to match the rest to as I go.
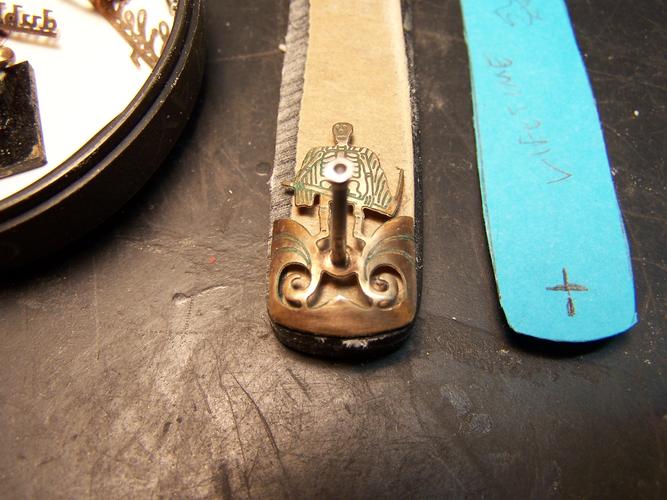
I didn't show it in the pictures but I have also cleaned the back side of the brass so it is ready to glue. I used a 5oo and 1000 grit paper and some Semi Chrome polish on them. Got to do something if your waiting for material to arrive in the mail :<0)Good judgment comes from experience, and experience....well that comes from poor judgment.
-
The Following User Says Thank You to 10Pups For This Useful Post:
MikeT (12-28-2018)
-
11-07-2013, 06:23 AM #35Senior Member


- Join Date
- May 2011
- Location
- Merthyr Tydfil South Wales UK.
- Posts
- 5,601
Thanked: 1413
Excellent instruction, I'm very much enjoying the progress of the grim reaper, just a question looking at your avatar were you ever a rodeo clown? being from the UK I've never seen a live rodeo but love watching those Pro bull riders, got to say you sure need a real big pair of balls to ride those Brahma bulls.
Last edited by celticcrusader; 11-07-2013 at 12:54 PM.
Wherever youre going never take an idiot with you, you can always find one when you get there.
-
11-07-2013, 01:43 PM #36
Looking Good 10Pups!
Glad you mentioned about sanding the INSIDE... I never even thought about that!
-
11-07-2013, 03:37 PM #37Senior Member
- Join Date
- Nov 2012
- Location
- Across the street from Mickey Mouse in Calif.
- Posts
- 5,320
Thanked: 1185
The avatar is me as a bull fighter for Halloween. I had a small ranch for some years and will have another someday. I wouldn't call myself a cowboy but my definition of one may be a little different than yours. I can do all the things a cowboy does but I don't do it for a living.
Chev,,, I sand the inside to give the ca glue more to bite into and hang on. Plus it gets all the old crud off. My scales are usually clear so I have to make the backside pretty also.Chevhead likes this.Good judgment comes from experience, and experience....well that comes from poor judgment.
-
11-07-2013, 04:04 PM #38
 That makes perfect sense... No wonder it didn't even cross my mind...
-
11-07-2013, 05:02 PM #39Senior Member

- Join Date
- Apr 2009
- Location
- Boulder County CO
- Posts
- 1,004
Thanked: 127
Are you tracing the hardware shape onto the scales to allow it to be sunk flush into into the scales? Been thinking about how to add recovered hardware onto new scales in a way that doesn't result in the hardware sticking up higher than the scales. For the ends I decided to do what it appears you're doing. For stuff like the "lifetime" piece you have I can only see routing the face of the scale as a solution. But maybe you'll be showing us how that's done later?
-
11-07-2013, 08:59 PM #40Senior Member
- Join Date
- Nov 2012
- Location
- Across the street from Mickey Mouse in Calif.
- Posts
- 5,320
Thanked: 1185
I have played around with various ways of setting the inlays below the surface. Hot brass, didn't work to well. Chemical melt, while it might work I found it too easy to do damage. Engraving, this seems to be the best possible path however after starting the process I realized how long this would actually take and stopped. The fact is, you have to ask yourself if it is worth the trouble to do it. If you have a simple pattern to inlay, (a square, triangle , rectangle , etc.) then you may want to cut it in. If you have held 1 of my ducks in your hand you would know that the difference is barely detectable if you fit them tight. The brass is 34 maybe 36 gauge. The appearance is not bad unless you actually think about it and for some reason it bothers you. I would guess that some of these razors with inlays where poured into, or pressed into, at the time the scales were made. Out of the 2 dozen or so ducks I have held, the consistency in quality is not really perfect. I have seen the brass on some deeper than others and 1 that was very deep.
That's my 2 cents on that :<0)Chevhead likes this.Good judgment comes from experience, and experience....well that comes from poor judgment.
-
The Following 3 Users Say Thank You to 10Pups For This Useful Post:
AirColorado (11-08-2013), Chevhead (07-18-2015), pfries (11-08-2013)


 Reply With Quote


