-
Yep, same here. On rare ocassions I will sleave them but usually not. Unless you bend the pin it doesn't seem to make a difference. The tricks for sucess with pinning are don't cut the pin too long and don't peen too hard. Easy as she goes wins the day.
Oh, and I don't use washers either. Don't lile the way it looks.
-
Important to note too that the pin hole may appear larger than it is. That razor is only 5/8. You can see by the narrow tang that it started out that way.
On a side note, Joseph Wostenholm was an interesting fellow whose downfall may have been having too many balls in the air at once. Here's some entertaining reading about him.
https://www.hawleysheffieldknives.co...?val=w&kel=487
-
4 Attachment(s)
Doing a job for a local union house built in the late 60s. They have Sargent locks which are top line commercial hardware with a top line price:
Attachment 355049
To cut to the chase, I am changing the key broaching but some of the locks have shorter cores which are no longer made and like hen's teeth trying to find even used.
Attachment 355050
What is still available is on the top. What I need is in the middle. What replaced it is on the bottom.
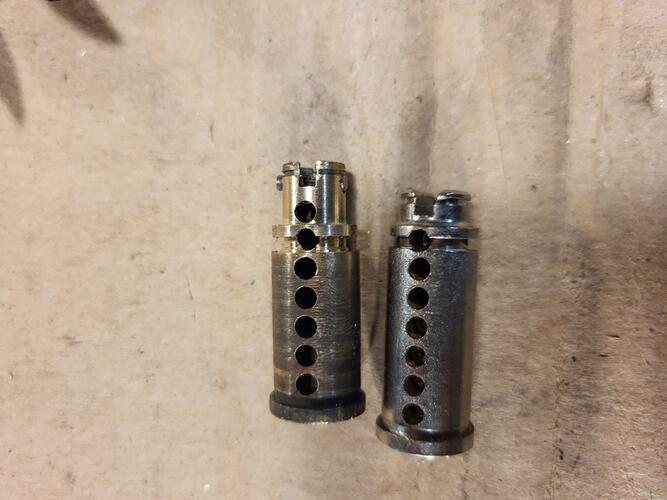
So...out of what I can get a friend with a metal lathe helped me make what I need.
Attachment 355051
Attachment 355052
What I need on the left, made out of what is on the right.
-
1 Attachment(s)
Related to the previous, my brother in law and I were talking about this project. He has a larger lathe I asked about using but it has been a number of years since it has run and it needs repair and a power cord. However, he told me, "if you want it, it's yours." As stated it is in need of restoration but it is one exactly like this one.
Attachment 355053
I already talked to my friend with the mini lathe that helped with the other project about it. He opens and restores old safes and he is stoked to restore an old shop sized lathe. So that may be an upcoming project.
Stay tuned for more of... AS THE LATHE TURNS!!!!!
-
That would be an awesome find Paul!!
Hope it works out for you.
-
3 Attachment(s)
Got this FBU in today. Figured delving hard into it would be good to take my mind off of depressing things.
Attachment 355356
First thing was getting it out of those hideous scales.
Attachment 355357
As expected it looks like they enlarged the pin hole. I'll need to sleeve that. Here you can also see the big chips in the heel end. There are a few smaller ones a little forward of it plus the main ones at the toe. Fortunately it was just under 9/8 so I can hopefully keep it at 8/8 or a little more.
Next to scrape the negligable amount of pitting and give it an initial hand polish with the 3M Marine. Also as you can see it had been reshaped at the toe end before. See how far forward the spine is? So I got out Dad's wet wheel grinder and reshaped the spine and toe to give it more of an authentic FBU look. I didn't want to remove too much but it just didn't look right. Also I took out as much of the chipping as I was willing to. The rest should come out in honing. Here's what I have so far.
Attachment 355358
Oh, also did a bit of a heel reduction, necessary after removing the width to take out the chips. Amazing how little hone wear there is. There's basically none and almost no pitting. This one should turn out to be a gem.
-
Your going to need a manhole cover to fill that pivot hole LOL.
Looks good though, should be nice.
-
Thanks. I have brass tubing in various, stackable diameters for that.
-
That already looks like it will turn out very nice!
-
3 Attachment(s)
Got some more sanding done today.
Attachment 355387
I was really feeling the pang mourning for Max and the sanding is very cathartic. Man I miss that dog.
Edit: Some more polishing.
Attachment 355389