
Results 91 to 100 of 194
 846Likes
Thread: Vacuum&pressure pot experiments
 LinkBack URL
 About LinkBacks
-
03-02-2017, 04:04 AM #91Str8Faced Gent.


- Join Date
- Aug 2013
- Location
- Orangeville, Ontario
- Posts
- 8,456
- Blog Entries
- 1
Thanked: 4207
Got these two jigged, centered, and glued up tonight.
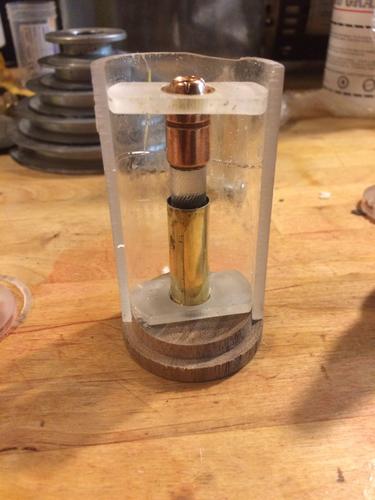
And onto their sacrificial bases.
Then into their molds.
I spray silicon release onto the bases before pouring to allow me to pry them off still when the cure is complete.
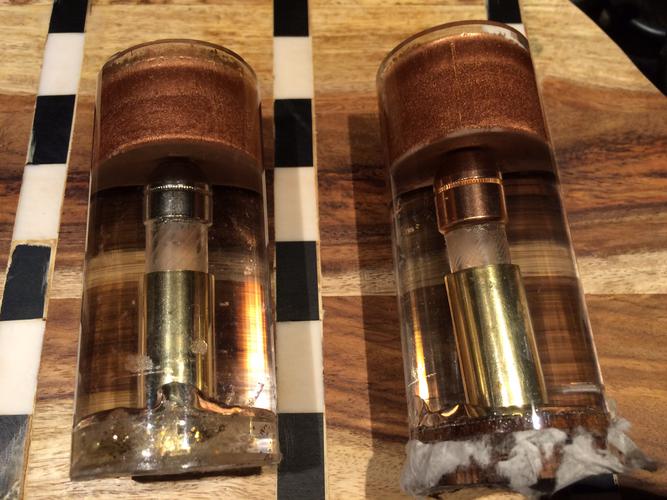
Then after pouring, Put them under 28" of vacuum for 5 minutes, then switch to 60 psi positive air pressure for a solid hour till they set up. Really quite pleased with the clarity this time since I skipped the sparkles. You can see the different rifling effect I put on each calibre slug even though the mold tubes.
Now 48 hrs to fully cure and I can turn them into their final shapes..
Still perfecting the zero leak sealing issues along the bottom of the molds. Luckily those stryations visible from the leakage during curing is all turned away during the final shaping.
Cheers gents."Depression is just anger,, without the enthusiasm."
Steven Wright
https://mobro.co/michaelbolton65?mc=5
-
The Following 7 Users Say Thank You to MikeB52 For This Useful Post:
32t (03-02-2017), Dieseld (03-02-2017), HARRYWALLY (03-03-2017), Hirlau (03-03-2017), RezDog (03-02-2017), TrilliumLT (03-02-2017), xiaotuzi (03-03-2017)
-
03-02-2017, 09:31 PM #92Str8Faced Gent.
- Join Date
- Aug 2013
- Location
- Orangeville, Ontario
- Posts
- 8,456
- Blog Entries
- 1
Thanked: 4207
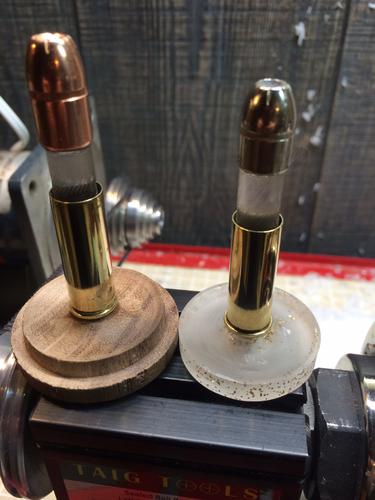
Popped the molds off today and I was pleased to see how recessed the bullets are.
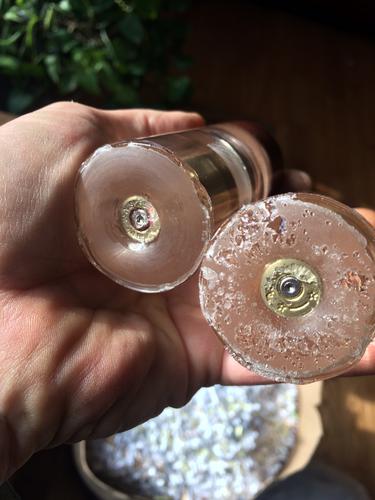
Zactly what I wanted, enough material to clean up and still ensure the brass doesn't protrude, but can be felt in the base bottom. It's all about the tactile touches IMO.
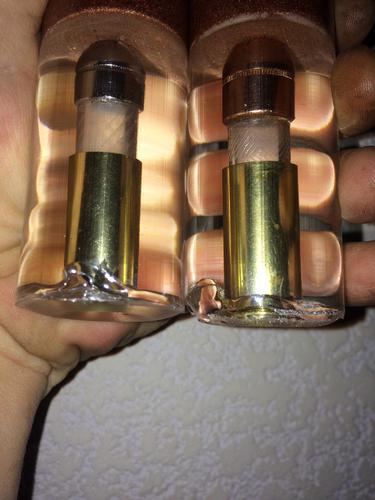
The ripples at the bottom shan't be an issue once turned, and you can see how the slugs just penetrate the upper 'ballistic jelly'. I
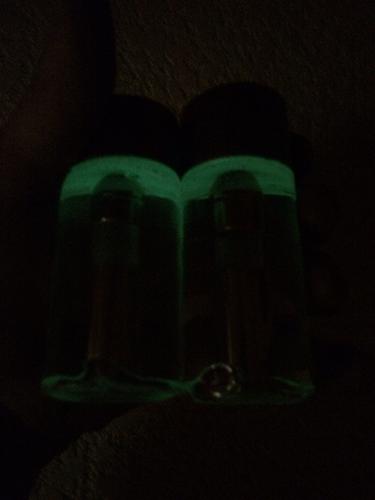
added some phosphorous to these trying to change the effect of the upper colors a bit. And a neat side effect of phosphorous is..
Tomorrow I can start to turn these into proper handles.
Cheers gents."Depression is just anger,, without the enthusiasm."
Steven Wright
https://mobro.co/michaelbolton65?mc=5
-
The Following 4 Users Say Thank You to MikeB52 For This Useful Post:
dinnermint (03-19-2017), HARRYWALLY (03-03-2017), Hirlau (03-03-2017), xiaotuzi (03-03-2017)
-
03-03-2017, 03:17 PM #93I love Burls....... and Acrylic

- Join Date
- Mar 2012
- Location
- Baden, Ontario
- Posts
- 5,475
Thanked: 2284
Really, really cool Mike!
Sent from my LG-K121 using TapatalkMikeB52 likes this.Burls, Girls, and all things that Swirl....
-
The Following User Says Thank You to HARRYWALLY For This Useful Post:
MikeB52 (03-03-2017)
-
03-03-2017, 10:40 PM #94Senior Member


- Join Date
- Oct 2010
- Location
- 50 miles west of randydance
- Posts
- 9,685
Thanked: 1354
I really like these but can't help but thinking that the acrylic spacer is not the same diameter as the bullet.
I think that that would look better.MikeB52 likes this.
-
03-03-2017, 11:45 PM #95Senior Member

- Join Date
- Feb 2013
- Location
- Haida Gwaii, British Columbia, Canada
- Posts
- 14,451
Thanked: 4829
The acrylic spacer reminds me of the swirling smoke and gases following the bullet out of the casing.
It's not what you know, it's who you take fishing!
-
03-03-2017, 11:48 PM #96Str8Faced Gent.
- Join Date
- Aug 2013
- Location
- Orangeville, Ontario
- Posts
- 8,456
- Blog Entries
- 1
Thanked: 4207
That bugs me too, TBH, but the next size up I can source local is .5 and that's too big for the calibre. Tried to turn some down,, ended badly as its too flexible. So I am definately open to ideas from the forum as to other material to try. Technically the rifling effect in the air would be a slightly smaller trail than the bullet, but a little bigger dia would be better for sure.
This thread is all about the experimentation..
I'm stopped where I am till my new knot order arrives anyway so I might turn to a few other ideas I've been wanting to try. I don't like to do my final boring and turning without the know in hand so waiting on China post.
Appreciate the feedback as always.
 "Depression is just anger,, without the enthusiasm."
Steven Wright
https://mobro.co/michaelbolton65?mc=5
-
03-04-2017, 12:01 AM #97Str8Faced Gent.
- Join Date
- Aug 2013
- Location
- Orangeville, Ontario
- Posts
- 8,456
- Blog Entries
- 1
Thanked: 4207
Thanks Shaun, that's what it's supposed to represent. Originally Posted by RezDog


I tried one using window sealant expansion foam, then the acrylic,in the casing, to sort of copy the 'explosion' as fired, but that foam does not stop expanding when you want! Then guess what happened under vacuum? It was ugly suffice to say, haha. Shredded bits of urethane inside a clear urethane tube. Definite fail that was. I've made about a dozen of these so far, and had about a 60% failure rate due to various challenges. I don't post all the fails, but have no problem learning from them. "Depression is just anger,, without the enthusiasm."
Steven Wright
https://mobro.co/michaelbolton65?mc=5
-
03-04-2017, 12:07 AM #98Senior Member
- Join Date
- Feb 2013
- Location
- Haida Gwaii, British Columbia, Canada
- Posts
- 14,451
Thanked: 4829
We usually learn the most from what hits the dust bin!
The ones you have finished look great.It's not what you know, it's who you take fishing!
-
The Following User Says Thank You to RezDog For This Useful Post:
MikeB52 (03-04-2017)
-
03-04-2017, 03:50 AM #99Senior Member
- Join Date
- Oct 2010
- Location
- 50 miles west of randydance
- Posts
- 9,685
Thanked: 1354
I thought you were turning them and then spiraling them.
In this brush design I envision the bullet going down the barrel that is clear and represented by the brush. The spiral represents the rifling in the barrel. Not that a Zip Gun disguised as a brush would necessarily have rifling. But we are talking high quality gentleman fashions here!
Just my opinion of course but with all the time, effort, and skill that is being put into these creations that little detail would put them to the apex.
P.S. Or should I say over the apex?
Last edited by 32t; 03-04-2017 at 03:57 AM. Reason: P.S.
MikeB52 likes this.
-
03-04-2017, 05:19 AM #100Str8Faced Gent.
- Join Date
- Aug 2013
- Location
- Orangeville, Ontario
- Posts
- 8,456
- Blog Entries
- 1
Thanked: 4207
To date, the rifling of the acrylic has been done prior to casting. Came about as a requirement since the bullet would either get sucked into the brass, or displaced from the brass under vacuum and pressure curing. So the transparent rod filled the brass, and held the slug evenly for the cure. Spiraling it was to simulate the round leaving the bullet.
But I gotta say I like where your thinking is going as far as a transparent 'barrel' and the bullet traveling through it. That will require a different approach, but is really a neat evolution or twist on the idea. Thanks for the idea..
Another limitation to the idea is the overall length I am working with. Reason and proportions have me wanting to keep the finished brushes under 4" height and even at that bigger knots are almost a must to keep it all to scale. 25 mm knots minimum I think.
Thanks again mate..
"Depression is just anger,, without the enthusiasm."
Steven Wright
https://mobro.co/michaelbolton65?mc=5


 Reply With Quote