Page 2 of 5 FirstFirst 12345 LastLast
Results 11 to 20 of 42
Like Tree138Likes

Thread: Scales Experiment.

  1. #11
    At this point in time... gssixgun's Avatar
    Join Date
    Jun 2007
    Location
    North Idaho Redoubt
    Posts
    26,948
    Thanked: 13221
    Blog Entries
    1

    Default

    What a great idea

    The results look pretty damn good too
    "No amount of money spent on a Stone can ever replace the value of the time it takes learning to use it properly"
    Very Respectfully - Glen

    Proprietor - GemStar Custom Razors Honing/Restores/Regrinds Website

  2. #12
    'with that said' cudarunner's Avatar
    Join Date
    Aug 2010
    Location
    Walla Walla in WA State USA
    Posts
    11,151
    Thanked: 4230

    Default

    Quote Originally Posted by gssixgun View Post
    What a great idea

    The results look pretty damn good too
    I can hear the gears turning in your head clean down here Glen------------------

    What I envision is that lovely bride of yours saying "Honey have you seen the toaster oven"?
    Our house is as Neil left it- an Aladdin’s cave of 'stuff'.

    Kim X

  3. #13
    Senior Member joamo's Avatar
    Join Date
    Dec 2011
    Location
    Omaha, Ne
    Posts
    468
    Thanked: 259

    Default

    Quote Originally Posted by DVW View Post
    This is an excellent idea. Thank you. I did some research on it and that stuff is extremely strong. I don't think that you need a metal liner or cheesecloth. How did you make and attach the wedge? From what I can tell, adhesives don't work on it well at all, but you can "weld" it with a heat gun.

    This would be really cool with a blade forged from a recycled car spring. Imagine having a functional, good looking and unique razor that was made completely from junk. It would just be cool to have something worth a few hundred dollars that cost $0 in materials and that other people had thrown out. One man's junk and another man's treasure, so to speak. I think that I just found the next razor project to add to my collection.
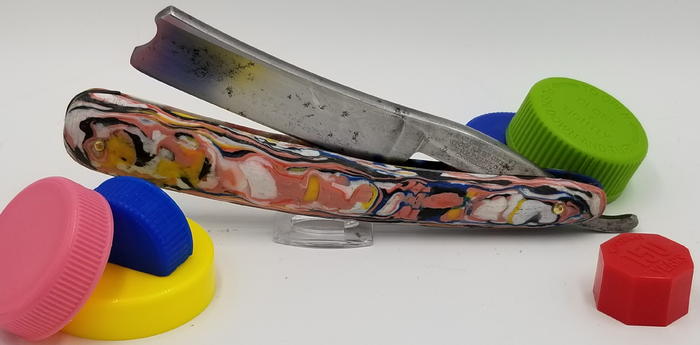
    My normal go to wedge material is acrylic sample chips. I was in a hurry to get this done so I dremeled up a section of some broken hard rubber scales. It is just pinned in with a friction fit, no glue.
    Sounds like my type of project. I've made scales from Pex tubing before and was pleased with those results. i may even have a tutorial somewhere on making the Pex scales.
    ScoutHikerDad and outback like this.

  4. #14
    Senior Member joamo's Avatar
    Join Date
    Dec 2011
    Location
    Omaha, Ne
    Posts
    468
    Thanked: 259

    Default

    A few more blanks, new scales this weekend.
    Yellow, white black and milk jug:
    Name:  JdX1CxUb.jpg
Views: 120
Size:  9.1 KB
    Milk jug and green otc supplement bottle:
    Name:  U0Qpjfkb.jpg
Views: 128
Size:  7.6 KB
    Translucence of milk jug, it is clear when melted and gets milky when cool:
    Name:  tBJdBXXb.jpg
Views: 129
Size:  6.9 KB

  5. #15
    Senior Member Johntoad57's Avatar
    Join Date
    Feb 2016
    Location
    San Antonio, TX
    Posts
    1,701
    Thanked: 406

    Default

    Outstanding! How long does it take for the plastic to melt? Got to get some ideas on timing.....
    Semper Fi !

    John

  6. #16
    Senior Member joamo's Avatar
    Join Date
    Dec 2011
    Location
    Omaha, Ne
    Posts
    468
    Thanked: 259

    Default

    Quote Originally Posted by Johntoad57 View Post
    Outstanding! How long does it take for the plastic to melt? Got to get some ideas on timing.....
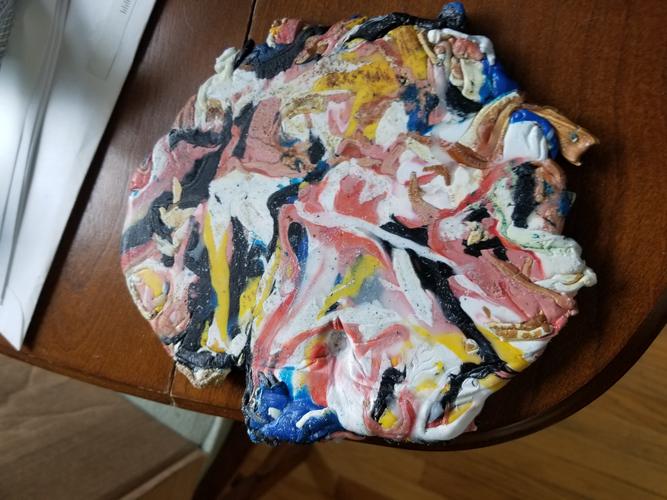
    I think i spent a total of 2 hours today on the green but I was melting the milk jug in layers and sprinkling the green between them. I would say depending on quantity and size of pieces at least a good 45 to an hour and a half using a toaster oven at about 330-350. It will have the consistency of a very stiff dough.
    JBHoren and Johntoad57 like this.

  7. The Following User Says Thank You to joamo For This Useful Post:

    Johntoad57 (07-17-2020)

  8. #17
    DVW
    DVW is offline
    Senior Member
    Join Date
    Jun 2014
    Location
    Eastern Washington State USA
    Posts
    406
    Thanked: 59

    Default

    I played with making some last night. It is kind of the damascus of plastic. I don't think that I got mine hot enough though. While it looked good and felt strong, I cut it up and then bent it to test the "welds". In the middle of the piece I had the equivalent of "cold shuts". So I'll melt it back down and give it another try later today.

  9. #18
    Senior Member joamo's Avatar
    Join Date
    Dec 2011
    Location
    Omaha, Ne
    Posts
    468
    Thanked: 259

    Default

    Quote Originally Posted by DVW View Post
    I played with making some last night. It is kind of the damascus of plastic. I don't think that I got mine hot enough though. While it looked good and felt strong, I cut it up and then bent it to test the "welds". In the middle of the piece I had the equivalent of "cold shuts". So I'll melt it back down and give it another try later today.
    That is a big plus that the rejects and scrap can all be remelted and tried again.
    I'ts a learning process too, my clamping rig has too much flex and I'm dealing with varying thickness because of it. I may rig up a frame and use a scissor jack and steel plates.
    Pressure helps a lot with squeezing out the cold shuts.

  10. #19
    'with that said' cudarunner's Avatar
    Join Date
    Aug 2010
    Location
    Walla Walla in WA State USA
    Posts
    11,151
    Thanked: 4230

    Default

    Quote Originally Posted by joamo View Post
    That is a big plus that the rejects and scrap can all be remelted and tried again.
    I'ts a learning process too, my clamping rig has too much flex and I'm dealing with varying thickness because of it. I may rig up a frame and use a scissor jack and steel plates.
    Pressure helps a lot with squeezing out the cold shuts.
    I think that an Arbor Press may be your friend instead of the scissor jack. I have the Harbor Freight and it works OK. I did some fine tuning by smoothing things up a bit but straight from the box it worked fine.

    https://www.harborfreight.com/1-ton-...ress-3552.html

    If you picked up some 1/2" steel plates, then filed the edges and the surfaces you could then sand the surfaces smooth right down to a mirror finish. I'd take the turntable out and lay the bottom plate directly on the flat surface then the melted plastic and top plate and then press it.

    If by chance the angle of the handle isn't where you can get good pressure, the ring on the right is held in with a single set screw, you can loosen the screw remove the ring then pull the shaft with the handle out till you can move the ram up or down till you can get the right angle.

    You could do that before by experimenting with how the set up would be before hand.

    I'm also wondering if those polished plates could be preheated with the plastic to give you more working time
    jfleming9232 likes this.
    Our house is as Neil left it- an Aladdin’s cave of 'stuff'.

    Kim X

  11. #20
    DVW
    DVW is offline
    Senior Member
    Join Date
    Jun 2014
    Location
    Eastern Washington State USA
    Posts
    406
    Thanked: 59

    Default

    Quote Originally Posted by cudarunner View Post
    I think that an Arbor Press may be your friend instead of the scissor jack. I have the Harbor Freight and it works OK. I did some fine tuning by smoothing things up a bit but straight from the box it worked fine.

    https://www.harborfreight.com/1-ton-...ress-3552.html

    If you picked up some 1/2" steel plates, then filed the edges and the surfaces you could then sand the surfaces smooth right down to a mirror finish. I'd take the turntable out and lay the bottom plate directly on the flat surface then the melted plastic and top plate and then press it.

    If by chance the angle of the handle isn't where you can get good pressure, the ring on the right is held in with a single set screw, you can loosen the screw remove the ring then pull the shaft with the handle out till you can move the ram up or down till you can get the right angle.

    You could do that before by experimenting with how the set up would be before hand.

    I'm also wondering if those polished plates could be preheated with the plastic to give you more working time
    Great minds must think alike. I too have that arbor press, but I ended up using a large vice with steel plates. I found that preheating the steel plates not only helps with a longer working time, but they really help with the finish of the plastic. Warm plates make the plastic much smoother on the outside. Here is my second attempt from today. This time I let the plastic get hotter (almost puddling) and it didn't have any cold shuts. These are just rough cut and sanded down to 60 grit. One thing I noticed. While this material is extremely strong, it is soft and bends easily. I'm not sure how thick to make the scales. They won't give much (if any) tension due to flex. They will simply flex.
    Name:  IMG_1415.jpg
Views: 140
Size:  53.2 KB

Page 2 of 5 FirstFirst 12345 LastLast

Posting Permissions

  • You may not post new threads
  • You may not post replies
  • You may not post attachments
  • You may not edit your posts
  •