
Results 1 to 10 of 50
 46Likes
 LinkBack URL
 About LinkBacks
Hybrid View
-
01-13-2011, 12:15 PM #1At this point in time...


- Join Date
- Jun 2007
- Location
- North Idaho Redoubt
- Posts
- 27,069
- Blog Entries
- 1
Thanked: 13249 CA-Super Glue, Finishing Hints and Tips
I am going to take some time and give you some hints and tricks to doing these finishes...
Basically you goop it on, let it dry, and sand no really that is it...
OK here are a few hints...
Sand your wood to 220 don't go finer it wont suck up the glue, and yes all good finishes go into the wood not just on it...
Acetone is your friend yes if you wipe the scale before your first coat of CA life will be good... I could try and tell you what woods need it (oily) and which don't (dry) , a quick wipe will not hurt any wood that I have used YET..
There are basically 3 types of CA glue, Thin, Medium, and Thick I have never tried the Thick...
Use either the thin or the med or as I'll explain next both types...
When you finish using a regular wood finish, most start with what is often referred to as a "wash coat" or a thinned version of the finish... This gets deep into the wood fiber and protects (waterproofs) it much better then just a top finish...It also sets up a bonding surface for the next coats...
Thin CA is your wash coat, always start with it, put 2-3 coats of thin CA on then switch to a medium if you want, or continue with thin...
Every 1 coat of med is about the same as 3 coats of thin, as a rough guide..
Key, 3 coats of Thin or 1 coat of Med = 1 Application
With most finishes application is the key to a good smooth finish, CA is the reverse, application means nothing, it will be messy sanding makes the finish...
DON"T FORGET THE INSIDE OF THE SCALES I actually do them first with 2 wash coats then 2 aplications..
Application:
After the "wash coat" dries use 320 sandpaper and rough the surface, now 1 application of CA, then let dry, rough sand and continue...I use cut off Nitrile glove finger tips to apply CA, you can also use cello tape around a finger but I have never got that to work as well..
Rough sand 320 before the next application of CA, you will start to notice that they are sanded smooth spots and shiny spots in the finish this becomes very important later..
Continue with your applications, I don't even think about sanding for effect until 3 applications but usually 4-5 is the right spot... (That is 9-15 coats of Thin AT LEAST)
Remember that if you are using thin CA, it has to dry between each thin coat or you will fog it...
Sanding:
Here is where the finish comes into its own...
I use 320 still and get the finish fairly even, the less shiny spots, the more even the finish,, EVERY SINGLE SHINY SPOT MUST BE GONE eventually...
I use a fresh clean piece of sandpaper each time I do this first cut-down because it can tell you very fast if you burned through the finish, you will see a wood color streak on it
If you burn through do 2 more applications and try again...
As you sand for effect, watch the shiny spots get smaller and smaller, DON"T get lazy here, as they get smaller, switch to 600 and continue...
then 800 then 1500 (the grits can vary) you can wet sand if you want at about the 800 level...
Check the finish against a bright light for shiny spots, and continue lightly sanding until there are none... Yes really none, if you leave any you will be sad after the next step...
Now once you are SURE the finish is even and clear, then comes the magic...
You should have a pretty smooth glassy finish now but it needs to be "Cut" a really good inexpensive cutting compound is Turtle Wax Liquid Rubbing Compound, apply and buff and then do it again, and you will find this liquid glass finish staring back at you...
If you left any shiny spots they will now be DENTS in your finish go back to about 1000 grit or so, and sand them out and re-"cut" the finish with the compound...
A good coat of Johnson's paste wax (or the like) or Ren-Wax makes the whole thing beautiful..
I am working a set right now I will try for some pics later...
This is a general format, there are many variations to this that work...
-
The Following 68 Users Say Thank You to gssixgun For This Useful Post:
1oldDago (09-22-2016), 32t (01-14-2011), 71L (04-30-2016), alb1981 (01-09-2012), baldy (01-13-2011), bassguy (08-12-2011), BigJim (03-21-2011), bondpunk (06-09-2011), Catrentshaving (01-14-2011), Cevulirn (04-24-2011), Chevhead (01-30-2015), Cove5440 (04-04-2012), Deckard (01-14-2011), Deeter (08-30-2016), Disburden (01-16-2011), dnjrboy (01-13-2011), donjcschilde (07-29-2011), dukeofwails (12-30-2013), eod7 (09-22-2013), Ernie1980 (01-31-2017), GeauxLSU (02-11-2011), Geezer (11-05-2018), Grizzley1 (01-13-2012), HNSB (01-13-2011), hornm (01-13-2011), ignatz (01-13-2011), jaycey (01-25-2011), JeffR (01-13-2011), jeness (01-30-2011), jmercer (01-16-2015), johnny2274 (05-01-2014), JP5 (06-14-2015), JTmke (06-01-2014), llalm (10-24-2014), luckypip (05-10-2019), MarkinLondon (02-09-2011), Mastershake (01-27-2012), Maximilian (01-13-2011), Miner123 (11-12-2013), mrbhagwan (01-13-2011), MW76 (03-13-2016), mycroftar (06-10-2012), nipper (07-19-2013), Oldnick (05-17-2016), onimaru55 (01-14-2011), OnTheRocks (01-23-2015), PapaBull (05-31-2012), parkerskouson (08-13-2012), ppetresen (01-04-2018), richmondesi (01-16-2011), Robbied (02-10-2014), rplunk43 (04-04-2014), Sandycrack (04-04-2014), sharptonn (01-13-2011), sidmind (08-27-2011), Silents (05-06-2012), Spectro (06-07-2014), str8dave (02-16-2011), str8fencer (01-13-2011), Str8Raz0r (06-14-2011), Suavio (01-07-2014), tedh75 (05-03-2014), Thisisclog (01-27-2014), tictac (01-06-2015), tinkersd (07-28-2012), virtus (04-12-2013), Walterbowens (04-04-2014), wedwards (01-13-2011)
-
01-13-2011, 01:24 PM #2Lookin like a crim


- Join Date
- Apr 2009
- Location
- Coffs Harbour Australia, Home of the Big Banana
- Posts
- 2,706
Thanked: 1072
Thanks Glen. Thats going straight in the subscribed threads list. ONE DAY I'm going to get around to making some wood scales.
Grant."I aint like that no more...my wife, she cured me of drinking and wickedness"
Clint Eastwood as William Munny in Unforgiven
-
-
01-13-2011, 01:56 PM #3Senior Member
- Join Date
- Jan 2008
- Posts
- 701
Thanked: 182
i need to find a way to jsut dip the and pull a vac on them to drive it deaper into the scales
i use mostly stabilized wood but i i sure do like the high gloss topcoat of CA
-
01-13-2011, 02:48 PM #4Cream Huffer

- Join Date
- Aug 2008
- Location
- Edmonton, Alberta
- Posts
- 573
Thanked: 74
Any tips for how to best make a wedge so it fits well with the newly finished scales?
If you build the wedge before the finish, you run the risk of the wedge being too small once the finish is applied. If you build the wedge after the finish, you run the risk of sanding through the finish when shaping the wedge. My OCD demands as flush a fit for the wedge as possible.
All tips appreciated.
-
01-13-2011, 03:28 PM #5 Examples of thick/thin
There should be a shrine of gratitude to Glen. Thank You! 'Can't say that enough.
It would be helpful to know how to assess a given CA as thick/thin, etc. The further from a large city one gets, the harder it is to grab a specific brand, though there's always online buying.
Any fav brands? or test/observations to assess where a given product falls in this thick/thin scale? Is there such a thing as 'thinning' a CA?
Thank You very much in advance.
-
01-13-2011, 03:43 PM #6Senior Member

- Join Date
- Jul 2009
- Location
- Portland, Oregon, United States
- Posts
- 518
Thanked: 125
The stuff that comes in the little metal tubes at the checkout counter...that's basically thin CA. The thickness just goes up from there. Originally Posted by pinklather

Honestly unless you have a decent hobby shop near you online is probably going to be the way to go.
CA Glue
I tried some of my local places but even they charged more than this guy online so I figured the next time I need to re-supply just go with the online. It'll probably be a while though as I have some "company" that's been on my couch for the last 6months so I've had to put most of these projects on the back burner.
Michael
-
The Following 2 Users Say Thank You to hornm For This Useful Post:
pinklather (01-13-2011), tinkersd (02-01-2017)
-
01-14-2011, 08:18 AM #7Junior Member
- Join Date
- Aug 2010
- Posts
- 2
Thanked: 3
Thanks a lot for these CA finishing hints ! And also for the pictures, it helps a lot !
I'm wondering exactly the same... Originally Posted by dnjrboy
All tips will be VERY appreciated !
-
01-14-2011, 05:30 PM #8At this point in time...
- Join Date
- Jun 2007
- Location
- North Idaho Redoubt
- Posts
- 27,069
- Blog Entries
- 1
Thanked: 13249
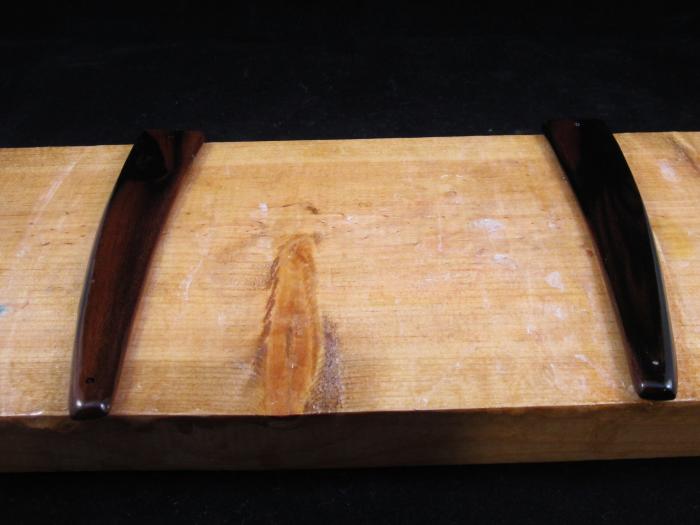
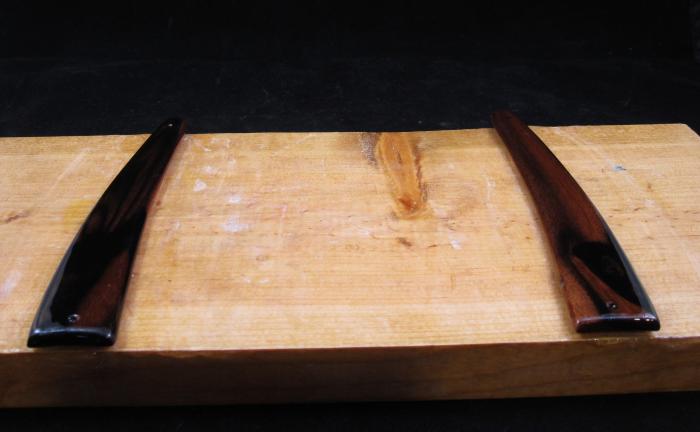
Here are some from this morning after another 2 applications now at 4
BTW Normally this can be done way faster, about 1 hour between Med coats and about 20 minutes between thin coats for a total of 1 hour for each application, wet to dry... Maybe 6 hours most of which is drying time
My day yesterday consisted of getting up at 4:30 to fire up the big tractor and 3 hours of clearing the road of snow, putting on 1 application of CA going to the real job getting home to another 3 hours more of clearing the road sanding and putting on another application and finally sleeping hehehe....
Is it Spring Yet ????
You can see even in these pics that the finish is starting to even up more and more...
-
01-22-2013, 06:27 AM #9Member
- Join Date
- Apr 2010
- Posts
- 41
Thanked: 2
I have been applying the same amounts of coats to the exposed edges of the wedge. So far it seems like it will be a seemless fit. I have some finish sanding and a polish to do still on the scales and still need to polish the blade too. I will post it when I finish in the show and tell.
-
01-13-2011, 04:45 PM #10Poor Fit
- Join Date
- May 2010
- Posts
- 4,562
Thanked: 1263
Thanks Glen...very informative and helpful as always


 Reply With Quote

