
Results 31 to 40 of 45
 8Likes
 LinkBack URL
 About LinkBacks
-
06-29-2011, 06:21 PM #31Geriatric Gamer/Surf Fisher


- Join Date
- Mar 2011
- Location
- Manassas, VA
- Posts
- 298
Thanked: 42 I wouldn't... when you get your hones you'll be doing it on a nice flat hone, you'll have your loupe and can see what's happening, and you won't subject your most excellent work to any unnecessary wear and tear. You also don't want to start getting it razor sharp until it's all buttoned up.
 Originally Posted by tekbow

-
The Following User Says Thank You to tonycraigo For This Useful Post:
tekbow (06-29-2011)
-
06-29-2011, 06:26 PM #32Senior Member

- Join Date
- Mar 2011
- Location
- Leith, Edinburgh
- Posts
- 821
Thanked: 95
Cheers mate, you're just right, got a bit over enthusiastic there and forgot about repinning before honing. Originally Posted by tonycraigo
Just looking at one of the others to be refurbed, its something for another thread but it has collarless pins.. Not sure how to deal with those lol
-
06-29-2011, 06:31 PM #33Geriatric Gamer/Surf Fisher
- Join Date
- Mar 2011
- Location
- Manassas, VA
- Posts
- 298
Thanked: 42
From what I've garnered from the nearly limitless info found here - looks like a job for a center punch and a drill press. Those scales sho-doo look nice... would be a shame to trash them, eh? Originally Posted by tekbow
Hit that baby with some autosol and see what happens...
 tekbow likes this.
-
06-29-2011, 06:39 PM #34Senior Member
- Join Date
- Mar 2011
- Location
- Leith, Edinburgh
- Posts
- 821
Thanked: 95
the white scaled one? yeah, they're nice, change from the black scales i almost exclusively have. May need more than autosol though. Maybe not all the way down to 180 grit, but masking the etch and going at it, starting at 300 or 420 should see it ok. hard to see from the pics but there's rock solid black crap on the jimps and in the triangle engravings. I need a better camera. Think one of those toothbrush style wire brushes someone mentioned should help a lot
-
07-15-2011, 08:13 AM #35Senior Member
- Join Date
- Mar 2011
- Location
- Leith, Edinburgh
- Posts
- 821
Thanked: 95
Hey guys, I'm back from work, the nortons are here.. and the tuckmar is repinned..
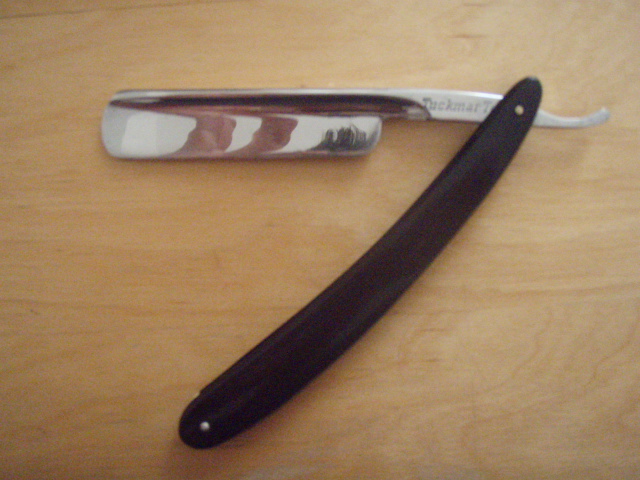
Major thanks to everyone who's help and advice got me here, Maxi, tony, bharner and theseus.
Also want to give props to neil miller at Strop-shop.co.uk. I contacted him last week about a strop, and we got to talking about pinning. Yesterday a little baggy of prepeened brass pins, washers, and microfasteners arrived in order to "get me started until my washers arrive from the states". What a dude
From here i'll be attempting to make my own pins, just got to wait for my hobby vice to arrive.
another of my little notes on the process:
when unpinning (tapping out the pin) i've started wrapping the scales and blade above and below the pin with electrical tape, as it stops the scales from splitting too far apart and breaking when the pin cleasr the first side of the scales.
lapping is a bugger.. I was at my 1000 grit for 45 mins last night (having read the tutorial in the wiki) and there's still a low spot on the bottom corner where the pencil marks just won't disappear..Last edited by tekbow; 07-15-2011 at 08:15 AM.
-
07-19-2011, 08:09 PM #36Senior Member
- Join Date
- Mar 2011
- Location
- Leith, Edinburgh
- Posts
- 821
Thanked: 95
Right so... question time again.. Hope you guys haven't got hacked off with this thread and can see you're way clear to a little more advice
I've managed to get the damage i did to the tuckmar honed out without, may i add, resorting to the very strong lure of breadknifing. There was lots of practice on a beat up blade for 2 days before moving to this one and am pretty confident in my various strokes.
I've got 2 micro micro nibbles in the blade that's only visible under a 20x loupe. Am I being to anal in trying to get rid of these or should i continue on? I figure that, if i'm going to do this, i should make sure the bevel and edge are perfect before moving up to the 4k.
At the minute i'm using 2 strips of tape on the spine (as per the wiki if using circles and "firm pressure) and intend to move down to one strip once the edge is clean. It just seems to be taking forever, don't know how many sets of circles.
I'm getting good water displacement on the norton and the water sits up as a fine film on the bevel when stroking evenly across the length of the blade so i figure the contact is good.
More lessons learned for me. The lapping plate from norton is nowhere near as quick and easy as a plate of glas and some 220 grit wet dry paper.. did in 15 minute what i couldn't do in three hours
Cheers
Simon
-
07-19-2011, 09:44 PM #37..mama I know we broke the rules...


- Join Date
- Feb 2010
- Location
- Toronto, Ontario, Canada
- Posts
- 2,895
- Blog Entries
- 8
Thanked: 993
Check your contact with a magic marker. Run the marker along each side of the bevel, at the edge. Do a nice and even X stroke on each side, and you'll very clearly see where there is contact (the marker will be ground off). If your micro micro nibble are only visible under 20X, then by the time you are though with the 4k they'll probably be gone. Yet, a couple of even strokes on the 1K should also take care of them.
Remember to TNT to check for a set bevel, or if your thumbpad is keen do the TPT. Then it's the arm hair test. That puppy should pop hairs at the 1K, on any part of the blade. Only when this happens can you put your 1K to bed and wake up the 4/8 combo.
Even with "firm pressure", remember to keep it consistent across the blade....as opposed to bearing down in one section and then swearing.
Hope this helps a bit Simon.
-
The Following User Says Thank You to Maxi For This Useful Post:
lungo (08-20-2011)
-
07-19-2011, 09:59 PM #38Senior Member
- Join Date
- Mar 2011
- Location
- Leith, Edinburgh
- Posts
- 821
Thanked: 95
It does, Thanks. I've been using the magic marker right from the start (that is an awesome technique for making sure even contact is being made), and it's passing the TNT test perfectly, it's just not popping arm hair.. Am going to go back to the MM again.
The 4/8 is currently in the bath lol lucky its synthetic material otherwise it'd be wrinkly by now.
I'm learning intense patience from this if nothing else
-
07-20-2011, 02:51 PM #39..mama I know we broke the rules...
- Join Date
- Feb 2010
- Location
- Toronto, Ontario, Canada
- Posts
- 2,895
- Blog Entries
- 8
Thanked: 993
Ease up on your pressure. Start with heavy circles/medium circles to set the bevel, and then use light circles and really light X strokes after you TNT. Continue with the light strokes with very little pressure.
-
07-20-2011, 09:42 PM #40Senior Member
- Join Date
- Mar 2011
- Location
- Leith, Edinburgh
- Posts
- 821
Thanked: 95
Cheers Nate, that got it, i wasn't being methodical enough. I had actually got the bevel set, just hadn't done quite enough at the 1k before progressing. Light circles and X's did the trick. So... I have a shaver
well.. it's not the smoothest in the world and very mild tugging, just needs more work i think. I'm getting good TPT, and it isn't getting more pronounced with further honing on the 8k. Think i need to move up to the 12k but that doesn't come until thursday.

So there it is. I know the bevel is wavey, but.. i started with a chipped blade along it's full length, and i do have a bevel and an edge, so i'm quite pleased. I'm now working on the silver ring that was pictured waaayyy back on the first page and it's progressing much faster and tidier with a "prettier" bevel.
So i guess that's this thread wrapped up thanks everyone again for all the help and encouragement.


 Reply With Quote