
Results 21 to 23 of 23
 9Likes
 LinkBack URL
 About LinkBacks
Threaded View
-
08-03-2011, 09:03 AM #1"Nah"


- Join Date
- Jul 2011
- Location
- Ottawa
- Posts
- 71
Thanked: 14 Method for blade sanding with a drill press
I'm new to restoration, actually new to everything, but after four hours sanding a blade by hand and no reduction in the pitting I knew I wouldn't want to hand-sand my rapidly growing collection. I skipped the dremel entirely and found something that works surprisingly well, or at least I think so; so I thought I'd share.
**Disclaimer: This isn't a "How-To" or a recommendation, I'm just sharing. There's nothing very safe about the way I'm doing this. When sanding near the spine it tends to grab and push the blade in my hands. However, it doesn't fling it anywhere. The worst that's happened is the blade falling onto the table and I can usually keep hold of it anyway. But doing this with anything other than a totally dull razor is insane, and gloves would probably make it MORE dangerous with hands wrapped around a high-torque spindle.
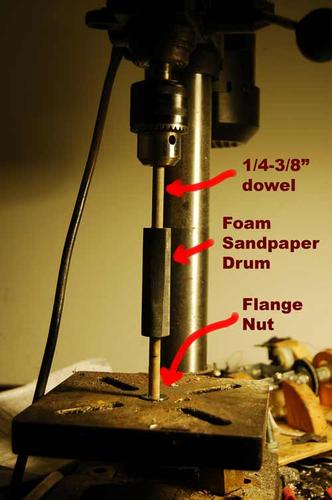
I chucked a piece of wooden dowel (~5/16 actual diameter) in my drill press, slipped a flanged bicycle axle nut in the center hole of the table to support the bottom end of the dowel, wrapped a layer of bike packing foam around the dowel with electrical tape to hold it and stuck some sandpaper to it. Resulting 'drum' is about 3/4" wide and 3" long. Perfect for doing the face of a hollow blade.
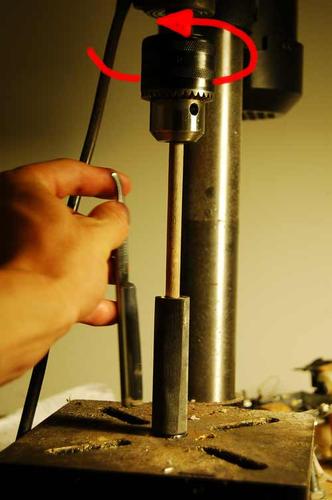
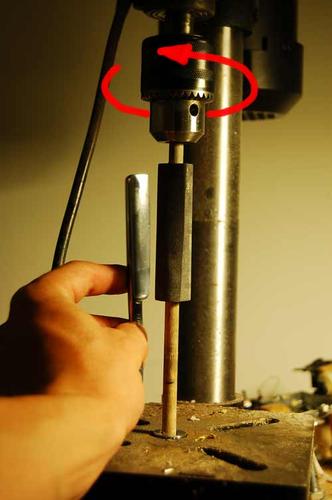
The 'drum' has enough friction on the dowel to sand a blade but you can slide it up or down so that you can do both sides of the blade with the drum rotating away from the edge (see photos below). I hold the tang with one hand and control the pressure with the fingers of the other hand resting in the hollows of the blade.
I've finished two blades this way from 220 grit to 2000. Ran the first one at 750 RPM and the second at 1500 RPM. Just finished de-pitting my third blade, too. I dip the blades in water every 10 seconds or less and the blade never even seems to feel hot unless I use a lot of pressure, which usually makes the drum slip anyway. It's really nice compared to a dremel because the speed is low and stays constant
The drum can do the whole face of the blade evenly, and the drum end can get into the shoulder, too. Works great everywhere on the tang, too, and for cleaning up the face at the tip of the blade. The only bit it can't reach is the corner between the blade shoulder and the bottom of the tang, I do that and the top of the spine by hand.
Getting the flaws out of the blade takes a while, but nothing compared to hand-sanding, and once I've got a clean 220 grit finish I go to 400, then 800, then 1000, then 2000, putting deep transverse scratches in by hand to mark each transition. The high grits really take no time at all, and each stage uses up two or three 3x3 inch pieces of sandpaper. I've never gotten as far by hand, but IMHO this method puts a pretty nice brushed finish on the blade at the lower grits. My favourite look is at 800 but here's the Adrian & Stock I'm working on right now after 220 grit de-pitting with literally no attention paid to detail. Both times I went through the grits I was sorely tempted to just stop at 400, then again at 800. The finish seems to come out a lot less even above 1000 grit, though.
*Note: that's just dust at the edge, not chipping. Went real easy near the edge for this one. Learned my lesson.

So far I've had two real problems with this method.
1. When working near the spine it tends to grab the sandpaper and shift the blade in your hands. Doesn't throw the blade anywhere like buffers allegedly do, but definitely hazardous to your fingers.
2. Because it's a power tool, need to be very careful if working near the edge. My guinea-pig first blade (full hollow) turned out great, but I approached the second (quarter-hollow) with a bit too much confidence and the toe third of the edge crumbled during the 220 grits stage, and the heel third followed suit during the 400. My notch-point (disguising a chip in the toe) became a spanish-point.
I have a tendency to hack things together with hot glue and duct tape, this is a (very) rare case of it actually working pretty damn well ,I think.Last edited by Goggles; 08-03-2011 at 09:17 AM. Reason: Clarifying a bit
-
The Following User Says Thank You to Goggles For This Useful Post:
Jeltz (08-05-2011)


 Reply With Quote