
Results 1 to 10 of 23
 9Likes
 LinkBack URL
 About LinkBacks
-
08-03-2011, 09:03 AM #1"Nah"


- Join Date
- Jul 2011
- Location
- Ottawa
- Posts
- 71
Thanked: 14 Method for blade sanding with a drill press
I'm new to restoration, actually new to everything, but after four hours sanding a blade by hand and no reduction in the pitting I knew I wouldn't want to hand-sand my rapidly growing collection. I skipped the dremel entirely and found something that works surprisingly well, or at least I think so; so I thought I'd share.
**Disclaimer: This isn't a "How-To" or a recommendation, I'm just sharing. There's nothing very safe about the way I'm doing this. When sanding near the spine it tends to grab and push the blade in my hands. However, it doesn't fling it anywhere. The worst that's happened is the blade falling onto the table and I can usually keep hold of it anyway. But doing this with anything other than a totally dull razor is insane, and gloves would probably make it MORE dangerous with hands wrapped around a high-torque spindle.
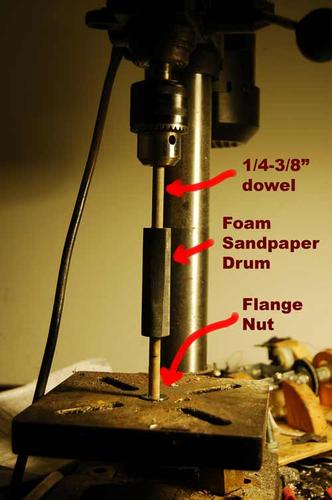
I chucked a piece of wooden dowel (~5/16 actual diameter) in my drill press, slipped a flanged bicycle axle nut in the center hole of the table to support the bottom end of the dowel, wrapped a layer of bike packing foam around the dowel with electrical tape to hold it and stuck some sandpaper to it. Resulting 'drum' is about 3/4" wide and 3" long. Perfect for doing the face of a hollow blade.
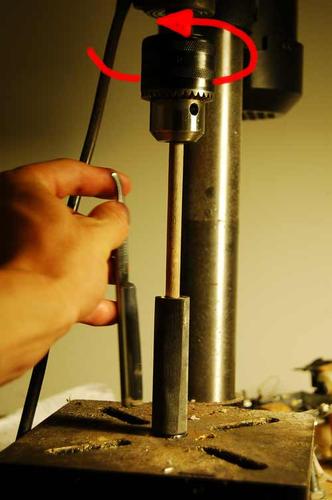
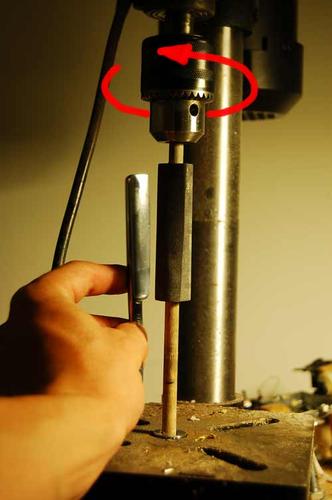
The 'drum' has enough friction on the dowel to sand a blade but you can slide it up or down so that you can do both sides of the blade with the drum rotating away from the edge (see photos below). I hold the tang with one hand and control the pressure with the fingers of the other hand resting in the hollows of the blade.
I've finished two blades this way from 220 grit to 2000. Ran the first one at 750 RPM and the second at 1500 RPM. Just finished de-pitting my third blade, too. I dip the blades in water every 10 seconds or less and the blade never even seems to feel hot unless I use a lot of pressure, which usually makes the drum slip anyway. It's really nice compared to a dremel because the speed is low and stays constant
The drum can do the whole face of the blade evenly, and the drum end can get into the shoulder, too. Works great everywhere on the tang, too, and for cleaning up the face at the tip of the blade. The only bit it can't reach is the corner between the blade shoulder and the bottom of the tang, I do that and the top of the spine by hand.
Getting the flaws out of the blade takes a while, but nothing compared to hand-sanding, and once I've got a clean 220 grit finish I go to 400, then 800, then 1000, then 2000, putting deep transverse scratches in by hand to mark each transition. The high grits really take no time at all, and each stage uses up two or three 3x3 inch pieces of sandpaper. I've never gotten as far by hand, but IMHO this method puts a pretty nice brushed finish on the blade at the lower grits. My favourite look is at 800 but here's the Adrian & Stock I'm working on right now after 220 grit de-pitting with literally no attention paid to detail. Both times I went through the grits I was sorely tempted to just stop at 400, then again at 800. The finish seems to come out a lot less even above 1000 grit, though.
*Note: that's just dust at the edge, not chipping. Went real easy near the edge for this one. Learned my lesson.

So far I've had two real problems with this method.
1. When working near the spine it tends to grab the sandpaper and shift the blade in your hands. Doesn't throw the blade anywhere like buffers allegedly do, but definitely hazardous to your fingers.
2. Because it's a power tool, need to be very careful if working near the edge. My guinea-pig first blade (full hollow) turned out great, but I approached the second (quarter-hollow) with a bit too much confidence and the toe third of the edge crumbled during the 220 grits stage, and the heel third followed suit during the 400. My notch-point (disguising a chip in the toe) became a spanish-point.
I have a tendency to hack things together with hot glue and duct tape, this is a (very) rare case of it actually working pretty damn well ,I think.Last edited by Goggles; 08-03-2011 at 09:17 AM. Reason: Clarifying a bit
-
The Following User Says Thank You to Goggles For This Useful Post:
Jeltz (08-05-2011)
-
08-03-2011, 11:09 AM #2I used Nakayamas for my house


- Join Date
- Aug 2009
- Location
- Des Moines
- Posts
- 8,664
- Blog Entries
- 1
Thanked: 2591
Could the spine grabbing part be due to too much pressure when sanding? It can happen easy when using a buffer too.
Stefan
-
08-03-2011, 12:50 PM #3Senior Member
- Join Date
- Jul 2011
- Location
- Ponca City, Oklahoma
- Posts
- 605
Thanked: 66
I am not sure I will reproduce your idea 100% but I have a few idea's using your root design. Thanks for the idea. I think I can make a smaller version like this but using small DC motors designed more like a lathe. perhaps even some safety guards. The wheels are spinning in my head.
Thanks.......now I will be loosing sleep because of you..
-
08-03-2011, 01:11 PM #4At this point in time...


- Join Date
- Jun 2007
- Location
- North Idaho Redoubt
- Posts
- 27,033
- Blog Entries
- 1
Thanked: 13247
Somewhere in the deepest darkest pits of SRP is a thread about using these
12 Piece Long Drum Sander Kit and Replacement Sleeves - Rockler Woodworking Tools
Combined with a simple variable speed/reversible drill in a stand, for those of you that don't own a drill press... This system does work and it works really well for removing pits on 1/2 hollows and heavier, be very careful on hollows and full hollows they are pretty thin
I love reading about work arounds for expensive power tools, great idea Goggles
-
08-03-2011, 03:20 PM #5< Banned User >
- Join Date
- Jun 2011
- Location
- miami,fl
- Posts
- 577
Thanked: 69
nice improv ... kudos!!
-
08-03-2011, 04:13 PM #6Senior Member
- Join Date
- Mar 2011
- Location
- Corcoran, Minnesota
- Posts
- 665
Thanked: 170
How about using a mini lathe instead of a drill press. Mine is variable speed, and you would be holding the blade horizontal instead of vertical. Just a thought.
-
08-03-2011, 04:24 PM #7At this point in time...
- Join Date
- Jun 2007
- Location
- North Idaho Redoubt
- Posts
- 27,033
- Blog Entries
- 1
Thanked: 13247
I remember Dan aka Floppyshoes used a lathe for most everything so I see no reason it wouldn't work Originally Posted by skipnord

-
08-03-2011, 04:31 PM #8"Nah"
- Join Date
- Jul 2011
- Location
- Ottawa
- Posts
- 71
Thanked: 14
Yeah, it usually happens when I press harder, but the main reason is that I haven't perfected a way to attach the sandpaper, so it's always a bit lumpy. Originally Posted by mainaman
Thanks for the compliment. I was definitely nervous on the first, full-hollow test blade, even though it was already damaged. Just like hand sanding I think it comes down to guessing how deep the pits are, since it still takes a while to work them out. Luckily there doesn't seem to be any issue with heat build-up because of the speed, unless you press really hard. The squishyness of the drum really helps to avoid too much harshness. Originally Posted by gssixgun
On other topics, I've also used the drill press in place of a lathe to make stainless steel washers (well, technically only 1 so far) out of a 3/16" piece of 18-8 rod I had lying around. I pulled the chuck off my cheap hand drill to hold a bit for center-drilling, and used a cut-off wheel in the dremel to part them off. The accuracy with which you can turn things using a cut-off wheel by hand is surprising. Not great, just surprising.
Oh, and I've also got a way of keeping blades from bumping into each other in a tumbler that seems to be working brilliantly so far, even though it was just a pocket knife & cardboard solution. Think I'll share that in another thread.Geezer likes this.
-
08-04-2011, 10:55 PM #9Member

- Join Date
- Oct 2008
- Location
- Llanbobl - somewhere and everywhere in Wales
- Posts
- 36
Thanked: 7
I am going to speak out against the practice mentioned in the first post (sorry, I'm a former Health & Safety officer).
The practice you are employing is placing side forces on the chuck and motor housing of the drill as you move the blade under the drill - side forces that the drill was not designed to take (there WILL be forces, as you have to apply a pressure to do the sanding)
There is also the question of what happens if the long shaft you are employing snaps - there you will have a length of broken metal flying off in whatever direction at a hell of a speed.
Why not splash out $20 or so for a flexi drive shaft and attach that to your drill - it will reduce the side forces on the chuck/motor, and allow a hell of a lot more manouvereability.
Oh, I take it that you have the blade firmly clamped in some sort of jig too, and not just sitting on the baseplate of the drill press?? (Just knocked up a jig at home for less than £2, and that cost was for the magnets!!)
I've seen too many bad accidents caused by people thinking they can adapt power tools for purposes that they were not originally designed for, where there is a perfectly good alternative available for less than the cost of a stay in hospital!!!
Please, heed this warning
Mark
-
08-05-2011, 12:13 AM #10Senior Member
- Join Date
- Jul 2011
- Location
- Ponca City, Oklahoma
- Posts
- 605
Thanked: 66
@wmsheep, get over your bad self, it's our fingers we will lose them if....... Oh wait. Perhaps your right
Truthfully I liked the op's design but safety was the first thing I thought of and planned to build something safer and horizontal.
Thanks for the heed of warning..


 Reply With Quote