Results 21 to 30 of 50
-
06-02-2012, 12:24 AM #21At this point in time...


- Join Date
- Jun 2007
- Location
- North Idaho Redoubt
- Posts
- 27,037
- Blog Entries
- 1
Thanked: 13249
-
06-02-2012, 12:42 AM #22At this point in time...


- Join Date
- Jun 2007
- Location
- North Idaho Redoubt
- Posts
- 27,037
- Blog Entries
- 1
Thanked: 13249
Ok holding at 27 in/Hg I just put the Brake Fulid Reservoir that came with the kit, in line between the Vacuum chamber and the pump, so that should solve the problem of an accident with the foam up possibly getting to the Pump...

I bought the one at Harbor Freight here
Brake Bleeder & Brake Bleeder Vacuum Pump Kit
I priced them locally at the Auto parts Houses and the cheapest was $49 and they went up to $99 so I figured I would at least try the HF one and see what happened, heck I could buy 2-4 of them for the same price as the others and every one on them looked the same except for the packaging, and all were made in China anyway...
Ok I have done as promised with pics and info now does anyone have ideas about Finishes/Hardeners
-
06-02-2012, 01:36 AM #23

Awesome!
How were the pickles?
-
06-02-2012, 04:44 AM #24At this point in time...


- Join Date
- Jun 2007
- Location
- North Idaho Redoubt
- Posts
- 27,037
- Blog Entries
- 1
Thanked: 13249
Update 4 hours later and the new set up held all the way through, I just pulled out the Spalted Tamarind from this morning's batch, now I just have to leave it be for a week or so and see what happens

Well with no recommendations yet I guess I am just going to have to start experimenting myself
-
06-02-2012, 12:19 PM #25Member

- Join Date
- Aug 2010
- Location
- Rochester, NY
- Posts
- 71
Thanked: 14
Glenn,
give Deks Olje a try. It's a tile sealer. I've also "melted" plexiglass in acetone and treated reel seat blanks. Both methods works really well,but the Deks Olje leaves wood less "plastic" feeling. Hope this helps.
Don
-
06-02-2012, 02:28 PM #26

not much help here, i don't have any recommendations for type of fluid to try. but i was just thinking with a bit of creative piping, a few more jars and the right fittings you could probably get 3 or 4 different chambers up at once off a single pump, cut down on testing time. either in series or off a main header. and of course we would all benefit greatly from your hard work and the great pictures that would surely follow.
 (i would try the main header gig first). you could even make the main header another smaller jar, it would work as a overflow safety catch as well that way.
you've probably got rain for the next week there anyway, what else could you possible have to do?
-
06-02-2012, 06:01 PM #27

I have used poly finish, minwax wood hardener, acrylic, poly resin, CA glue and epoxy resin. I wish I still had access to my setup. It was at the cabinet shop I used to work at.
If you use a 2-part resin you can always use a disposable vacuum chamber or a non-stick system to remove the resulting billet, but removing the excess may be a bit much for flat work. I have only used the resin with round work and the lathe made quick work of the excess resin.
-
06-02-2012, 06:35 PM #28

That's a great setup Glen, well done. I don't know if you can reuse the sealer for more batches? If you can't, perhaps a square "something" to hold the wood and the liquid might be better economy, perhaps with cut-to-size plastic mesh or something alike to separate the wood blanks? It would cut down on the liquid needed for sealing. Did that make sense? Like, stack layer mesh - woob blank - mesh - wood blank - mesh till you have your pieces ready, and fit these into a snugly fitting square container of sorts.
Just a thought. Sure looks great already, and those will make killer scales
-
06-02-2012, 07:11 PM #29

How well is it holding vacuum? And how long did it have to remain in vacuum? Not to long for the “soak” I assume?
I was thinking about building one out of a bicycle pump and using hose clamps at the connections. Are the hose clamps necessary?
I have no concern about the cure time on the oils. Where I have concern is with the cure time of epoxies for hardening softer woods. Any input on this? I have not searched the cure time on deep penetrating epoxies. I would think a two part would be the way to go.
Jeff
-
06-02-2012, 08:07 PM #30Hones & Honing


- Join Date
- May 2005
- Location
- Saint Paul, Minnesota, United States
- Posts
- 8,023
- Blog Entries
- 1
Thanked: 2209
A few years back I used an old paint sprayer pot for a container, almost 2 gallon capacity, and 60 lbs of pressure. The wood was mostly spalted maple. Approx 1.25" square by 7" long. I also tried Minwax wood hardener, clear gloss polyurethane, BG42 acrylic beads dissolved in acetone. and Resinol 90C.
The Resinol 90C gave the best fill of the wood pores because their is no solvent that evaporates but it is so very expensive and a real pain to use. Plus when you start sanding it down it is very irritating to the nose/lungs. Worse than any of the other stuff and worse than any of the exotic woods.
The Minwax worked but pores were not filled very well.
The BG42 acrylic beads were a pain to dissolve. Constant stirring is necessary for an extended length of time for a 2 gallon capacity and it wanted to clump up a lot.
Poly was simple, had a reasonable but not perfect wood pore filler %. The downside is that it took 3 months ( yes, 3 months) for the wood to dry and an oven did not help. In addition since it is partly a solvent the wood pores will not be completely filled. You will need to use a sealer on the wood when finishing.
We did let the wood soak for a week in the various solutions and would release and re-pressurize several times during the week.
In the future I would be usen a combo pressure/vacuum setup for the best penetration.
The reason for the 1.25" square x 7" long was that I read that thinner stock may warp. The info I relied on when starting out came from the various knife forums.
If you try to sand/buff the wood before it is completely dry it will "smear" from the heat of the sander/buffer.
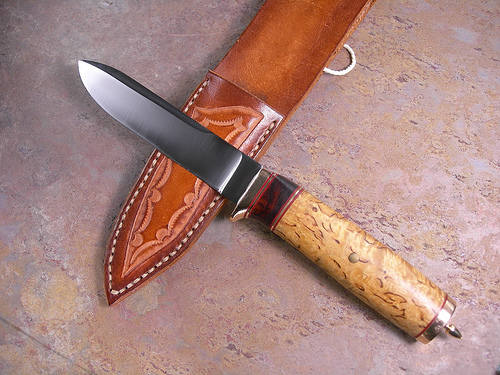
Here is some of the wood...........


Hope this helps,
-
The Following 3 Users Say Thank You to randydance062449 For This Useful Post:
HNSB (06-02-2012), skipnord (06-02-2012), TURNMASTER (06-03-2012)


 29Likes
 LinkBack URL
 About LinkBacks


 Reply With Quote
