
Results 1 to 10 of 32
 15Likes
 LinkBack URL
 About LinkBacks
-
03-30-2012, 09:23 AM #1Senior Member


- Join Date
- Jan 2011
- Location
- Virsbo, Sweden
- Posts
- 114
Thanked: 11 First attempt at making my own scales.
I'm not sure this is the right section since I haven't begun anything yet, so please move it to the correct section if it's wrong.
Some background story and beginners mistakes.
A while back I bought a beautiful E.A Berg for almost nothing at a flea market. The scales where in perfect condition but the blade had some pitting and rust that I thought I would attempt to clean up. I got it home and took out my dremel (Mistake no. 1) and went at it. I got it somewhat cleaned and thankfully didn't mess anything up. What was left I thought I could just polish away with some metal polish, elbow grease and time (Mistake no. 2). After several hours of polishing the blade was shiny but the pitting stilled shamed it in my opinion. That's when I decided I would take it apart (Mistake no. 3), clean it up and pin it back with original scales. Since I lack the correct tools I decided to grind the pin down using a diamond rasp. I got the pin grinded down but was still unable to remove the pin, that's when I broke the scales. (Mistake no. 4 )
)
Future plans?
So now I have a beautiful, restored blade but no scales to put it in. But since I'm going away over the easter to my cabin where I have an unlimited supply of Birch wood and all kind of hardware I decided to make an attempt of making my own. I have read about custom scale making on the forum and decided to go with a "one-piece" since I was hoping to be able to salvage the washers from the wedge on the original scales and reuse them. I made a rough model in Inventor on how I would like the scales to turn out. I'm not sure if I want to keep them in the natural color of the wood or use some kind of wood stain on it.
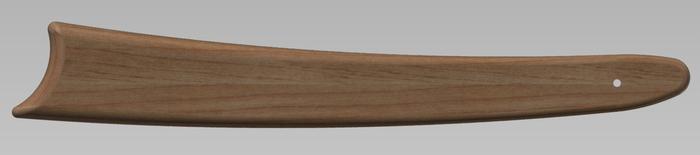

I would like as much comments and feedback as possible on design, does and don't etc. before I start to commit to this and hopefully the razor will be brought back to life again.
Kind Regards,
MagnusLast edited by PMH; 03-30-2012 at 09:44 AM.
-
03-30-2012, 10:19 AM #2Senior Member

- Join Date
- Jun 2009
- Location
- Colorado Springs
- Posts
- 1,769
Thanked: 1045
I would put some arc in the design. Curved scales look better.
-
03-30-2012, 10:35 AM #3Senior Member
- Join Date
- Jan 2011
- Location
- Virsbo, Sweden
- Posts
- 114
Thanked: 11
There isn't a single straight line in the model.

But I guess you mean that the arcs should be more pronounced? Or do you mean that the sides shouldn't be flat?
-
The Following User Says Thank You to PMH For This Useful Post:
Tylerbrycen (04-04-2012)
-
03-30-2012, 10:45 AM #4Senior Member

- Join Date
- Jul 2009
- Location
- Brampton, Ontario
- Posts
- 635
Thanked: 121
If it means anything, I like them. Personally, I prefer darker scales. I'll let the pros comment on how, if you want to go that way. It's better than what I can do anyway!
-
03-30-2012, 11:01 AM #5Member

- Join Date
- Mar 2012
- Location
- Manchester, CT; Blacksburg, VA
- Posts
- 58
Thanked: 11
I love them! I really like the simple classy lines, and the one piece design. Don't see that often.
-
03-30-2012, 11:02 AM #6Senior Member
- Join Date
- Jan 2011
- Location
- Virsbo, Sweden
- Posts
- 114
Thanked: 11
Yes, I also prefer darker scales so I will either stain them black or use ferrous sulfate, but it really depends on the piece of wood I use and how the grain looks. I am a bit concerned what will happen when it is exposed to water. I will of course oil them in every once in a while.
Last edited by PMH; 03-30-2012 at 11:12 AM.
-
03-30-2012, 11:21 AM #7At this point in time...


- Join Date
- Jun 2007
- Location
- North Idaho Redoubt
- Posts
- 27,170
- Blog Entries
- 1
Thanked: 13250
A one piece set of scales looks to be an easy endevor, but where the fun begins is in the cutting of the slot for the razor
There are several ways to do this but not one of them is easy, I have tried quite a few except two 1) a Laser.. 2) a CNC machine...
Now to cut them and basically have a Knife design is easy but the razor will not function correctly, there has to be "Flex" or a "Bow" to the scales and that takes a little doing
-
03-30-2012, 11:35 AM #8Senior Member
- Join Date
- Jan 2011
- Location
- Virsbo, Sweden
- Posts
- 114
Thanked: 11
I think I know what you mean. I would have to make the scales kind of flare out and then bring them in when i pin it? Originally Posted by gssixgun

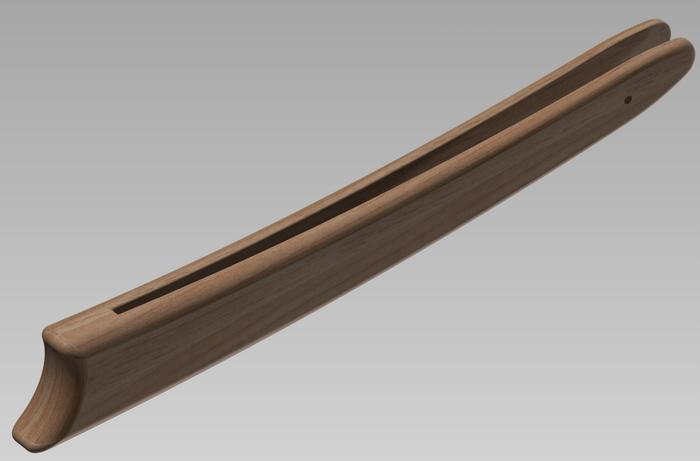
I also made a slight change to the design to make it less "bulky", what do you think?

Last edited by PMH; 03-30-2012 at 11:48 AM.
gssixgun likes this.
-
03-30-2012, 11:47 AM #9At this point in time...
- Join Date
- Jun 2007
- Location
- North Idaho Redoubt
- Posts
- 27,170
- Blog Entries
- 1
Thanked: 13250
Yes they have to flare, and I have done it with the cut and I have done it with steaming and forming the wood
Looking for link to the thread
http://straightrazorpalace.com/works...solutions.html
There ya goLast edited by gssixgun; 03-30-2012 at 11:52 AM.
cudarunner likes this.
-
03-30-2012, 11:59 AM #10Senior Member
- Join Date
- Jan 2011
- Location
- Virsbo, Sweden
- Posts
- 114
Thanked: 11
Thanks!!!
That is a great advise, just one question, did you make the cut the same width as the tang or slightly smaller? I guess you would have to make it smaller right?


 Reply With Quote