
Results 11 to 20 of 41
 5Likes
Thread: Norton Waterstone Starter Kit
 LinkBack URL
 About LinkBacks
-
06-08-2012, 06:20 PM #11Senior Member


- Join Date
- Nov 2006
- Location
- New Jersey
- Posts
- 1,139
Thanked: 173
I have used the norton plate and combo stones as a set for the last nine months.
The flattening plate has worked just fine with very little maintenance. I didn't flatten it when new. Recently I replaced it w dmt8c but that wasn't a true need.
The combo stones do everything I need for razors. I might like to switch to a different 1k stone like chosera or shapton at some point but it's not necessary
I've done knives on these a couple times but now use only for razors. Just keep them wet while sharpening and lap well before switching back to razors.
Michael“there is the danger that the ignorant man may easily underdose himself and by exposing his microbes to nonlethal quantities of the drug make them resistant.”---Fleming
-
06-14-2012, 02:59 AM #12Senior Member


- Join Date
- Apr 2012
- Location
- Diamond Bar, CA
- Posts
- 6,553
Thanked: 3215
Spinsheet
That’s a great buy and will get you started and keep you going for a long time.
No need to worry about divorce, once she starts using a “Sharp Knife” there’s no going back, she’ll just want better knives. Knife sharpening is a different skill, similar but not the same. There is a lot of good information and video on knife sharpening on-line. Sharpening a knife is a good way to break in a Norton. Some Norton’s need some serious lapping before using on a razor. A knife is more forgiving, thicker blade and will teach you how to feel the stone before you put a razor to it. 1K sharp is plenty for most kitchen work.
If you are going to sharpen knives or tools, you will need to re-lap when you switch to razors. You can do so with Wet Dry sand paper 220/320 on glass or something FLAT. If you use the Norton flattening stone you will still need the Wet Dry. Use lots of water and make sure the new hone is smooth with no grit from the flattening stone.
A Diamond hone - 325 grit will make your life much easier and will be a good investment for lapping & slurry making. It can also be used for chip removal.
There’s a lot of talk about stones here, but really that setup is all you need, perhaps a finisher down the road. A C-12k, Ark Translucent or Black Surgical are inexpensive finishers that will give you a very shave ready edge. You can achieve similar results with a pasted strop, Chrome or Cerium Oxide, post 8K on a budget.
-
06-14-2012, 05:28 PM #13Senior Member

- Join Date
- Feb 2010
- Location
- Annapolis, MD, USA
- Posts
- 138
Thanked: 2
I did play with the stones a bit last night. I took a really horrible razor that couldn't even cut arm hair and when I finished, it still couldn't...
I didn't use the flattening stone first. just started honing on the stones as they were out of the box. I'll hit each one with the flattening stone before I do anything with the razors this evening.
I have Lynn's DVD which I left at work yesterday so I really didn't have his instruction last evening, I'll make sure that I have it this evening just to give me a good baseline. I believe that I have a 220/1000 and a 4000/8000. What should I start at with a razor that is not close to shave ready but has no chips in the blade? 1000 and work up? I'm sure the 220 is too coarse for anything but the most damaged edge.
I was disappointed that the DVD that came with the stones was limited to chisels, not a word about knives. I'll search around for some videos online for that. Anyone have any links to any favorites? I need to at least get one knife sharpened this weekend or there will be hell to pay. I prefer not to find out how those Norton stones taste...
-
06-14-2012, 06:49 PM #14'tis but a scratch!


- Join Date
- Oct 2010
- Location
- Durango, Colorado
- Posts
- 2,080
- Blog Entries
- 2
Thanked: 443
Unless you have extremely high-quality kitchen knives, don't bother sharpening them beyond 1000 grit. Finer edges than that won't stand up to kitchen use anyway, unless you spent some big bucks on the blades.
Do flatten your hones before using them on your razors. Out of the box, the surfaces are quite irregular, and many people have found that the outermost layer of the hone isn't suitable for razor honing. Probably some weird effect of being close to the mold, or heated more in the curing, or some such artifact of its manuracture.
Yes, start at 1000 to set your bevel. If you don't know what it means to set the bevel, do not touch the stone with the razor yet. Backtrack and study a little bit, watch Lynn's DVD and do some reading.
Just don't rush in. You'll only end up with hone wear and frustration. For what it's worth, my first honing success came after I got the Norton 4k/8k and doggedly followed the pyramid honing instructions. Check out the wiki on honing for more on that.
Best wishes to you.
-
06-14-2012, 07:46 PM #15Senior Member
- Join Date
- Apr 2012
- Location
- Diamond Bar, CA
- Posts
- 6,553
Thanked: 3215
There is tons of good video from Lynn, Sixgun, Spazola, Hibudgl and a whole bunch of others. I agree do some research, watch the videos, tape the bevel so you do no harm then proceed slooowly.
The same with knife sharpening lots of good video, watch it before you put a knife or razor to your hones.
A good hone, will not make you a good honer, I don’t care how much you pay for the hone.
-
06-14-2012, 08:13 PM #16Senior Member

- Join Date
- May 2010
- Location
- Upstate South Carolina
- Posts
- 3,308
Thanked: 987
Hey Spinsheet-I got that same kit (with that same useless video!), and sold it to the wife as a good all-around sharpening system; the only deal is that I have to keep all the kitchen knives (and boys' pocket knives) sharp, but as I enjoy honing anyway, it's just more fun for me. But yeah, as others have said, lap 'em up good 1st, with no pressure-let the weight of the stone do the work, or you'll end up with the dreaded grit embedded in that soft water-stone.
As a relative honing newbie myself, I have found that it does indeed pay to watch all the videos you can (Lynn, gssixxgun, hi-bud-gl, all of those). Secondly, I have found the easiest method to a successful bevel in Lynn's circles on the 4k side; there's a video for it on here, and it's practically foolproof. The 4/8k pyramid system after that is another fairly simple way to get a blade shave-ready. Enjoy the journey-once you get one to shave-ready, you'll be hooked, and will want to hone everything in sight!
-
06-15-2012, 12:50 AM #17Senior Member
- Join Date
- Feb 2010
- Location
- Annapolis, MD, USA
- Posts
- 138
Thanked: 2
As far as 'setting my bevel', I looked at Lynn's DVD (nothing on bevels there) and here but I see nothing on how to actually set the bevel. I see explanations on the different bevels but not how to actually make them. Am I missing something?
-
06-15-2012, 01:16 AM #18'tis but a scratch!
- Join Date
- Oct 2010
- Location
- Durango, Colorado
- Posts
- 2,080
- Blog Entries
- 2
Thanked: 443
You may be missing something. I'll work from the first diagram in the link (with thanks to the diagram's original creator): Originally Posted by spinsheet

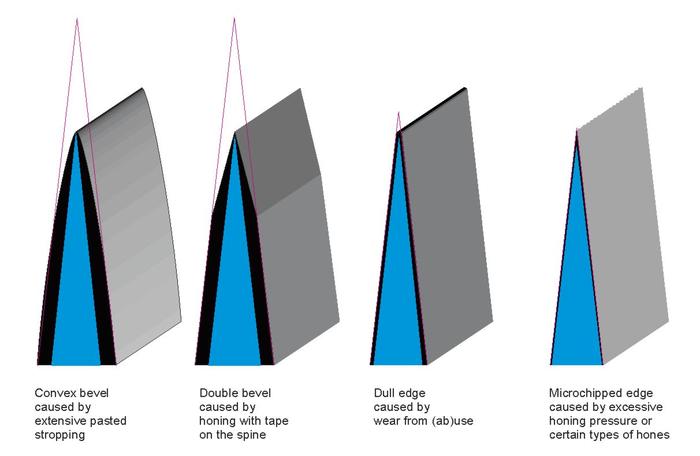
The purple lines outline the triangle formed by three points: the front of the spine, the back of the spine, and the point of intersection you acheive by honing away metal along the edge of the razor. That honing, to create that point of intersection, is what we call setting the bevel. It is critical because if you haven't done it, all the work you do with finer hones achieves nothing except to polish metal that's significant microns back from your shaving edge. Instead of working on a triangle, you'll be working on a four-sided polygon with really shiny corners.
In this diagram, the purple outline shows the previous bevel from a previous honing, and different ways in which the current edge can have worn back from that point. The blue shows what you want to reveal in your current honing session: a new triangle, maybe a micron or two shorter than the previous one, that you achieved by honing away the steel shown in black. That honing will be done at 1000 grit. Next, at 4,000 grit or so, you'll smooth away the teeth left by the 1k stone (even at 10x mag, those teeth look nasty!), then at 8k you'll polish the edge up to something you wouldn't mind rubbing on your face. Beyond 8k is icing.
I hope this makes it a little clearer for you. In short, the purpose of bevel-setting is to create a microscopically perfect triangle. You can refine that triangle into a nice shaving edge. If you don't take the time to create--and verify--a good bevel, then you'll waste a lot of time using your higher grits to polish the four corners of a polygon.
-
The Following User Says Thank You to roughkype For This Useful Post:
lloydw (06-15-2012)
-
06-15-2012, 01:47 AM #19Senior Member
- Join Date
- Feb 2010
- Location
- Annapolis, MD, USA
- Posts
- 138
Thanked: 2
@roughkype
I appreciate you reinforcing those images but I'm still not sure what to do. I see that it explains what the different bevels are but I don't know how to choose which one I want or how to achieve it. I'm sure that I'm missing something here, just not sure what...
-
06-15-2012, 02:45 AM #20Pasted Man

- Join Date
- Jul 2010
- Posts
- 1,283
Thanked: 269
The idea of setting a bevel is simple. Actually doing it takes time and fortitude. First really flatten your stones that includes the flattening stone. Next your going to spend awhile on the 1 k stone. There are a bunch of strokes you can use. However you already know how to strop use the same stroke you do for that but lead with edge instead of the spine. Same rules apply keep the spine on the stone, flip on the spine and a light touch. Now you are going to do that until you get a sharp even edge. The amount of laps needed will vary depending on the blade. There are test describe in the wiki that you can use to see if your bevel is set. http://straightrazorpalace.com/srpwi...ests_explained
Most people use one or the other of these.


 Reply With Quote