
Results 11 to 20 of 38
 15Likes
Thread: First time honing - questions...
 LinkBack URL
 About LinkBacks
-
07-01-2015, 03:46 AM #11Senior Member


- Join Date
- Jan 2015
- Location
- Pinole, ca
- Posts
- 1,526
Thanked: 339
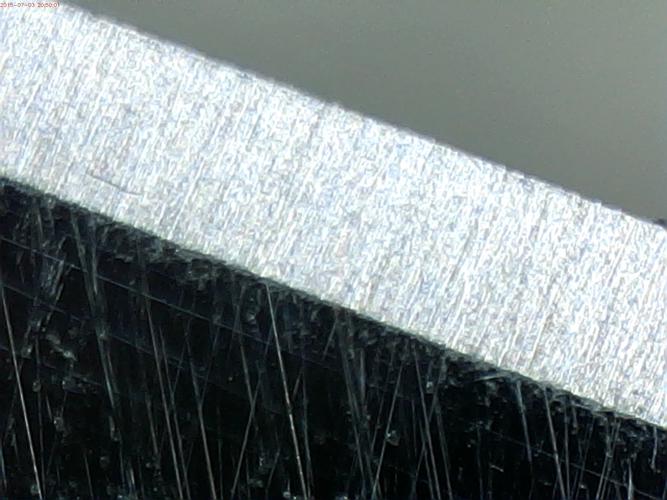
The last picture makes it obvious that you need a few more strokes. You can see scratch that runs parallel to the edge from when you were doing circles with some pressure that haven't quite been completely removed by your lighter finishing strokes.
-
The Following User Says Thank You to jfk742 For This Useful Post:
pcm (07-01-2015)
-
07-01-2015, 04:01 AM #12Senior Member


- Join Date
- Apr 2012
- Location
- Diamond Bar, CA
- Posts
- 6,553
Thanked: 3215
Almost, I would remove the circle stria in the last photo. Removing it now will save you a lot of time on higher stones. There is probably more circle stria so a few more strokes on the 1k, will make your life easier, on the higher grit stones.
The 220 is pretty course, so you may get some chipping at higher grits. If you do you will have to remove a bit of the edge to get to good steel. You just want to get the bevels close with low or aggressive stones, then seal the deal with a 1k. See what happens.
At 1k you just want the edge to grab hair, check the toe, middle and heel.
Make sure to check the tip of the toe and the heel, that the bevel goes all the way to the edge.
You are close, clean up the horizontal stria with lite pressure and move up. The edge will begin to straighten out on a 3 or 4k and really get straight with an 8K.
-
The Following User Says Thank You to Euclid440 For This Useful Post:
pcm (07-01-2015)
-
07-02-2015, 12:02 AM #13Senior Member

- Join Date
- Dec 2014
- Location
- Southern NH
- Posts
- 562
Thanked: 41
Ok, with the 1K Norton, I did 35 sets of 15 X strokes. The last 5 sets were just the weight of the blade, as light as I could do it. Looking at the edge straight on, the bevel meets perfectly all along the length of the edge. I cannot see any grooves parallel with the edge, only one or two diagonal (like the one shown below). Here are shots from either side:
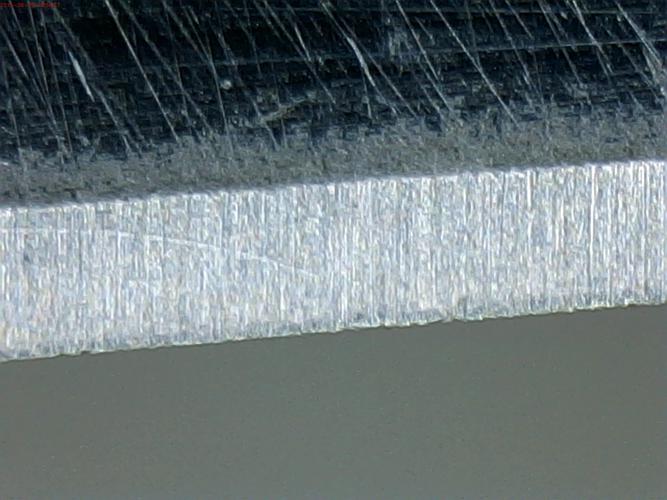

It cuts arm hairs pretty easy, across the whole length of the blade.
Seems like I'm ready for the Norton 4K/8K. Any suggestions there? Do I do a pyramid, like Lynn's video mentioned? Any detailed suggestions would be appreciated.Regards,
PCM
-
07-02-2015, 04:19 AM #14Senior Member
- Join Date
- Jan 2015
- Location
- Pinole, ca
- Posts
- 1,526
Thanked: 339
I do light pressure circles, then x strokes, weight of the blade circles, weight of the blade x strokes then look at the bevels. They should have a consistent hazy look to them on the 4k, under magnification the scratches should look consistent, no deep striations from the 1k left. Don't leave any of the parallel scratch marks from the circle strokes. Again don't move on until its perfect.
I would do a few more passes on the 1k. Get the whole bevel consistent. The fact that the cuts from the circle strokes can still be seen is reason enough to assume that the edge isn't as good as it could be on the 1k. Looking at the depth and width of that scratch makes me think its from your previous hone. You may want to do another round of light strokes to get rid of those scratches. When those are gone do your super light strokes and check again under magnification.Euclid440 likes this.
-
The Following User Says Thank You to jfk742 For This Useful Post:
pcm (07-03-2015)
-
07-02-2015, 04:53 PM #15Senior Member
- Join Date
- Apr 2012
- Location
- Diamond Bar, CA
- Posts
- 6,553
Thanked: 3215
I also think the deep scratches are from the 220 grit and you may have some chipping as a result.
220 and even lower grits are common for knife sharpening, but not for razors, because they cause too much trouble on the back end, the finish. Just remember it is not just about sharp, a straight edge is comfortable, micro chipping on a knife does not matter as much or often at all.
Any time that you save, is paid back in spades, on the high grits and often you end up going all the way back to, at least the 1k to remove deep stria and possibly a new edge.
Try the 4k and see what the stria pattern and the edge look like. An easy way is to ink the bevels with colored ink and any missed stria shows up quickly. Ink will fill the stria and remain until you hone it out. Or hone heel forward and you will have a completely different 4k stria pattern.
With this razor because of the 220 grit stria, I would start with, 2 sets of 20 circles to remove as much of the stria as possible, if it looks good, go heel forward X strokes, until all the old stria is removed. You will still see some chipping on the edge at 4K but it should start to straighten up.
If you still see a lot of deep stria, or you can trace a deep groove to a chip on the edge, go back to the 1k and completely remove the stria with circles in sets of 20, more than 20 will build a large burr which will break off and possibly cause more problems and remove more steel.
Do it now or it will make you crazy…later.jfk742 likes this.
-
The Following User Says Thank You to Euclid440 For This Useful Post:
pcm (07-03-2015)
-
07-03-2015, 02:49 AM #16Senior Member
- Join Date
- Dec 2014
- Location
- Southern NH
- Posts
- 562
Thanked: 41
Thanks folks for the suggestions. I'll stick with the 1K longer and see if I can get the groves removed. Will try more X strokes and if it doesn't improve will try sets of 20 circles.
Too late today, but I'll try tomorrow.Regards,
PCM
-
07-04-2015, 01:03 AM #17Senior Member
- Join Date
- Dec 2014
- Location
- Southern NH
- Posts
- 562
Thanked: 41
Did seven sets of 20 light circles, and then 40 sets of 15 X strokes. It's looking better, and most of the edge looks like this:
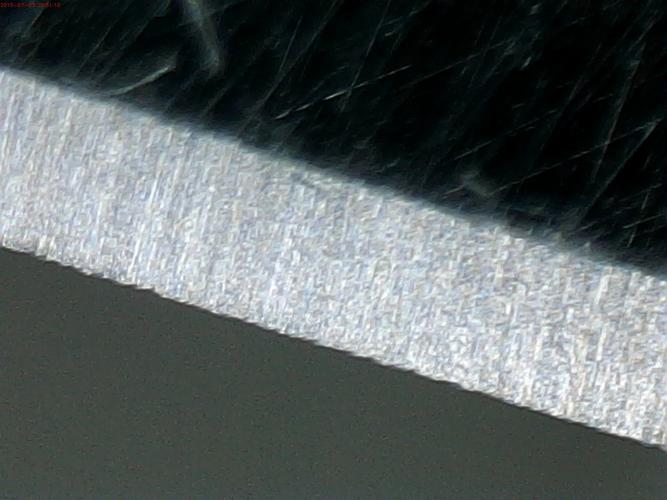
There is barely any horizontal marks. I'll keep playing with it a bit more.jfk742 likes this.Regards,
PCM
-
07-04-2015, 01:06 AM #18Senior Member
- Join Date
- Dec 2014
- Location
- Southern NH
- Posts
- 562
Thanked: 41
Ignore the last two images. There were old, and I tried to edit with the new pictures and now it has both.
Regards,
PCM
-
07-04-2015, 01:46 AM #19Senior Member
- Join Date
- Apr 2012
- Location
- Diamond Bar, CA
- Posts
- 6,553
Thanked: 3215
Looks good, strop 15-20 laps on linen or canvas and move to the 4k.
Do 2 sets of 20 circles, then X strokes to remove the 1k stria.
-
The Following User Says Thank You to Euclid440 For This Useful Post:
pcm (07-04-2015)
-
07-04-2015, 12:07 PM #20Senior Member
- Join Date
- Dec 2014
- Location
- Southern NH
- Posts
- 562
Thanked: 41
Interesting. I didn't know about stropping in between 1k and 4k. Can you elaborate on how that helps improve the edge (just trying to understand what I should see before and after stropping)? Originally Posted by Euclid440

Thanks for the guidance!Regards,
PCM


 Reply With Quote