
Results 131 to 140 of 156
 616Likes
 LinkBack URL
 About LinkBacks
-
09-07-2017, 11:53 PM #131'with that said'


- Join Date
- Aug 2010
- Location
- Walla Walla in WA State USA
- Posts
- 11,260
Thanked: 4238
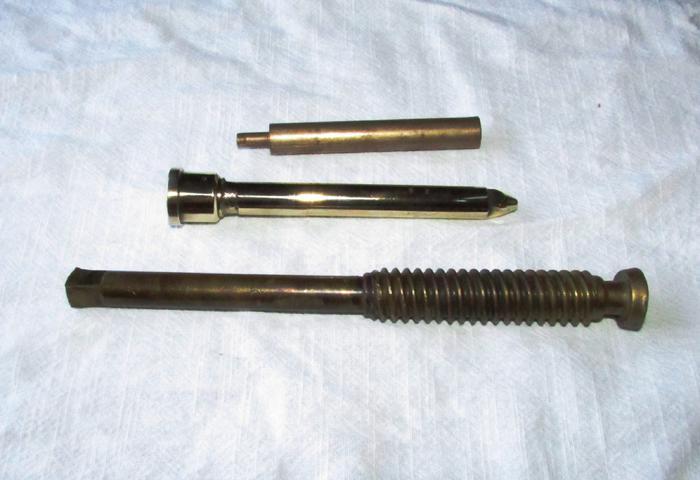
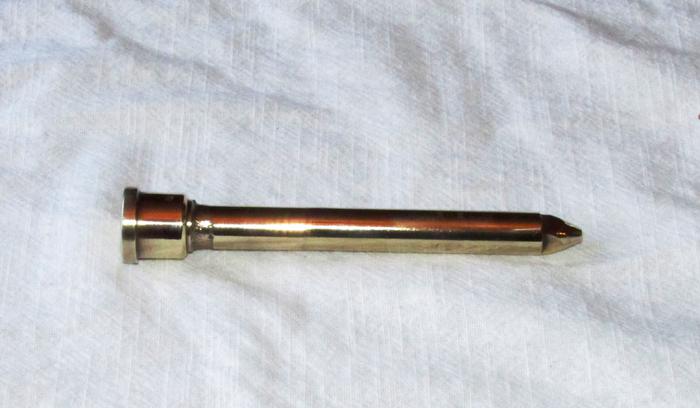
I needed to R&R my front tire on my Harley so the brake caliper needed to be removed. In the past I'd just loosened the master cylinder's cover and used my fingers to press the piston back a bit but this time I needed to do more that that. I have the chrome and gold Ride to Live Live to Ride trim and I didn't want to bugger it up when I used a C-clamp so I made a modification to one of my C-clamps and it's now a specialty tool.
I cleaned the surface of the piece that's on the end of the threads up with acetone and then sanded and buffed the surface. I used a socket that was just slightly larger in diameter and traced the pattern on a scrap piece of 1/8" leather. Then a thin coat of Barge contact cement which was allowed to dry and a second coat was applied and when dried the leather was clamped well and allowed to setup for an hour.


I will confess to not planning far enough ahead as after the leather piece was secure I went ahead and cleaned up the threads really well, I also straightened the rod used to tighten and use some Kroil Oil to de-rust where the ball turns along with the female threads in the C-clamp and once well de-oiled (except for a light coat of Ballistol in the ball area) all work great!
So it's now stored away from the other C-clamps ready for it's next use on the brakes of my Harley. Our house is as Neil left it- an Aladdins cave of 'stuff'.
Kim X
-
12-15-2018, 01:05 AM #132Senior Member


- Join Date
- Oct 2010
- Location
- 50 miles west of randydance
- Posts
- 9,699
Thanked: 1355
This post has stuck with me and I got a couple of brass stems from some valves that got replaced at work. Just got them home today. Didn't have a ruler handy so the spoon and flashlight are for reference. Originally Posted by cudarunner

The one is a little on the large size.

-
12-15-2018, 01:40 AM #133
Tim, I got out one of my service manuals because I know it says it in there somewhere's but I can't find it right now. They say to always put anti-seize on an axle before putting one back in. I've had them where the axle wouldn't come out because water gets in there from washing a bike, rain or moisture & so on. That way the next time you have to take the wheel off, the axle will come out easily. I have an old axle I use that was damaged on the end & another one to show what happens when one won't come out easily.


I also have a set of brass punches but the brass hammer & ground down axle in the 1st pic is what I usually use. The other 2 pics are of a damaged axle. Then if one is much more difficult, I use the same hammer or another large hammer & a brass punch. Put some anti-seize on it when you go back together & it will be much easier next time. BTW, you can see Harley makes the axle smaller at the end just for that reason. I. have always put the nut on flush with the end of the axle & tap it to get it moving, then remove the nut.Last edited by engine46; 12-15-2018 at 01:52 AM.
-
12-15-2018, 01:48 AM #134Senior Member
- Join Date
- Oct 2010
- Location
- 50 miles west of randydance
- Posts
- 9,699
Thanked: 1355
I don't have an axle to remove at the moment but I have always liked brass punches and the idea of using valve stems to make them appealed to me.
engine46 likes this.
-
12-15-2018, 01:50 AM #135
Here ya go. Read #3.

Of course any brand will work.
-
12-15-2018, 03:19 AM #136Senior Member
- Join Date
- Oct 2010
- Location
- 50 miles west of randydance
- Posts
- 9,699
Thanked: 1355
Don't know if I will ever own a bike with a drive belt. Except to drive the generator.
sharptonn likes this.
-
12-15-2018, 03:27 AM #137Razor Vulture

- Join Date
- Oct 2010
- Location
- Lone Star State
- Posts
- 26,208
Thanked: 8626
Those swingarm bolts can be a pain too. I have a tool that goes in my air-hammer that works for axle and swingarm bolts.
Some PB Blaster penetrating oil.
Usually come right out unless it has been out in the weather. Changing bits and hammering back and forth!
Last edited by sharptonn; 12-15-2018 at 03:32 AM.
engine46 likes this.
-
12-15-2018, 03:29 AM #138Razor Vulture
- Join Date
- Oct 2010
- Location
- Lone Star State
- Posts
- 26,208
Thanked: 8626
I can see you on a service cycle, Tim! Originally Posted by 32t
engine46 likes this.
-
12-15-2018, 03:34 AM #139
My '03 fXDWG is the newest bike & the only rear belt drive I'll ever own. I got it because it was the fastest way for me to ride at the time. My shovel was all in pieces, & I mean all the way down to the crank. Now i have a 2nd shovel I need to finish. First shovel still in pieces.
Those swingarm bolts................same thing, anti-seize.
-
12-15-2018, 03:50 AM #140Senior Member
- Join Date
- Oct 2010
- Location
- 50 miles west of randydance
- Posts
- 9,699
Thanked: 1355


...........


 Reply With Quote

