
Results 41 to 50 of 55
 20Likes
Thread: Is anyone using a Planer ???
 LinkBack URL
 About LinkBacks
-
03-13-2012, 04:49 PM #41Historically Inquisitive


- Join Date
- Aug 2011
- Location
- Upstate New York
- Posts
- 5,782
- Blog Entries
- 1
Thanked: 4249 Yeah right!! thats why most of my woodworking are hand tools, a drill press is made to drill holes, not plane wood, if that little planer grabs tight at 1800 rpm your piece of wood will now become a flying weapon, and who knows where your hands and finger will end up !!
 Originally Posted by randydance062449

-
03-13-2012, 05:49 PM #42Senior Member

- Join Date
- Jan 2011
- Location
- Roseville,Kali
- Posts
- 10,432
Thanked: 2027
Thats why I have my wife do stuff like that Originally Posted by Martin103
 Martin103 likes this.
-
03-14-2012, 04:53 AM #43Senior Member

- Join Date
- Jun 2011
- Location
- London, United Kingdom.
- Posts
- 227
Thanked: 47
Hi, Originally Posted by randydance062449
I use the MDF technique mostly on the sanding jig because feeding a short thin strip between the fence and the sanding drum can be awkward as you can't easily grip a short strip as it passes out of the jig.
Care does have to be taken with the rotary planer, as does any machinery involving cutters moving at speed, I make sure that my hands are never closer than a couple of inches to it when operational, TBH it looks a lot more scary than it actually is, the cutters are set back from the edge so unless you stick your hand directly under it there should be no issues, the only thing that initially worried me about using it was the possibility of the cutter somehow working it's way loose from the chuck, and stressing the bearings on the drill press, they are not designed for horizontal forces, however I found that so long as the cutters are sharp and shallow cuts are taken it works smoothly, the link I posted to the LMI site shows a good way of setting up the table to avoid kickback and the possibility of the cutters binding on the exit side. I have been using the set up for a number of years now and have had no issues.
I am away from home this week, when I get back I will take some pics of my sanding jig set up and post them, it's not fancy it's built out of plywood but it works, and better still it cost me just the price of some sanding drums to make. At the time I could not find an equivalent of the Stewart McDonald jig in the UK and importing from the USA costs a fortune once our customs have applied their draconian taxes so home -brew was the only real option for me.
-
The Following User Says Thank You to osdset For This Useful Post:
randydance062449 (03-14-2012)
-
03-16-2012, 03:07 AM #44
Late to the party. I am finishing up 2 dozen sets right now. I resaw the blocks in my bandsaw down to 1/8 inch. Then I run them through a surfacing drum sander to get them to final thickness. With a plainer, the wood you run through needs to be about 8 inches long minimum. The in feed and out feed rollers need some surface to grab onto. If you run shorts through a plainer the wood can get kicked out at high speed because you did not have a positive lock with the rollers. I have a Jet 18/24 sander and it works wonderfully for surfacing down scales. I can go sub 1/16 inch with it if I wanted.
gssixgun likes this.
-
03-17-2012, 07:56 PM #45Senior Member
- Join Date
- Jan 2011
- Location
- Roseville,Kali
- Posts
- 10,432
Thanked: 2027
Took it for a test run today,very well built,very easy to use,wish I had thought of it,great tool.
-
The Following User Says Thank You to pixelfixed For This Useful Post:
randydance062449 (03-17-2012)
-
03-17-2012, 08:54 PM #46Hones & Honing


- Join Date
- May 2005
- Location
- Saint Paul, Minnesota, United States
- Posts
- 8,023
- Blog Entries
- 1
Thanked: 2209
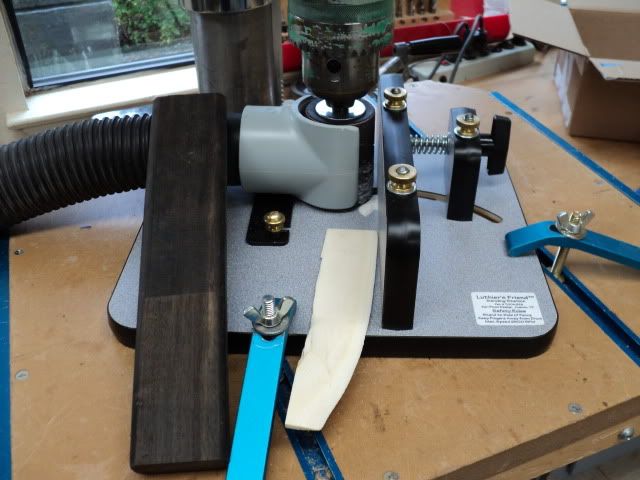
Thank you for the great pic. It is very informative. I built a similar device a year ago but noticed that the thickness was not exactly uniform from one edge of the scales to another. There was not much of a difference but some. The mistake I made was to not have the horizontal bolt centered. Please let us know what your measurements show after you have used it a few times.
I do like Osdset's idea of using a separate piece of MDF with double sided tape and the wood stock on top to push thru the work. Reaching around the drum to pull thru the wood scales can be a bit iffy for your fingers.Randolph Tuttle, a SRP Mentor for residents of Minnesota & western Wisconsin
-
03-17-2012, 09:14 PM #47Senior Member
- Join Date
- Jan 2011
- Location
- Roseville,Kali
- Posts
- 10,432
Thanked: 2027
I ran it at 1500 RPM,max I think is 2200,nothing happens quickly,as in getting the material shooting out of the jig,I think if doing already shaped scale blanks using tape would be a great idea.My intent is to cut the blanks after setting the thickness so I can run say a 2x8ish pce thru the tool.
In looking at the design,you could not make one using just a standard sanding drum as it would flex in the arbor and your work pce would taper,look at the site and you can see the drum has a bearing on the bottom that fits into a recess,keeps it square,neat tool,you can hog off a 1/16 per pass no prob,down to they claim 0.01 in.Last edited by pixelfixed; 03-17-2012 at 09:16 PM. Reason: correction
-
03-17-2012, 09:31 PM #48Hones & Honing
- Join Date
- May 2005
- Location
- Saint Paul, Minnesota, United States
- Posts
- 8,023
- Blog Entries
- 1
Thanked: 2209
"the drum has a bearing on the bottom that fits into a recess,keeps it square"
Cool, thanks for mentioning that. That is a critical part as is the hold down on the end of the fence. Both of which I did not have on mine.
 Randolph Tuttle, a SRP Mentor for residents of Minnesota & western Wisconsin
-
03-18-2012, 03:14 AM #49Senior Member
- Join Date
- Jun 2011
- Location
- London, United Kingdom.
- Posts
- 227
Thanked: 47
The bearing is also very useful for profile sanding, take the fence assembly off and raise the drum so that the bearing is clear of the base make some accurate templates of your favourite scale shapes from plexiglass or whatever, grab the ever -so -useful double sided tape fix your slightly oversize scale blank to it with the tape or pre drill the pin holes and pin / screw it down then you can sand it exactly to shape by running the template against the bearing.
Congratulations! you now have a scale making production line.
-
The Following User Says Thank You to osdset For This Useful Post:
pixelfixed (03-18-2012)
-
03-18-2012, 03:23 AM #50Senior Member

- Join Date
- Oct 2009
- Location
- Northern Virginia
- Posts
- 380
Thanked: 193
Can't say I've worked with it - at $600 it's out of my price range and I don't have indoor space to use it, but I've had my eye on this micro-planer for a while. It's made specifically for hobbyists who work in small scales - wooden model ship builders, etc.:
PROXXON TOOLS: Micro Planer DH40 - The General Store


 Reply With Quote
