Results 11 to 20 of 228
 23Likes
Thread: ONE COTICULE HONING
 LinkBack URL
 About LinkBacks
-
04-29-2009, 02:07 AM #11


- Join Date
- May 2005
- Location
- St. Louis, Missouri, United States
- Posts
- 8,454
- Blog Entries
- 2
Thanked: 4942
Thanks Bart,
I definitely appreciate your devoted passion to the Coticule an your elabote explanation here. I would agree whole heartedly that it is entirely possible to hone a razor with the Coticule as your only stone. Based on your explanation the repeatablility of the process may be there, but the amount of time and the variation of the amount of times you may have to go back to the stone, let alone the taping process would in my mine apply for the hobbiest at best.
I would be interested in the type of rubbing stone you are using and the grit comparison of the various slurries you generate if possible and to know if there is a way to describe coming up with the slurries ie, a lite slurry is 20 rubs with X type of slurry stone, a medium is 20 rubs with the same or different slurry stone.
I am experimenting with these methods as you introduce them and usually with 20-50 razors to determine the benefits. It would nice if you would indicate how many razors you do these with before you introduce them to us.
Keep up the good work.
Thanks,
Lynns0litarys0ldier likes this.
-
The Following User Says Thank You to Lynn For This Useful Post:
Bart (04-30-2009)
-
04-29-2009, 02:07 AM #12Citizen
- Join Date
- Apr 2006
- Posts
- 246
Thanked: 55
Bart, excellent post. If I may I would like to offer an alternative to those who don't care to use the tape on the spine (such as myself).
The difference I'd recommend is when you are done with the slurry clear the coticule with water. Next raise another light slurry and without using it clear it off the stone. The object here is to renew the stone's surface. Then with water only perform circular honing motions on each side 20 to 30 rounds with some light pressure. Make sure each side is given an equal number of rounds. Back hone the razor once or twice. Then hone forward with water about 20 - 50 times without any pressure. Then forward hone with a wet lather 20 - 50 times without pressure.
Regards,
ELFrankenstein likes this.
-
The Following User Says Thank You to elbonator For This Useful Post:
Bart (04-30-2009)
-
04-29-2009, 04:57 AM #13Always Learning

- Join Date
- Dec 2008
- Location
- Bloomingdale IL
- Posts
- 101
Thanked: 41
Thanks Bart
 as always your knowledge and insight benefit us all, and i appreciate the time and effort that you give us !
since I am a recently converted coticule guy, you method fits right in with a planned experiment, I have a 7 day set of razors (this will provide an excellent test group since they are all identical) , and I now have 3 coticules, a pink ( a very fast cutter) , a green combo, and a yellow, so with my novice hands, I will try your new method this weekend and report my results.
Dank u voor alle uw hulp, bent u uitstekendLast edited by currentman; 04-29-2009 at 05:03 AM.
-
The Following User Says Thank You to currentman For This Useful Post:
Bart (04-30-2009)
-
04-29-2009, 07:41 AM #14Coticule researcher
- Join Date
- Jan 2008
- Location
- Belgium
- Posts
- 1,872
Thanked: 1212
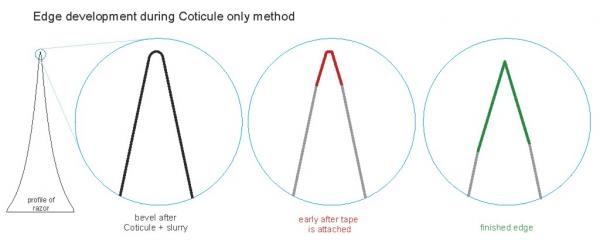
Yes I did. But it required 2 to 3 layers of tape. As I tried illustrating with the drawing, when the angles between the main and the second bevel alter only very little, it takes a wider secondary bevel to achieve enough refinement. My idea was to to create a narrow strip with light slurry, not too wide, so that the Coticule with water can still offer some meaningful refinement along with its polishing qualities. This actually was the step that kept escaping me during many other experiments in the past year. Originally Posted by RayG

It would defeat the purpose. Originally Posted by BHChieftain

That said, you could experiment with using any other fine hone as replacement of the Coticule with light slurry of Step5 (right after the edge is taped).
So far, I 've done over 20 razors in total with this method. I have not needed to go back to the hones once. I have placed one "Coticule" aside during the honing and started over on another one. That stone was probably not even a true Coticule: it was a lapped piece of rock that I picked up at an abandoned Coticule mining pit, it had a cyanish hue. The rest of the Coticules worked fine, but I have limited the tests to those that generate slurry (the vast majority of Coticules), without the need for special tricks. I have a couple of extremely hard specimen, that don't generate slurry with the normal procedure. I will try those in the next weeks. Originally Posted by Lynn
The average time to go through the entire procedure is less than 15 minutes, on most razors so far, including a couple that came off 600 grit after a restoration job. There was a fellow straight razor user here, about 10 days ago, who relied mainly on the Dovo pastes for sharpening. Reestablishing flat bevel faces on his razor took me almost an hour, but I was talking and pausing all the time. Checking with the microscope told me I was catching up, otherwise I would have went to the DMT-600 first.
I have two slurry stones, both Coticule of course . They're nothing special. I don't count rubbing laps. I create a slurry with milky consistency for the bevel correction stage (step 3). It's not that critical. For the other steps that involve slurry, I use a much lighter slurry, maybe adding as much water as there's slurry on the hone. As long as it's a faint slurry, it seems ok.
Thanks, I look forward to your results. I'm especcially curious to the results of someone with "novice hands", as you put it. I aimed this method at being as fool proof as possible. Originally Posted by currentman
No offence, I hope.
Thanks,
Bart.Last edited by Bart; 04-29-2009 at 07:48 AM.
-
The Following User Says Thank You to Bart For This Useful Post:
jakoblah (04-29-2009)
-
04-29-2009, 12:31 PM #15Senior Member

- Join Date
- Mar 2009
- Location
- San Jose, CA, USA
- Posts
- 509
Thanked: 108
After using this method, I'm assuming you'd need to use tape to touch up the razor due to the double bevel?
-Chief
-
The Following User Says Thank You to BHChieftain For This Useful Post:
Bart (04-30-2009)
-
04-29-2009, 01:13 PM #16
- Join Date
- May 2005
- Location
- St. Louis, Missouri, United States
- Posts
- 8,454
- Blog Entries
- 2
Thanked: 4942
Thanks again Bart.
It will be interesting to see how many people can hone 20 razors or one for that matter, at a pace of 15 minutes each using your methods here. As I am following the same protocols with an 8x3 yellow Coticule, I have not been able to match that pace yet, even on new razors. The real key to me is step three. The 2-20 possible trips to the hone are for real, although the new ones are only taking 4-6 trips so far. I am also liking the shave with 10 strokes of chromium oxide after the stone a little better than just of the stone and leather as well. For some reason, the 50 finishing laps on water is taking me over the edge, so to speak, but if I limit to one or two times on the stone at 10 strokes each, I get there. So far I have only used carbon razors, but I think I want to try a few stainless and see if what happens.
This is fun.
Regards,
LynnLast edited by Lynn; 04-29-2009 at 01:40 PM.
-
04-29-2009, 02:14 PM #17Senior Member


- Join Date
- Feb 2008
- Posts
- 32,564
Thanked: 11044
Thanks for another useful post Bart. Personally I find setting a bevel on a coticule a PITA . If that is the only game in town than so be it but having messed with a few razors and various coticules I decided that going through the extra time involved just to say that I did wasn't worth the effort. I'll stick with my 1 and 2K Shapton pros or my DMT 1200. I think you have a DMT 1200 too don't you ? A very efficiant bevel setter.
Another difference in our honing philosophy is when to apply the tape. Since the bevel setting is putting more wear on the spine than any other part of the process I prefer to tape from the beginning and set the bevel. I don't like the idea of the double bevel that would be the result of introducing the tape later in the process. I know that some feel it makes for a stronger edge.
Like Lynn, if I understand him correctly, I prefer an edge that is keener than a coticule by itself will provide so I will typically go to the Escher or maybe the Shapton 15k pro to finish. The edge a coticule leaves is smooth but IME not as comfortable for me as that of the forementioned hones.Be careful how you treat people on your way up, you may meet them again on your way back down.
-
04-29-2009, 02:29 PM #18Senior Member

- Join Date
- Jun 2006
- Location
- Westchester NY
- Posts
- 2,485
Thanked: 184
Great thread. As a hobbyist who has been struggling to get consistent results from the coticule, this is good info to try out.
Jordan
-
The Following User Says Thank You to jnich67 For This Useful Post:
Bart (04-30-2009)
-
04-29-2009, 02:33 PM #19Senior Member

- Join Date
- Nov 2005
- Posts
- 4,521
Thanked: 1636
I am sorry but i have to be respectfully disagree with your method. Originally Posted by Bart
Lets see what makes me not happy.
at first
your first step making 30 strokes in one side then go to another side and make 30 strokes?
You know and understand i am sure about it. it will not be exact amount of pressure put on both sides?
it is just impossible to put same amount of pressure in 30 strokes on both side of the blade. that is why you are saying pay attention to bevel as soon as you see uneven bevel go head fix it? quesion is why? why not do turn the blade and make normal strokes on both side of the blade?
what is your scientific prove 30 x30 in different sides is better then just regular way making strokes?
I am positive doing 30 stroke on one side and 30 strokes another will end up uneven bevel 90% times.
We are humans not machines to put exact pressures while doing 30 strokes.
in extreme case you will end up making 1400 stroke (including 30 +60 on strop)
Now My questions is this
after setting bevel you are taping back of the blade and making 30 strokes with belgian coticule ? you think this will great a new bevel ? I really don't think so.
Lastly i think spending so much time is just waste of time. You can bring any razor in better condition by using Norton 4/8 a lot less time.
Again I personally have nothing against you but i am against your ideas which i think is not right.
I haven't seen any person come back and say they had great shave off of coticule .You can get great shave off coticule but you will need to go next step pastes or escher's or nakayama.
This is my 002 cent.
RESPECTFULLY
SHAMLast edited by hi_bud_gl; 04-29-2009 at 02:35 PM.
-
The Following User Says Thank You to hi_bud_gl For This Useful Post:
Bart (04-30-2009)
-
04-29-2009, 03:06 PM #20---
- Join Date
- Jan 2009
- Posts
- 1,230
Thanked: 278
Good idea. You could be ruthless in the editing and make it short - a sequence of scenes showing how each stage is done, with annotations. As well as a "Director's Cut" full version? Originally Posted by Bart
I think it is only better in that it is faster. Accuracy is less important at the early stage. (Other than big mistakes that will ruin the edge, obviously.) Originally Posted by hi_bud_gl
Doing one side at a time might even reduce errors for a beginner.
-
The Following User Says Thank You to Rajagra For This Useful Post:
Bart (04-29-2009)