
Results 211 to 220 of 2504
 8857Likes
Thread: 51 MG restoration.
 LinkBack URL
 About LinkBacks
-
05-29-2018, 02:09 AM #211Razor Vulture


- Join Date
- Oct 2010
- Location
- Lone Star State
- Posts
- 26,151
Thanked: 8616
That would require math, Mike...The diameter and stroke of the master cylinder..
The same of the booster. Same combined of the front dual cylinders and rear ones....Drum diameters/shoe width. Weight of vehicle.
Yadda Yadda. I do know more volume to the cylinders works fast. However, less volume to them squeezes harder with smaller diameter cylinder. Basically, the booster uses some of the fluid from the master to move a valve in the booster which directs the vacuum to push on the cylinder on the booster. In that regard, the bigger the cylinder on the booster will shove a greater volume to the cylinders. YET a smaller diameter cylinder on the booster will push less volume but with more pressure.
Sigh..... The diameter and stroke of the vacuum diaphragm in the booster comes into play. So does available vacuum from the engine.
I never got into it, but the Girling booster my car had originally worked a bit better, yet it was worn and sucked-up fluid into the vacuum chamber. Still, the universal replacement works much better than no booster at all.
So, finding some aggressive Hawk Racing pads for the front gave it the best brakes yet.
Tight adjustment on the drums is also key.
SO, in that regard, it's an old give it a go thing. I think good friction material is key, no matter what you do.
Check with Hawk racing and see if they have some aggressive street/track compounds for the brakes on your car.
A customer has a very heavy 41 Lincoln Continental with intermediate GM disks all-around. I went with bigger and bigger boosters behind the master, even a dual diaphragm one. Better, yet not good enough.
He suggested huge rotors and multi-piston calipers. I said no way with using his original wheels so that was out.
A light bulb went on and I ordered the street/track pads. Holy SMOKES! It would stand on it's nose!
I wanted to put a smaller booster back on! He liked it like it was.
Sometimes, you have to 'spearment!
Last edited by sharptonn; 05-29-2018 at 02:15 AM.
-
The Following User Says Thank You to sharptonn For This Useful Post:
MikeB52 (05-29-2018)
-
05-29-2018, 02:29 AM #212Str8Faced Gent.


- Join Date
- Aug 2013
- Location
- Orangeville, Ontario
- Posts
- 8,456
- Blog Entries
- 1
Thanked: 4207
And regarding gages, my voltmeter is in fact a smiths, my ahmeter is a Lucas, and my temp?
Almost looks like Treger..
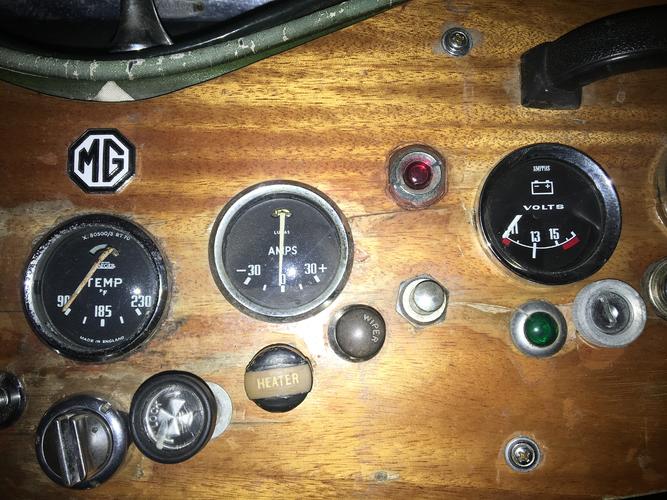
Think ordering a single pole and doing away with the diode glow will be the way to go. But I’d like to keep the ahmeter, maybe.
Once I design and build the new dash center area I will decide if 5 or 6 gages will flow better.
 "Depression is just anger,, without the enthusiasm."
Steven Wright
https://mobro.co/michaelbolton65?mc=5
-
05-29-2018, 02:38 AM #213Str8Faced Gent.
- Join Date
- Aug 2013
- Location
- Orangeville, Ontario
- Posts
- 8,456
- Blog Entries
- 1
Thanked: 4207
The second ignition switch under the voltmeter is to run the auxiliary fuel pump for end of season tank draining btw..
There are a series of brass petcock Vv’s under the rear end that route the fuel to the second pump and to a discharge hose under the front right wing for collecting in a Jerry can. Previous owner was a fussy pharmacist as I mentioned early on in the thread.
However I don’t have the key for the second ignition switch so will replace it with a toggle switch mounted somewhere out of the way, in the new dash build.
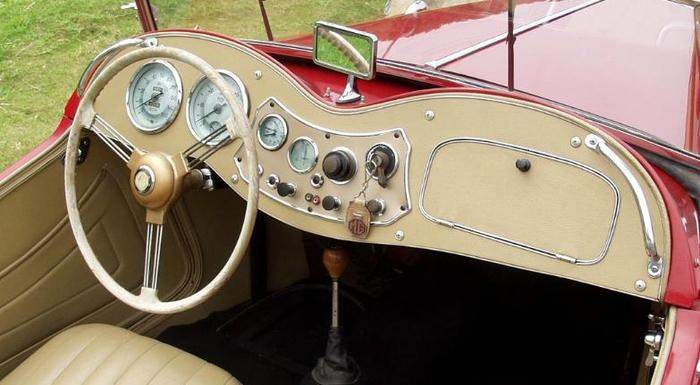
Still not sure if polished aluminum main dash body with a burl center insert will look as good as a newly built wood one, modeled after the original..
Plus not sure if buddy will drop his price on the aluminum one..
And this is what the original looked like, for point of reference gents.

Last edited by MikeB52; 05-29-2018 at 02:42 AM.
"Depression is just anger,, without the enthusiasm."
Steven Wright
https://mobro.co/michaelbolton65?mc=5
-
05-29-2018, 02:55 AM #214Razor Vulture
- Join Date
- Oct 2010
- Location
- Lone Star State
- Posts
- 26,151
Thanked: 8616
That would be expensive to duplicate.
The car likely came with those Jaeger guages. Mine has all Jaeger except the Tach, which is Lucas.
I think Smiths is the only way to get an English voltmeter. That one in your car is a replacement.
Never saw a car with an ammeter AND a voltmeter!
Get some Neverdull on the brightwork and Old English out on that dash. It will look great!
Looks like the original gas gauge is in the tach?Last edited by sharptonn; 05-29-2018 at 03:00 AM.
MikeB52 likes this.
-
05-30-2018, 01:25 AM #215Str8Faced Gent.
- Join Date
- Aug 2013
- Location
- Orangeville, Ontario
- Posts
- 8,456
- Blog Entries
- 1
Thanked: 4207
I’m guessing clock in the tach, and it looks like the small gage beside it might have been a double needle 2 purpose gage as well??

Maybe the original manual calls out specifics.
Took her to work today just cause. And it was nice but shall be a rarity. This car doesn’t like traffic by today’s rush hour standards. My legs are beat from all the peddle action! Hehe.
But the drive home sure was enjoyable! Maybe on the odd Saturday I’ll use her for the hike..
Time for a shower and a shave..
"Depression is just anger,, without the enthusiasm."
Steven Wright
https://mobro.co/michaelbolton65?mc=5
-
The Following User Says Thank You to MikeB52 For This Useful Post:
sharptonn (05-30-2018)
-
05-30-2018, 02:08 AM #216Razor Vulture
- Join Date
- Oct 2010
- Location
- Lone Star State
- Posts
- 26,151
Thanked: 8616
On the original, seems the clock is to the right of the tach
(Tach has the gas gauge in the bottom).
The ammeter is next to the right.
What's the big bakelite thing in the middle?
I assume the ignition is on the right.
The guy's work needs undone.
I like to piggyback circuits with stronger ones to a point.
Sometimes, I can remove all that was done and re-do it.
What was done back then is done archaic.
Hell, they did not even have Bosch relays when that was done?
Ya, the old clutch is hard on ya in the city.
Things were not so congested back then...Last edited by sharptonn; 05-30-2018 at 02:31 AM.
-
05-30-2018, 03:23 AM #217Str8Faced Gent.
- Join Date
- Aug 2013
- Location
- Orangeville, Ontario
- Posts
- 8,456
- Blog Entries
- 1
Thanked: 4207
Heres another dash, the one Id copy if I do actually. Style wise, keeping some of my existing gages and ignition switch.
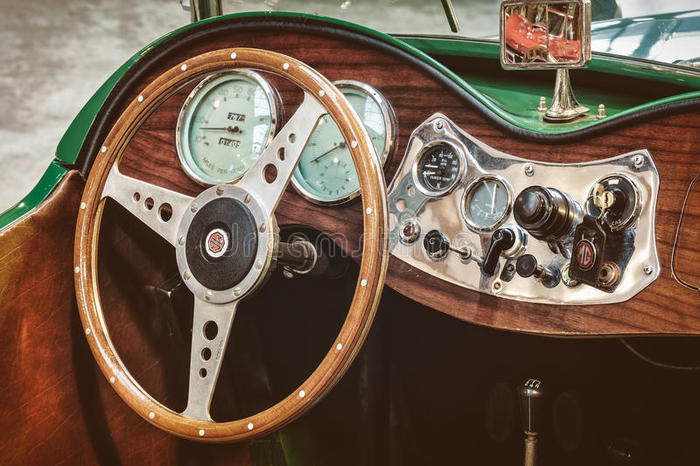
The big bakelite knob was the original light switch, which served as headlight and dimmer basically. The dip was a separate button entirely.
Think the small gage was water temp and oil pressure in one unit and the ahmeter was to the far right beside the headlight knob.
Idiot light for charge, signals, and low fuel level. Horn, choke, and wiper controls as well along the bottom row."Depression is just anger,, without the enthusiasm."
Steven Wright
https://mobro.co/michaelbolton65?mc=5
-
05-30-2018, 03:57 AM #218Razor Vulture
- Join Date
- Oct 2010
- Location
- Lone Star State
- Posts
- 26,151
Thanked: 8616
So that big bulb in the middle was a dimmer switch?
-
07-03-2018, 09:16 PM #219Str8Faced Gent.
- Join Date
- Aug 2013
- Location
- Orangeville, Ontario
- Posts
- 8,456
- Blog Entries
- 1
Thanked: 4207
Replaced my fuel fliter(s) and exhaust pipe to manifold gasket this past weekend.
Amazing how much noise this was starting to make.
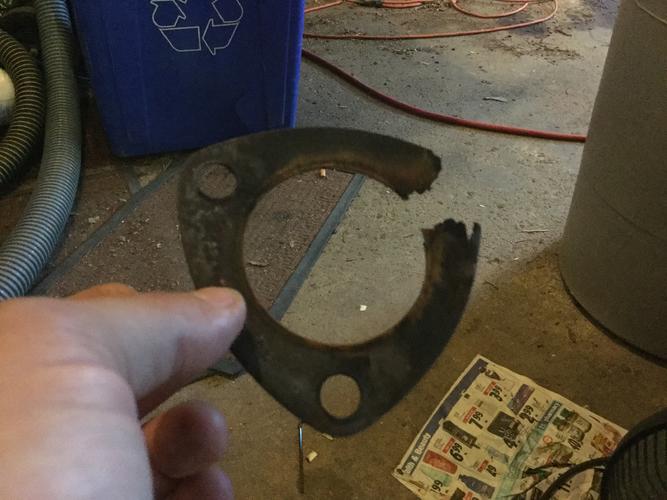
Fuel filters were so clogged Id actually starve under sustained heavy load. Have to pull over and physically disconnect and blow back down the fuel line from the carbs to clear a few holes in the filter, hehe. So much more responsive with full fuel flow!
But hey, Ive put over 3k on her already without significant issues.. (knock on dash)..
Even in this present +32 heat she runs a steady 180..
"Depression is just anger,, without the enthusiasm."
Steven Wright
https://mobro.co/michaelbolton65?mc=5
-
07-03-2018, 09:23 PM #220'with that said'


- Join Date
- Aug 2010
- Location
- Walla Walla in WA State USA
- Posts
- 11,249
Thanked: 4237
Mike I would presume that the filters were clogging from residual crap in the tank/lines?

Do you anticipate to have to continue to replace fuel filters for awhile? If so do you plan on installing a glass site filter as a pre-filter so you don't have to replace the regular filters? Just wondering--
Our house is as Neil left it- an Aladdins cave of 'stuff'.
Kim X


 Reply With Quote