
Results 51 to 60 of 2504
 8857Likes
Thread: 51 MG restoration.
 LinkBack URL
 About LinkBacks
-
04-08-2018, 12:42 PM #51Str8Faced Gent.


- Join Date
- Aug 2013
- Location
- Orangeville, Ontario
- Posts
- 8,456
- Blog Entries
- 1
Thanked: 4207
The picture angle may be off, but I am not touching the float arm in those pics with the bit.
The arm is sitting In its closed, or full bowl position and I have almost an additional 3/8 clearance between the bit and the arm, as shown. The bowls seemingly only would have filled about half way installed.
I did readjust back till the 7/16 bit just fit under the curved arm as the books dictate, but then upon reinstallation found the fuel level did seem too high and fuel came out of the jet at rest with just the fuel pump on.
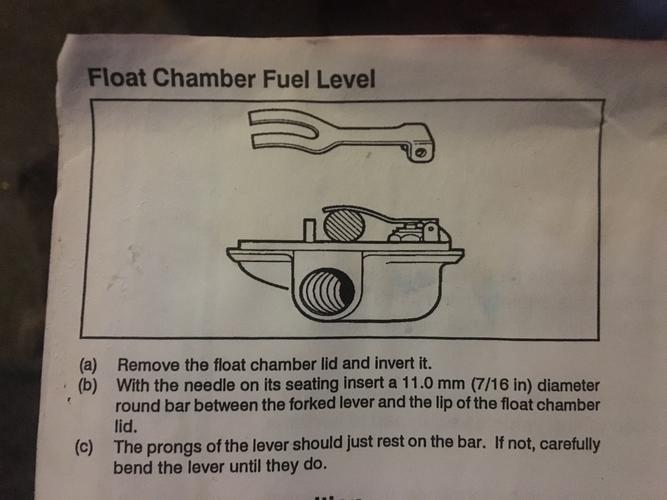
Measured my carb to intake manifold face angle and the carb sits at -19.
Not sure what angle it sat on the triumph originally. Would be a great reference point for future adjustments.

Subsequent adjustments have brought me back to about 11/16 float gap. Somewhere between the book value and where I was when I first opened it up.
No more fuel leaks before start, so the level is below the jet top surface again, but not sure how much below. 1/4 below is the book recommended level.
There must be away to verify fuel level, at rest on level ground, at the carb inlet inside the jet.
Also, noticed I must have still had some punky fuel in the lines as the first few shots into the bowls was very brownish looking with globs of water. Ran clear after subsequent fill and drain cycles however..
Slightly warmer day today so maybe I will get her running again a bit ..
Cheers."Depression is just anger,, without the enthusiasm."
Steven Wright
https://mobro.co/michaelbolton65?mc=5
-
04-08-2018, 03:29 PM #52Razor Vulture


- Join Date
- Oct 2010
- Location
- Lone Star State
- Posts
- 26,151
Thanked: 8616
Same brake or carb kleener blown into the fuel lines, blow out the lines with compressed air after a bit.
FME, some diesel in the tank a bit to soak, drain it and leave the cap off to let the tank dry.
good filter before the fuel pump and one before the carbs. Might have to pull the tank and use a pressure washer inside.
-
04-09-2018, 12:26 AM #53Str8Faced Gent.
- Join Date
- Aug 2013
- Location
- Orangeville, Ontario
- Posts
- 8,456
- Blog Entries
- 1
Thanked: 4207
First steady run, post carb clean up.
Will do till I get my carb rebuild kit.
Now on to brake tear down..
Cheers.."Depression is just anger,, without the enthusiasm."
Steven Wright
https://mobro.co/michaelbolton65?mc=5
-
-
04-09-2018, 12:43 AM #54Razor Vulture
- Join Date
- Oct 2010
- Location
- Lone Star State
- Posts
- 26,151
Thanked: 8616
Hell yeah!

Put the carb kits on the shelf, Bruv! Sounds like you have other things to do!
You are done here.....Full synchronicty as we say!
Seems the best carb jobs don't require parts!
Last edited by sharptonn; 04-09-2018 at 12:47 AM.
MikeB52 likes this.
-
The Following User Says Thank You to sharptonn For This Useful Post:
MikeB52 (04-09-2018)
-
04-09-2018, 12:57 AM #55Razor Vulture
- Join Date
- Oct 2010
- Location
- Lone Star State
- Posts
- 26,151
Thanked: 8616
Ya know, these things run on low pressure. If that pump is too much, it might explain why the floats were set low. Check the fuel pressure. Can you go back to a mechanical pump?
In my experience as bringing one back, put some ATF or Marvel oil in the gas. Just a bit.
As you go out to hear it run every day (which you will) it will work on the valve stems. They tend to stick with bad gas/sitting around. It sucks when you hit valves!
On second thought, they probably go straight down on that.
Piston would just push it back up.Last edited by sharptonn; 04-09-2018 at 01:08 AM.
MikeB52 likes this.
-
04-09-2018, 01:09 AM #56Skeptical Member


- Join Date
- Nov 2016
- Location
- Colorado Springs
- Posts
- 10,548
Thanked: 2194
I remember using Marvel in the engine oil too. But only easy dr8ving and for only a 100 miles. It thins the oil 1 to 4 quarts but hel0s to lube abd clean thing internally.
sharptonn likes this.It's just Sharpening, right?
Jerry...
-
04-09-2018, 01:11 AM #57Razor Vulture
- Join Date
- Oct 2010
- Location
- Lone Star State
- Posts
- 26,151
Thanked: 8616
Yeah. The old guys would do that. Dump a quart in right before oil change.
Just a bit won't hurt. It ain't a 2-stroke!
-
04-09-2018, 01:29 AM #58Senior Member


- Join Date
- Oct 2010
- Location
- 50 miles west of randydance
- Posts
- 9,684
Thanked: 1354
I haven't played with SU's in years and have a couple hiding in a box in my garage unless I gave them away with that transmission....

Thanks to you guys now I am getting adds trying to sell me some or parts!
-
04-09-2018, 01:36 AM #59Senior Member
- Join Date
- Mar 2015
- Location
- Indiana, Portland
- Posts
- 321
Thanked: 70
The way to check the fuel height with carbs on car, car on level ground is to run the fuel pump until it stops clicking, indicating that the carbs fuel float chambers are full. Remove the piston bell from the top of the carb and the piston which includes the tapered needle valve and look into the hole in the jet from which you have just removed the needle valve. I think fuel Originally Posted by MikeB52

level should be about 1/4 inch below the top of the jet. You will want the research that value but I think 1/4 inch in right but I'm well into geezerhood and my memory sometimes betrays
me.
-
-
04-11-2018, 11:08 PM #60Str8Faced Gent.
- Join Date
- Aug 2013
- Location
- Orangeville, Ontario
- Posts
- 8,456
- Blog Entries
- 1
Thanked: 4207
First box of parts finally arrived and they charged me duty despite the clear sticker indicating antique car parts, tariff free.
I am quite certain they figure, charge everyone, and hope people won’t take the time to try to get a refund..
just pisses me off how the gov runs the crown corps, like the Import office for example..
Anyway, here’s the goodies.
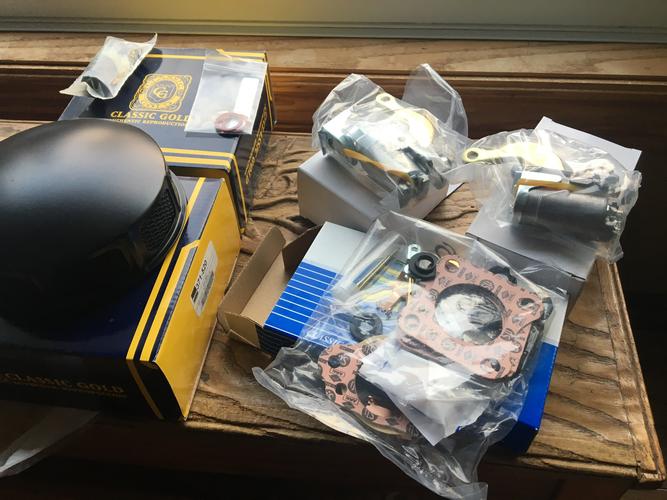
Washable air filters for the carbs, brake cylinders and carb kit. Probably leave the carb kit on the shelf till I get some miles in the car.
Cheers."Depression is just anger,, without the enthusiasm."
Steven Wright
https://mobro.co/michaelbolton65?mc=5


 Reply With Quote