
Results 71 to 80 of 2504
 8857Likes
Thread: 51 MG restoration.
 LinkBack URL
 About LinkBacks
-
04-16-2018, 09:07 PM #71Razor Vulture


- Join Date
- Oct 2010
- Location
- Lone Star State
- Posts
- 26,151
Thanked: 8616 Those things actually work...some.
 Originally Posted by MikeB52

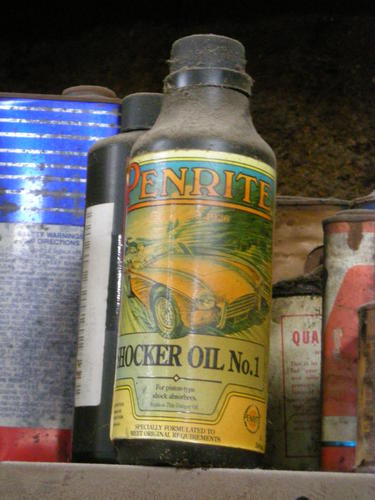
I put some rear ones from a Morris Minor on all 4 corners of my Model A.
Seems I got the oil from Victoria British
-
The Following User Says Thank You to sharptonn For This Useful Post:
MikeB52 (04-16-2018)
-
04-16-2018, 09:22 PM #72Str8Faced Gent.


- Join Date
- Aug 2013
- Location
- Orangeville, Ontario
- Posts
- 8,456
- Blog Entries
- 1
Thanked: 4207
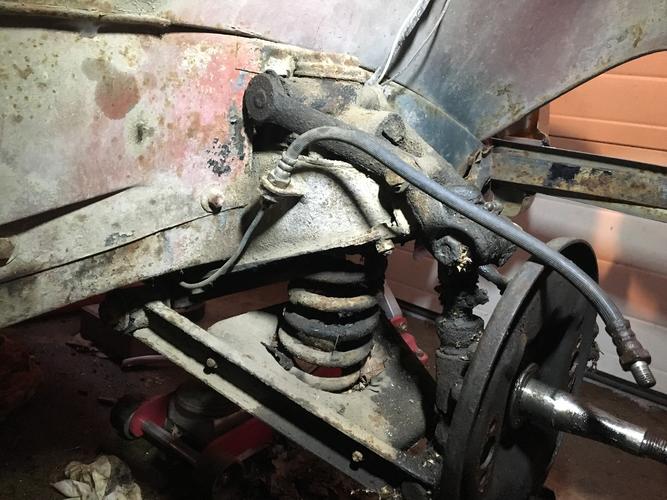
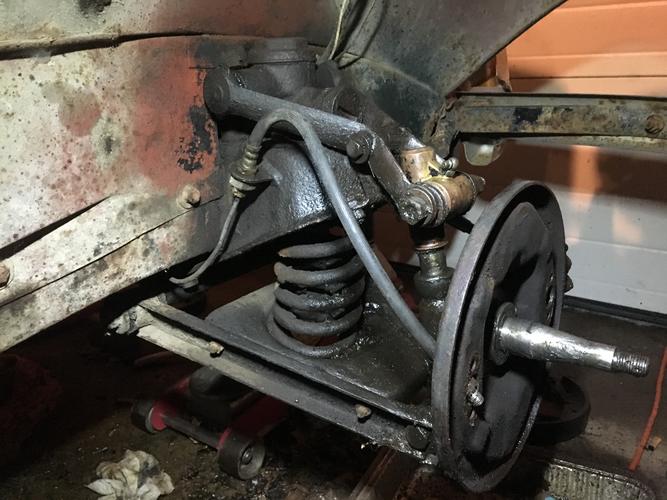
Yup Jerry, these were the hydraulics that work with the leafs in the back. Hydraulic dampening in either direction radially as transferred from the axle.
Fronts are similar but have independent springs. The TD was the first MG offered with independent front suspension actually. Leading edge for its time really.
 "Depression is just anger,, without the enthusiasm."
Steven Wright
https://mobro.co/michaelbolton65?mc=5
-
The Following User Says Thank You to MikeB52 For This Useful Post:
Gasman (04-16-2018)
-
04-16-2018, 09:35 PM #73Razor Vulture
- Join Date
- Oct 2010
- Location
- Lone Star State
- Posts
- 26,151
Thanked: 8616
The fronts on the Morris Minor were set-up like yours. As the control-arm pivot.
A buddy had 4 of the rear ones and I snagged them. Model A's had friction shocks which were almost nothing. I used Model A arms and links. The old-timers scratch their heads as they see them!
You can disconnect them and push up and down to see if they are working.
-
04-16-2018, 10:00 PM #74Str8Faced Gent.
- Join Date
- Aug 2013
- Location
- Orangeville, Ontario
- Posts
- 8,456
- Blog Entries
- 1
Thanked: 4207
Very ingenious solution Tom. Looks very clean and functional!
Nice work..sharptonn likes this."Depression is just anger,, without the enthusiasm."
Steven Wright
https://mobro.co/michaelbolton65?mc=5
-
The Following User Says Thank You to MikeB52 For This Useful Post:
sharptonn (04-16-2018)
-
04-16-2018, 10:09 PM #75Razor Vulture
- Join Date
- Oct 2010
- Location
- Lone Star State
- Posts
- 26,151
Thanked: 8616
I thought they were not much until someone brought in an A with no shocks at all to get running... First bump and the back tires came off the ground! Originally Posted by MikeB52
I thought more of them since then!
-
04-16-2018, 11:58 PM #76Str8Faced Gent.
- Join Date
- Aug 2013
- Location
- Orangeville, Ontario
- Posts
- 8,456
- Blog Entries
- 1
Thanked: 4207
My fronts cleaned up quite nicely as well. Love the extensive use of brass components throughout.
Now just waiting on brake cylinders. Then Im good to flush, fill, grease, and test drive.
Hoses look all recently replaced, as do wheel bearings and brake shoes.
 "Depression is just anger,, without the enthusiasm."
Steven Wright
https://mobro.co/michaelbolton65?mc=5
-
04-21-2018, 02:56 PM #77Str8Faced Gent.
- Join Date
- Aug 2013
- Location
- Orangeville, Ontario
- Posts
- 8,456
- Blog Entries
- 1
Thanked: 4207
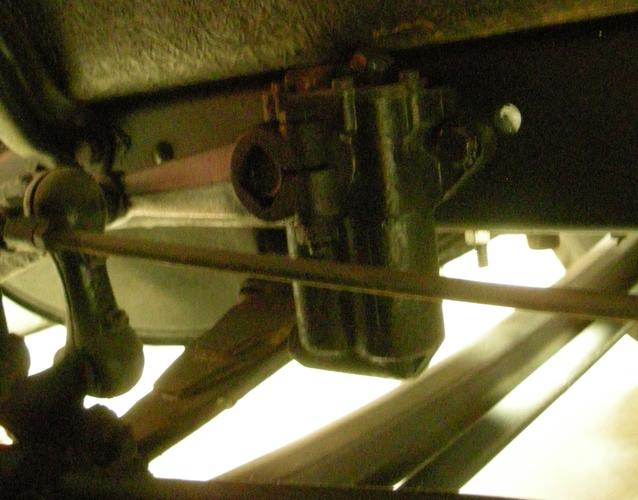
As tom predicted, I have been running the car almost daily in the shop while I wait for my brake cylinders.
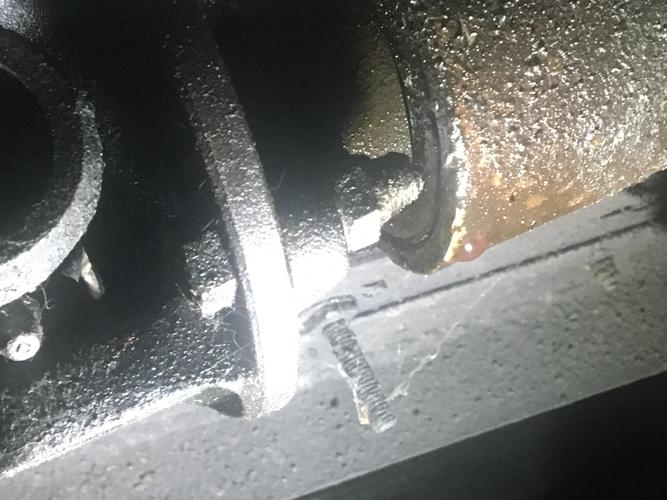
Noticed an oil stain below the tranny output shaft so took a closer look.
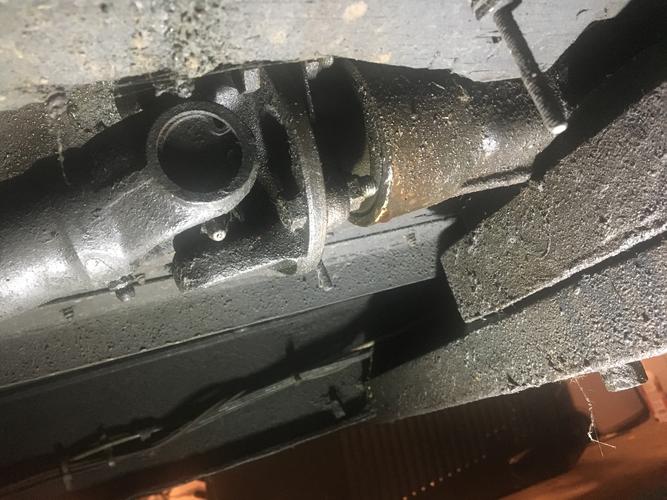
A British car with a rear seal leak?? How rare.
Good news, is it looks like clean fluid, so the tranny hasnt run dry.
Bad news, never taken a rear shaft out of a car like this so not sure if it can be done in place or tranny needs to be pulled.
It looks like the rear seal can be removed externally, slipped over the output shaft, if I can remove the drive shaft u joint mounting flange from the tranny output shaft.
Soaked everything with mouse milk penetrant while I do a little research on the construction of the tranny.
Then to decide if its a first priority, or can wait till next winters deeper tear down..
Hate the idea of stains under the car. Such a detractor from an old cars charm. Plus it restricts where I will park it till its fixed..
Finally above 5 degrees in Orangeville. A good day for garage projects.
Cheers."Depression is just anger,, without the enthusiasm."
Steven Wright
https://mobro.co/michaelbolton65?mc=5
-
04-21-2018, 03:08 PM #78Razor Vulture
- Join Date
- Oct 2010
- Location
- Lone Star State
- Posts
- 26,151
Thanked: 8616
If you have the front end jacked-up higher, that output shaft seal will leak.
The fact that it does leak means the tranny is pretty full.
Likely won't leak if the car is level. Might put that off?
Anything attempted begets 6 more jobs!
MikeB52 likes this.
-
The Following User Says Thank You to sharptonn For This Useful Post:
MikeB52 (04-21-2018)
-
04-21-2018, 03:16 PM #79Str8Faced Gent.
- Join Date
- Aug 2013
- Location
- Orangeville, Ontario
- Posts
- 8,456
- Blog Entries
- 1
Thanked: 4207
She is nose high Tommy, dang astute suggestion brudder. Had not thought of that.
Thanks man, love this forums depth of skill sets..
Wrenches put down, rag and cleaner picked up again..
 "Depression is just anger,, without the enthusiasm."
Steven Wright
https://mobro.co/michaelbolton65?mc=5
-
04-22-2018, 01:39 AM #80Senior Member

- Join Date
- Mar 2015
- Location
- Indiana, Portland
- Posts
- 321
Thanked: 70
If you choose to replace the seal so it won't leak even on an incline, remove the drive shaft. After the drive shaft is out you should see a nut in the recess on the output shaft. Remove that nut, pull the output shaft out (it is splined) then you can use a hooked tool to remove the old seal. Carefully tap a new seal in using something to cover the whole diameter of the seal so it isn't damaged then reinstall the removed parts. Originally Posted by MikeB52
Last edited by Learner; 04-22-2018 at 02:06 AM.
-


 Reply With Quote