
Results 81 to 90 of 151
 33Likes
Thread: Air hammer?
 LinkBack URL
 About LinkBacks
-
10-19-2015, 12:11 AM #81Tumbling down the rabbit hole...


- Join Date
- May 2011
- Location
- Calgary, AB
- Posts
- 445
Thanked: 27
Couple of silly things. First, I dropped the whole actuator on my head at one point so hard my teeth smashed shut. Also, I think it is permanently assembled. I forgot to drill a hole on the slider for the cotter pin to slide out, and I welded the top on before filling the vertical tube... I'll have to grind a hole out of the side and fill it with sand and gravel using a funnel or something!
-
10-19-2015, 03:14 AM #82"My words are of iron..."

- Join Date
- Oct 2006
- Posts
- 1,898
Thanked: 995
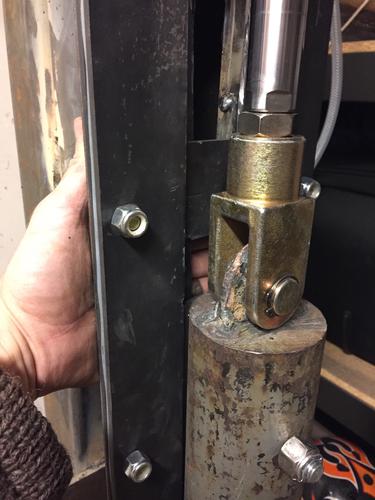
Alright, progress. Question (since it may turn into a problem later): what are you going to do, or maybe what is the plan for, trapping the hammer head/ram/tup. I believe you will need some sort of guides or that clevis knuckle is going to allow the hammer to swing on an off angle strike and that could get very interesting, in an unwanted way, to the operator or other witnesses.
Personally I like the idea of the clevis. Safety is always something on my mind.
-
10-19-2015, 03:22 AM #83Tumbling down the rabbit hole...
- Join Date
- May 2011
- Location
- Calgary, AB
- Posts
- 445
Thanked: 27
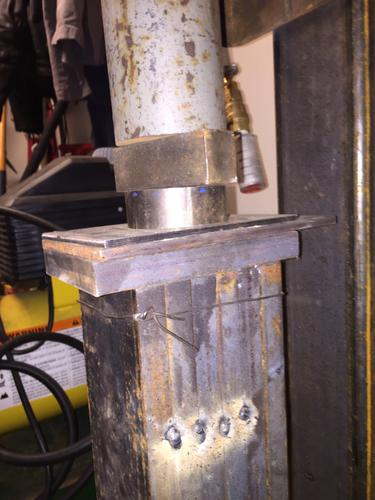
There is a slide system in the pics, but a bit hard to discern. I might paint this thing for longevity and visibility. The guide is 3/16" x 6" flat stock with 1" bars on either side, and then 2" bars over top, all bolted together. The hammer (tup or whatever) is tack welded and bolted with 1/2" bolts to a piece of 4" flat bar that slides up and down in the groove. To make a little space to move, I used some 24 ga steel, cut in 1" strips and sandwiched between the guide bars for that extra wiggle room, and then cut up one of my wife's thin uhmw cutting boards into 2" widths 15" long and lined the slide so it didn't need brass or grease.
I had to grind out room for the bolt heads through the guide and frame, but it looks like it will work!
-
10-19-2015, 03:27 AM #84Tumbling down the rabbit hole...
- Join Date
- May 2011
- Location
- Calgary, AB
- Posts
- 445
Thanked: 27
I still can't believe I didn't make room to take that clevis pin out. Even to paint the damn thing I am going to have to drill and chisel it out!
I haven't made up the foot control yet. I like Zoeller's idea of using a pneumatic control valve instead of a ball valve, but we'll see. I am considering a solenoid shutoff valve too, but if it's on a quick-release air hose, I might not need it. Just want to be safe for my two young boys.
-
10-20-2015, 04:23 AM #85"My words are of iron..."
- Join Date
- Oct 2006
- Posts
- 1,898
Thanked: 995
Ah, question answered, thanks.
-
10-22-2015, 04:38 AM #86Tumbling down the rabbit hole...
- Join Date
- May 2011
- Location
- Calgary, AB
- Posts
- 445
Thanked: 27
Air hoses mocked up!
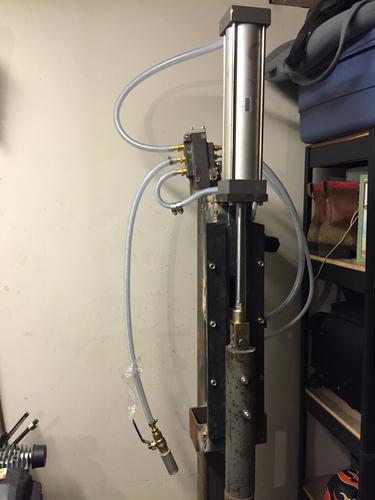
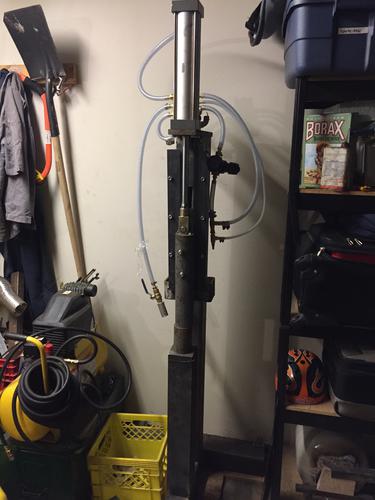
Room for the cotter pin.
Some ideas for dies.
-
10-22-2015, 01:06 PM #87Senior Member

- Join Date
- Jan 2013
- Location
- Croatia, Zagreb
- Posts
- 198
Thanked: 92
Realy interesting.
How you plan to regulate force of impact? Don't see any spring to amortize.
-
10-23-2015, 11:17 PM #88Tumbling down the rabbit hole...
- Join Date
- May 2011
- Location
- Calgary, AB
- Posts
- 445
Thanked: 27
Hope not to need it. If the switch is located half-way across the travel, it may reverse pressure enough to avoid banging the ends.
-
10-30-2015, 07:46 AM #89Senior Member


- Join Date
- Jun 2013
- Location
- Gladstone QLD AUSTRALIA
- Posts
- 3,245
Thanked: 804
Nice progressive it all works and well worth it
Look,forward to the finished resultsSaved,
to shave another day.
-
10-30-2015, 07:54 PM #90Senior Member

- Join Date
- Aug 2014
- Location
- East Central Illinois
- Posts
- 782
Thanked: 101
I have found the best dies for forging are the same size , Slightly crowned"VERY Slightly" & have parallel edges. I prefer to use tooling to make fullers, hacks & other things. It appears you have enough mass in the anvil but no where near enough in the rest of the hammer.
Old forging hammers were made of cast iron for a reason. Hope this helps
Dave Huffman


 Reply With Quote