
Results 41 to 50 of 63
 161Likes
Thread: 1095 stubby WIP
 LinkBack URL
 About LinkBacks
-
02-02-2020, 05:07 AM #41Str8Faced Gent.


- Join Date
- Aug 2013
- Location
- Orangeville, Ontario
- Posts
- 8,456
- Blog Entries
- 1
Thanked: 4207
Super project, and looks like terrific results.
 "Depression is just anger,, without the enthusiasm."
Steven Wright
https://mobro.co/michaelbolton65?mc=5
-
The Following User Says Thank You to MikeB52 For This Useful Post:
jfk742 (02-02-2020)
-
02-06-2020, 03:43 AM #42Senior Member

- Join Date
- Jan 2015
- Location
- Pinole, ca
- Posts
- 1,526
Thanked: 339
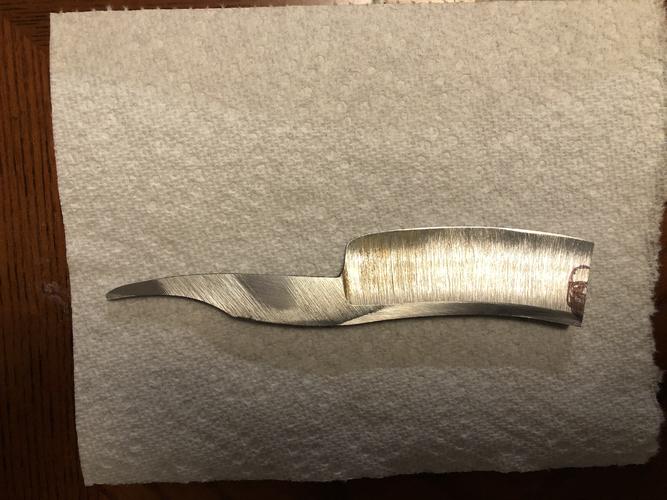
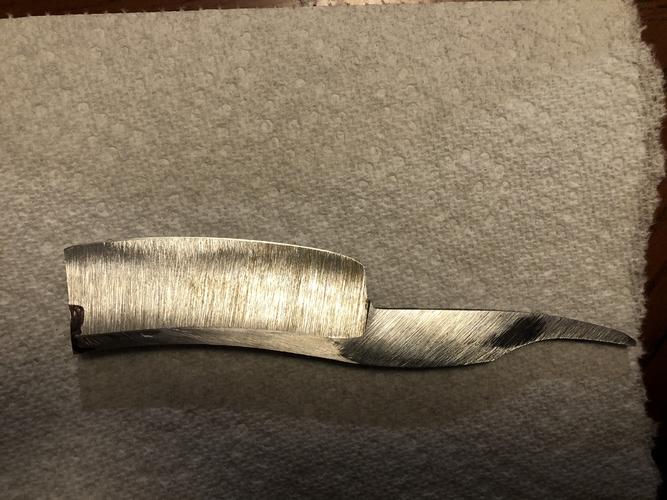
So I started rough grinding, not sure what I’m doing wrong. I tried to capture the grind lines in the light so you can see what’s going on.
The hollows are parallel at the edge within .002” from heel to toe. I’m getting some contact when I’m grinding the heel. Even if I ink it and do a pass to see what parts of the blade the belt is touching and try my best to stay off the center of the edge it’s still touching and hitting the middle. While not too big a deal now with .060” of metal at the edge, when I’m getting down to those last few thousandths I don’t want to blow on the 1 yard line.
I’m wondering if maybe I brought the smile too far towards the heel and the amount of rocking needed to follow the spine is just too much. I tried doing mock passes on just the wheel to see what is tipping the middle into the belt when I’m grinding the heel and toe but can’t see that anything geometry wise that cause that. Put it on a hone too to make sure the razor isn’t all out of whack but it acts as it’s supposed to.
I will be grinding all the way up to the top of spine after heat treat so there’s plenty of meat to fix whatever it is I’ve done wrong. I’m not counting out my lack of grinding skill but I’ve been trying all sorts of different approaches and they all end up with the same issue to one deeper or another.
-
02-06-2020, 08:53 PM #43Senior Member


- Join Date
- Jul 2014
- Location
- Denver CO
- Posts
- 4,632
Thanked: 811
If you're asking what I think that you're asking, you are trying to fit a cylinder (wheel) into a toroidal grove. Not a big deal at the roughing stage like you said. There are different ways of handling it when you are finish grinding. I crown my wheels.
-
The Following User Says Thank You to bluesman7 For This Useful Post:
32t (02-06-2020)
-
02-06-2020, 10:41 PM #44Senior Member
- Join Date
- Jan 2015
- Location
- Pinole, ca
- Posts
- 1,526
Thanked: 339
I gave it some thought last night and I’m pretty sure you’re right. I gave my 6” a slight crown. It’s odd though seems there is more tension at the center than the edges. With a straight edge across the wheel it shows a crown but with a belt install and tensioned it becomes slightly concave. I guess I’ll start throwing pieces of tape on the wheel and see where that goes. My plan was to try doing a full hollow on this blade but I don’t see how that’s going to happen without grinding through the middle right at the very end. I would much prefer not to have to hand sand the last few thousandths. My other thought was a 1” wide contact wheel and belt though I see that presenting its own problems.
-
02-07-2020, 04:41 AM #45Senior Member
- Join Date
- Jul 2014
- Location
- Denver CO
- Posts
- 4,632
Thanked: 811
That's weird, I can't say that I've ever checked the crown with a tensioned belt, but I do know that on my setup it does behave crowned. Originally Posted by jfk742
 jfk742 likes this.
-
02-07-2020, 07:59 AM #46
This is probably come across very ambiguously, but with a smiling razor, you do not just move the blade left and right on the grinding wheel.
On a smiling razor, the hollow should follow the edge / spine. It's not a cylindrical hollow from left to right.
So when you are grinding the toe, you need to hold the heel higher than the toe.
When you are grinding the toe, you need to hold the toe higher than the heel.
When you are grinding the middle, the toe and heel are the same height.
If you do anything else with a smiling razor, the hollows are going to look wonky because it won't match the outline geometry.Til shade is gone, til water is gone, Into the shadow with teeth bared, screaming defiance with the last breath.
To spit in Sightblinders eye on the Last Day
-
The Following 2 Users Say Thank You to Bruno For This Useful Post:
jfk742 (02-08-2020), randydance062449 (02-14-2020)
-
02-08-2020, 02:19 AM #47Senior Member
- Join Date
- Jan 2015
- Location
- Pinole, ca
- Posts
- 1,526
Thanked: 339
Definitely following the smile as I work back and forth. I need to work on technique some too. Running the blade on the contact wheel while it’s stopped shows me that I should be able to do that grind without trashing the blade.
-
02-08-2020, 03:03 AM #48Senior Member


- Join Date
- Oct 2010
- Location
- 50 miles west of randydance
- Posts
- 9,676
Thanked: 1354
To me there is a lot of trust in yourself.
You can only see one side at a time.
you know where the other edge is.
-
02-08-2020, 06:58 PM #49Senior Member
- Join Date
- Jan 2015
- Location
- Pinole, ca
- Posts
- 1,526
Thanked: 339
A little update:
The wheels I bought needed some dressing. I took a piece of wood that was flat and used spray adhesive to attach some 220 grit sand paper and spent some time flattening my wheels. I had originally used some tape to fill in low spots but I was still ending up with some issues. The first two razors I made I ground on my 8” wheel, which is much more true than my 6”. The 6” had a high spot with a low edge on one side and low spot with a high edge on the other. With my sanding stick and a straight edge with a flashlight. I ran the wheel with a belt on it and slowly worked at it until I couldn’t see any light shining past the straightedge from edge to edge of the wheel. I eased the corners just a little bit. After getting to flat I ran the razor I was having trouble with for a few passes and it immediately cleaned up the area I was having trouble with and also made the razor feel much more stable on the wheel. I have a much easier time “feeling” where I’m grinding while I’m passing the hollow back and forth. I’ll give a piece of tape or two to try crowning it again.
Really surprising what a difference it made. The difference from high to low spots was so slight you couldn’t tell without a light behind the straightedge. We’re talking about a couple of thousandths all together. Made all the difference though. Now I need to go through all my wheels and dress them flat while using a light behind the straight edge.
-
The Following 2 Users Say Thank You to jfk742 For This Useful Post:
32t (02-08-2020), randydance062449 (02-14-2020)
-
02-09-2020, 04:58 AM #50Senior Member
- Join Date
- Jul 2014
- Location
- Denver CO
- Posts
- 4,632
Thanked: 811
I'm assuming that you were dressing the wheel on the back side since I can't see any other way. I've never tried that, but I've always wondered how doable and successful it would be.
jfk742 likes this.


 Reply With Quote
