
Results 31 to 40 of 56
 7Likes
Thread: Tim's 1st Blade
 LinkBack URL
 About LinkBacks
-
12-06-2011, 01:32 AM #31Senior Member


- Join Date
- Jul 2011
- Posts
- 768
Thanked: 99
Tim, whether it's wrong or right I used an angle grinder to do a lot of the roughing out. Just be careful. If you thought a dremel could get away from you, an angle grinder is worse. Don't let your attention wander for even a second or you'll gouge the steel. In the early shaping it might not be a big deal, later it can ruin a blade in a heartbeat. I had one gouge that almost didn't come out.
-
12-06-2011, 10:19 PM #32Senior Member

- Join Date
- Mar 2011
- Location
- North Carolina
- Posts
- 407
Thanked: 72
More grinding (actually its a 6" 60 grit wheel).
I have a 4x36 horizontal belt sander. I'm thinking about moving over to that pretty soon. So how does one maintain a 16 degree angle? SHould I cut a wood block at that angle and hold it on there? Any suggestions. I've watched Charlie's videos about 10x and it seems like he just eyeballs it. Anyone have a jig to help?
-
12-06-2011, 11:36 PM #33Senior Member
- Join Date
- Jul 2011
- Posts
- 768
Thanked: 99
For the love of Pete man! Stop doing it the hard way, you have a sander!
http://straightrazorpalace.com/forge...ake-razor.html
Taaa-daaa. There you go.
-
The Following User Says Thank You to medicevans For This Useful Post:
tumtatty (12-07-2011)
-
12-09-2011, 09:27 PM #34Senior Member
- Join Date
- Jul 2011
- Posts
- 768
Thanked: 99
Any updates?
-
12-10-2011, 04:40 AM #35Senior Member
- Join Date
- Mar 2011
- Location
- North Carolina
- Posts
- 407
Thanked: 72
I got a 40 grit belt for my sander. Also I'm thinking about making an "angle jig" to use for grinding. Have you seen this?
-
12-10-2011, 07:13 AM #36Hones & Honing


- Join Date
- May 2005
- Location
- Saint Paul, Minnesota, United States
- Posts
- 8,023
- Blog Entries
- 1
Thanked: 2209
That angle jig is pretty cool and not to difficult to build. I would give it a try. But I would first try what Scott did. I was impressed with that. It actually develops the rough concave grind, which is what you need.
Last edited by randydance062449; 12-10-2011 at 07:18 AM.
Randolph Tuttle, a SRP Mentor for residents of Minnesota & western Wisconsin
-
The Following User Says Thank You to randydance062449 For This Useful Post:
tumtatty (12-10-2011)
-
12-10-2011, 09:21 PM #37Senior Member
- Join Date
- Mar 2011
- Location
- North Carolina
- Posts
- 407
Thanked: 72
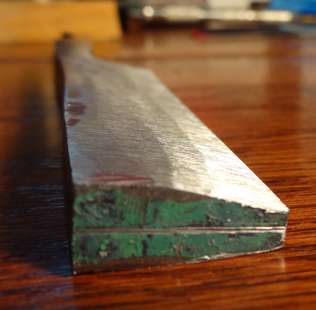
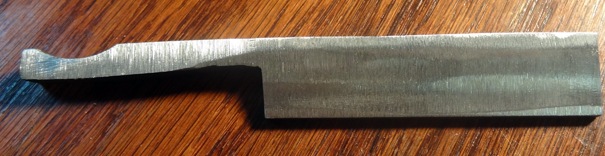
I did some work using the belt sander. I flattened out the spine and thinned out the metal a bit more. I can't help but think I'm getting to the point where I @#@#$ up the steel. Well...the turkey IS in the oven..that's for sure!
-
12-10-2011, 09:27 PM #38Hones & Honing
- Join Date
- May 2005
- Location
- Saint Paul, Minnesota, United States
- Posts
- 8,023
- Blog Entries
- 1
Thanked: 2209
Continue with the hollow grinding until the thickness of the edge is 1/16". Do not take the grind all the way up to the spine. Leave 1/16"-1/8" unground, as measured from the top of the spine down toward the edge. The reason is that you will be rounding over the spine and you want the full thickness of the spine to remain at 1/4". That will allow you an acceptable angle on the bevel, assuming a finished blade width of approx 7/8".
Hope this helps, Randolph Tuttle, a SRP Mentor for residents of Minnesota & western Wisconsin
-
The Following User Says Thank You to randydance062449 For This Useful Post:
tumtatty (12-10-2011)
-
12-11-2011, 10:54 PM #39Senior Member
- Join Date
- Mar 2011
- Location
- North Carolina
- Posts
- 407
Thanked: 72
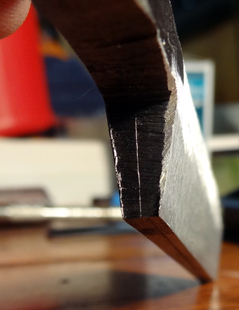
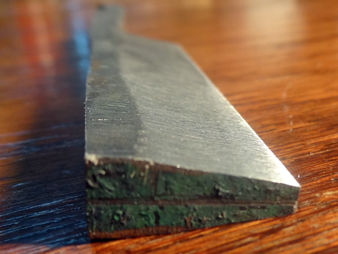
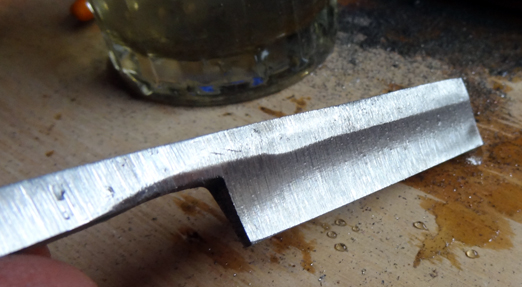
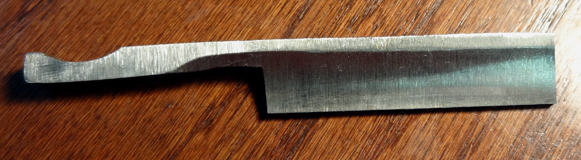
I've been following Randy's advice and continuing with the attempt at hollow grinding.
Here's my setup:
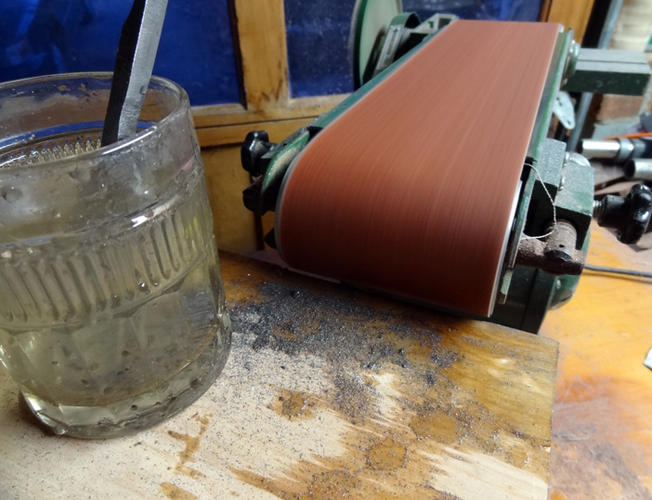

I'm giving that 40 grit belt a run for its money! It's tough to figure out if I'm grinding evenly. My center line (or attempt at a center line) is definitely helping, but getting the "hollowness" and evenness of the grind together is tough to do. Still, it's starting to look more like a razor than a hunk of steel
 Rugbysh9 likes this.
-
12-12-2011, 01:00 AM #40Hones & Honing
- Join Date
- May 2005
- Location
- Saint Paul, Minnesota, United States
- Posts
- 8,023
- Blog Entries
- 1
Thanked: 2209
Your doing good!
Suggestions....
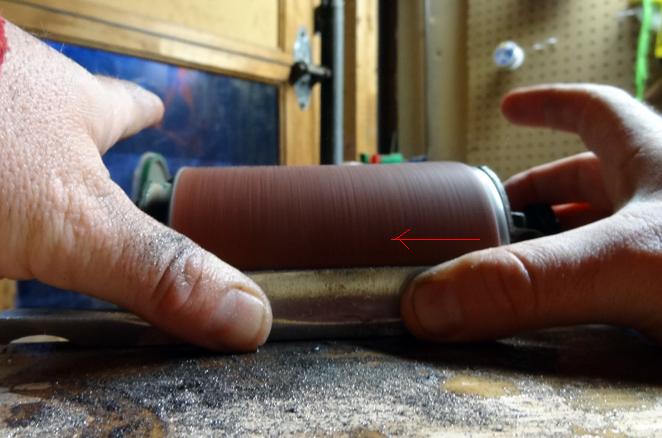
Your table top is to low. Raise it up so that the edge of the blade is even with the horizontal centerline of the wheel. Look at the red arrow...........
Then change the belt to a 60-80 grit. The last thing you want is to grind out 40 grit scratch lines after the Heat Treat. Thats a real bear to do.
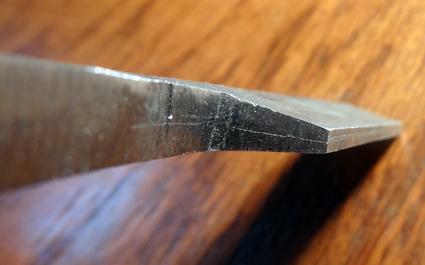
Then..... even up the grind so that it is exactly the same on both sides. Remember how you scribed a line? Well do it again but this time scribe a line 3/16" down from the spine, on both sides of the blade. This will act as a visual reference point for your grinding.
Your best guide guide for judging the evenness of the grinding are your fingers. Just run them over both sides of the blade at the same time. You will feel any changes in the thickness. The next guide is the line you scribed on the toe end of the razor. That will also show you the evenness of the grind.
Now you need to slow down and take your time. Focus on evening up your grind. Then take some pics and post again.
Keep on grinding,
Last edited by randydance062449; 12-12-2011 at 01:06 AM.
Randolph Tuttle, a SRP Mentor for residents of Minnesota & western Wisconsin
-
The Following User Says Thank You to randydance062449 For This Useful Post:
tumtatty (12-12-2011)


 Reply With Quote