
Results 41 to 50 of 56
 7Likes
Thread: Tim's 1st Blade
 LinkBack URL
 About LinkBacks
-
12-12-2011, 02:24 AM #41Senior Member


- Join Date
- Mar 2011
- Location
- North Carolina
- Posts
- 407
Thanked: 72
Thanks Randy, I really appreciate the input and concrete steps to take. I'll go get another belt and keep going!
Tim
-
12-12-2011, 07:08 AM #42Member

- Join Date
- Apr 2011
- Location
- Brisbane, Australia
- Posts
- 1,434
Thanked: 642
Looking great Tim, keep at it. Looking forward to the finished product.
-
12-16-2011, 08:00 AM #43
Be sure to wear a dusk mask though. Grinding like this throws large amounts of metal dust in the air.
We already have diseases on the books are miners lung or smokers lung. Grinders lung was a big problem in the old cutlery factories. Best not bring it back.
Bonus trivia: grinders lung was so bad that fork grinders (due to the nature of the small surface contact wheels) did not live past 28 years as a rule.Til shade is gone, til water is gone, Into the shadow with teeth bared, screaming defiance with the last breath.
To spit in Sightblinders eye on the Last Day
-
-
01-20-2012, 10:27 PM #44Senior Member
- Join Date
- Mar 2011
- Location
- North Carolina
- Posts
- 407
Thanked: 72
I'm totally stumped. Taken as a given that I'm not a math guy, have no previous experience and having a 4x36 belt sander and files, how do get an even grind and get my shoulders equal?
As I've shown in previous pics I've been holding the blank against my belt sander (I've switched to a 120 grit belt). I can't seem to get the lines even and I'm afraid I'll go to far soon and not be able to correct any mistakes i'm making.
I've thought about clamping the blank to the table and using my files to get a better angle, but I'm not sure how to get the correct angle.
Charlie suggested a guide of sorts, but I can't for the life of me figure out how that works.
I'm totally stumped.
-
01-21-2012, 12:35 AM #45Member
- Join Date
- Apr 2011
- Location
- Brisbane, Australia
- Posts
- 1,434
Thanked: 642
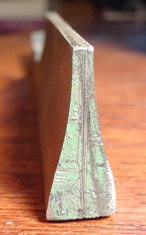
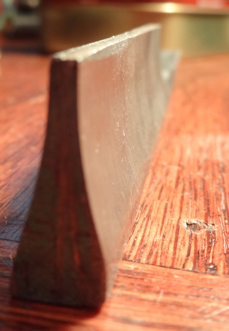
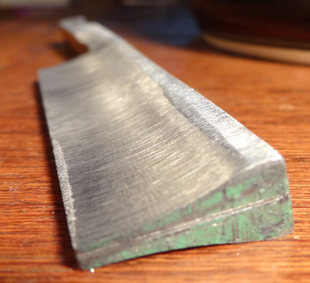
Tim, here is a couple of pics that I just took for you. This is just mocked up on an old blade but hopefully it gives you the idea.
I believe Charlie's version uses four nuts and bolts to clamp it together rather than the vise grips.
I have to admit that for me getting the transition between the blade and the tang even and neat is a struggle.
Hopefully some of the resident guru custom makers will also help out here.
Hope this is helpful.
Stu
-
The Following User Says Thank You to Str8Raz0r For This Useful Post:
tumtatty (01-21-2012)
-
01-21-2012, 02:38 AM #46Hones & Honing


- Join Date
- May 2005
- Location
- Saint Paul, Minnesota, United States
- Posts
- 8,023
- Blog Entries
- 1
Thanked: 2209
Here is a link to another file guide
File Guide Precision [FG0001 File Guide Precision] - $41.94 : USA Knife Maker Supply, Operated by a knifenaker for knifemakers!
I assume your talking about the shoulders of the razor? Where the spine ends and the tang begins? if so then the file guide is the answer...
or are you concerned with the evenness of the grind of the blade, front side & back side?Last edited by randydance062449; 01-21-2012 at 03:05 AM.
Randolph Tuttle, a SRP Mentor for residents of Minnesota & western Wisconsin
-
The Following User Says Thank You to randydance062449 For This Useful Post:
tumtatty (01-21-2012)
-
01-21-2012, 03:43 AM #47Senior Member
- Join Date
- Mar 2011
- Location
- North Carolina
- Posts
- 407
Thanked: 72
Thanks guys.
Str8Raz0r I really appreciate you taking the time to post the photos as well. I could make a guide like that I think, but (I feel like dolt), but I'm not sure how you use that guide.
The shoulders of the razor are kind of uneven after using the belt sander. I'm not sure how to even it out. I'm definitely concerned about the evenness of the grind as well. One side seems a bit more concave than the other. Due to both those concerns I was thinking of moving to files instead of the belt sander. The right side has a bit more "hollowness" to it.

Last edited by tumtatty; 01-21-2012 at 03:46 AM.
-
01-21-2012, 04:15 AM #48Member
- Join Date
- Apr 2011
- Location
- Brisbane, Australia
- Posts
- 1,434
Thanked: 642
I'm getting the feeling that we are on different wave lengths. Just to confirm that the shoulders I am referring to are the 'ridges' or steps where the blade meets the tang.
Are you referring to the part of the blade just near the spine, that runs the length of the blade?
We might get there eventually.
-
01-21-2012, 04:55 AM #49Senior Member
- Join Date
- Mar 2011
- Location
- North Carolina
- Posts
- 407
Thanked: 72
D'oh! yes that is what I'm referring to. Sry got my terms mixed up.
-
01-21-2012, 09:56 AM #50Member
- Join Date
- Apr 2011
- Location
- Brisbane, Australia
- Posts
- 1,434
Thanked: 642
I made a 'tool' rest at the front of my grinder that I rest the blade on a slide it back and forth as I hollow the blade. There is a fair bit of free hand involved though. I normally rough grind the hollow on high speed, around 2650sfpm, then slow it down to under 700sfpm and slowly 'tidy up' with a higher grit belt. Most of the the final tweaking is freehand.
Again hopefully one of the resident custom makers can add their comments here.
Stu

Last edited by Str8Raz0r; 01-21-2012 at 10:05 AM.
-


 Reply With Quote
