
Results 11 to 20 of 62
 145Likes
Thread: Best grit progression?
 LinkBack URL
 About LinkBacks
-
06-03-2019, 10:08 PM #11Senior Member


- Join Date
- Aug 2015
- Location
- Houston, TX
- Posts
- 605
Thanked: 217 Have you watched any YouTube honing videos? Look up and watch everything from gssixgun and drmatt357. Much good there.
 Originally Posted by animalwithin

Edit: I can’t believe I left out Lynn Abrams’ videos.Last edited by Longhaultanker; 06-04-2019 at 05:30 AM.
A little advice: Don't impede an 80,000 lbs. 18 wheeler tanker carrying hazardous chemicals.
-
06-03-2019, 11:07 PM #12Senior Member
- Join Date
- Nov 2016
- Location
- Chicago Suburbs
- Posts
- 1,102
Thanked: 292
Ideally, you would like the grit level to double each step. If you jump more than 2X, you can still get the job done, but it will be more difficult. Thus, the "ideal" progression would be 1K, 2K, 4K, 8K, 16K, 32k.
About the only stones that come in these specific grits are the Shapton Glass stones (with the highest grit being 30K rather than 32K). Because the SG30K is quite expensive, many folks stop at the 16K level.
Norton stones only come in 1K, 4K, and 8K, but many have used that progression successfully. If you have a tough beard, you probably want something after the 8K level: a higher grit synthetic, a natural finisher, or pasted strops.
Naniwa Superstones come in 1K, 2K, 3K, 5K, 8K, 10K, and 12K. Most folks skip some of the stones to save money. One common progression would be 1K, 3K, 8K, 12K; another might be 1K, 2K, 5K, 12K. Personally, for my face, I do not like the edge of the Naniwa 12K, so I often progress up through the 10K level and then jump to another stone.
Remember that the two most important stones are the one you use to set the bevel (typically a 1K, although other grits have been used) and the one you use to finish the edge. The intermediate stones in the progression only serve to remove the scratches and stria left by previous stones in the progression. The quality of your edge is determined by the first and last hones in the progression.
Also remember that for most razors, you will only need to set the bevel once, if you do a good job. After that, you should be able to maintain the edge without going back through the full progression.
-
The Following User Says Thank You to RayClem For This Useful Post:
ScoutHikerDad (06-12-2019)
-
06-03-2019, 11:28 PM #13Senior Member
- Join Date
- Aug 2015
- Location
- Houston, TX
- Posts
- 605
Thanked: 217
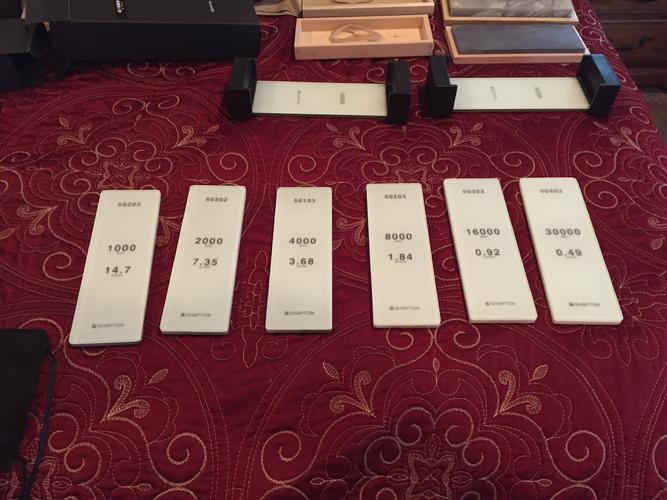
Heres my progression of Shapton Glass stones. The real progression is in the microns. Notice the micron numbers on each stone.A little advice: Don't impede an 80,000 lbs. 18 wheeler tanker carrying hazardous chemicals.
-
06-03-2019, 11:29 PM #14Senior Member


- Join Date
- Feb 2013
- Location
- Haida Gwaii, British Columbia, Canada
- Posts
- 14,450
Thanked: 4829
I firmly believe the most important hone is your bevel setter. It sets the “tone” for the rest of your progression. The 1K shave challenge was a big eye opener. I have done it a couple of times. The first time when I was first learning to set a bevel and a couple of times when I was helping others learn to hone. There is a couple of threads on that too. Basically you refine your edge to what you think is the perfect bevel set, strop on linen and leather and shave. If you finish off nicely on the 1K you can get a surprising shaving edge, which is also the point of perfect setup for the next hone in your progression. Some guys have shave every honecin their progression. As Ray said the first and last are the most important.
It's not what you know, it's who you take fishing!
-
The Following User Says Thank You to RezDog For This Useful Post:
ScoutHikerDad (06-17-2019)
-
06-04-2019, 02:28 AM #15Senior Member
- Join Date
- Feb 2016
- Location
- pennsylvania
- Posts
- 302
Thanked: 66
when i first joined this forum, nanawa 1-5-8-12k was the general starter rule of thumb. and it still works great. but when i added a 2k life became soooo much easier. cant say/stress it enough - good bevel set is 90% of the game. and the 2k helped refine the bevel further while easily and quickly removing the deep 1k scratches. after the 2k the rest of the progression is super fast, just a couple minutes per. then the only tough decision is deciding which finisher to use - jnat, thuringian, coticle, ark, zulu etc. =]
-
06-04-2019, 02:48 AM #16Senior Member
- Join Date
- Apr 2012
- Location
- Diamond Bar, CA
- Posts
- 6,553
Thanked: 3215
I think my rationale with respect to the grit progression was that I thought the finer you go, the easier it is to get a shaving edge. I wasn't aware that that is not necessarily the case. I have much learning to do...
Often, especially once you master honing, you do not need to reset a bevel on a 1k and can do it easily on a 4k or if there is no damage or chip and just needs a touch up just the 8k.
But if you are new to honing, make your life easy and just reset on a 1k. 95% of new honer problems stem from a lack of a fully set bevel, then the honer polishes two bevels that never fully meet.
Once you learn to fully set a bevel you will learn to do so removing very little steel.
The other trick, the is what ever you next stone after the 1k is, 4k in your case. The 1k is the grinder, it makes the bevels flat, in the proper plane/angle and gets the bevels to meet, the edge will be ragged.
The next stone transitions from grinding, to polishing and the goal is just to remove all the deep 1k stria and begin to produce a straight edge. Once the 1k stria is removed, the rest of the stones just polish the bevel and make a progressively straighter edge.
Here is a good post with great micrographs of bevels from a new honer. He took a razor from bevel set to shave ready, it was the second razor he honed. As you hone, match your bevels to his. (Second try at Honing).
-
The Following User Says Thank You to Euclid440 For This Useful Post:
ScoutHikerDad (06-17-2019)
-
06-04-2019, 03:34 AM #17Senior Member

- Join Date
- Apr 2012
- Location
- Los Angeles, CA
- Posts
- 377
Thanked: 23
Oh man, where to begin haha.
Longhaul, I did watch a few of Glen's videos and copied his technique on my 4k/8k. This was on a razor that just needed sharpening, the bevel was already set.
If I remember correctly, it was shaveable (although not the smoothest) and by the end of the shave it was tugging quite a bit to the point where another shave would have been uncomfortable. This has been my experience with honing so I thought perhaps higher grit would help establish a better/longer lasting sharpness to the blade. I'm now learning this isn't necessarily the case I did take note of the microns in your photo, not something I considered when looking at stones. Quite a collection you've got there!
You all are stressing the importance of the bevel which I didn't give much thought to as I've only attempted honing on razors with the bevel already set. However, I have a slew of vintage wedge blades which will need the bevel reset so this could be a great place to practice.
I've been looking at honing incorrectly. I assumed more laps, higher grit, etc. meant sharper and better but from what I'm seeing here, this isn't the right approach.ScoutHikerDad likes this.
-
06-04-2019, 09:44 AM #18Senior Member
- Join Date
- Mar 2012
- Location
- Thunder Bay, Ontario, Canada
- Posts
- 17,331
Thanked: 3228
Originally Posted by animalwithin
Unfortunately honing a razor is not a paint by numbers game. By that I mean if you watch a honing video and do the same number and types of strokes as in the video you won't likely replicate the same results. Honing is a learned skill/art more than an exact science. So it is frustrating at the start. Add to that knife/tool sharpening is similar but different enough that that a lot does not carry over to honing a razor.
People are stressing the bevel set more than what the actual bevel looks like. Without the two bevels meeting at the apex/edge all along the apex/edge you likely will not get a good shave no matter how much you polish the edge after that. You build on a bevel that is actually set.
That is where a couple of accessories really help. To me a good direct light source and a decent hand loupe will help you determine if a bevel is set or not. If you see sparkle reflected off the very edge the bevel is not set. Another helpful tool is a felt maker. By marking the bevel with the felt maker and doing a few strokes you can see if you are honing all the way to the edge or missing some spots.
Once you think you do have the bevel set there are tests you can do to check that. Personally, if the blade will shave arm hair easily all along the edge I take it that the bevel is set. I then do a few light strokes on the bevel setter hone, change the tape for new and go to the next hone up in the progression.
You can continue to use the felt marker at each stage to make sure you are refining the bevel right out to the edge while checking with a loupe too.
The number of strokes at each stage will vary according to what the blade needs and varies blade to blade. You also decrease the pressure/torque that you apply to the edge as you go up the progression. With a chipped/rust pitted blade you have to hone past the bad stuff till you get to good steel. That is where a 1K bevel setter makes thing a bit easier.
Have fun, be patient and don't be afraid to walk away nd take a break from honing if it gets frustrating.
BobLife is a terminal illness in the end
-
The Following User Says Thank You to BobH For This Useful Post:
ScoutHikerDad (06-17-2019)
-
06-04-2019, 01:05 PM #19Senior Member
- Join Date
- Aug 2015
- Location
- Houston, TX
- Posts
- 605
Thanked: 217
There is much good to learn from the leading voices on YouTube about sr honing. Meetups are rarely convenient. Local mentors are an option. But for the normal, average, amateur honer, YouTube is an excellent option for visual instruction. None of the leading presenters suggest a “paint-by-the-numbers” approach. General principles and techniques are what is being presented, and what every beginner needs to know. In this technological age, what could be more convenient that video instruction? Practice and growing experience from principles learned are key.
ScoutHikerDad and animalwithin like this.A little advice: Don't impede an 80,000 lbs. 18 wheeler tanker carrying hazardous chemicals.
-
06-04-2019, 01:35 PM #20Senior Member
- Join Date
- Mar 2012
- Location
- Thunder Bay, Ontario, Canada
- Posts
- 17,331
Thanked: 3228
I never said "the leading presenters suggest a paint by the numbers approach". I am saying that a beginner may try and duplicate the same number and type of strokes as in a video and not get the same results as in the video. That may come with practice and growing experience in honing. Originally Posted by Longhaultanker
Yes, videos are the most convenient way for most people to learn honing. Not the best but most convenient. Also there are videos out there that I really don't think offer anything good to learn for the beginner. I cringe, as do a lot of others, at some of the methods suggested.
To me this thread represents what I am talking about.
https://sharprazorpalace.com/honing/...ompensate.html
BobLife is a terminal illness in the end


 Reply With Quote