
Results 51 to 60 of 91
 148Likes
Thread: Can't get 2 razors to shave
 LinkBack URL
 About LinkBacks
-
05-24-2020, 10:38 PM #51Member

- Join Date
- Mar 2011
- Location
- Gyptuckey, CO
- Posts
- 57
Thanked: 1 This is my goal, or thereabouts... with the addition of a natural finishing stone(s). That's another subject of addiction, LOL. I feel like compounds and pastes are a crutch, and I'd like to gain the skills and knowledge to where I can shave comfortably and smoothly with an edge from a finishing stone, and stropped on naked cloth and leather. But for now, the compounds and pastes are working for me.
 Originally Posted by HungeJ0e

-
05-24-2020, 10:44 PM #52Member
- Join Date
- Mar 2011
- Location
- Gyptuckey, CO
- Posts
- 57
Thanked: 1
I have been looking at the edge as you and other have described, and I'm not seeing any sparkles, white lines, etc. I've been trying different locations, angles, backgrounds and light sources to see if I can see anyting different, and I can't. It appears to me that the bevels are set. The edge will shave from heel to toe. Originally Posted by RezDog
I'm working on improving my technique and pressure to refine the stria and smoothness of the edge.RezDog likes this.
-
05-24-2020, 11:48 PM #53Home of the Mysterious Symbol


- Join Date
- Dec 2019
- Location
- New Orleans LA
- Posts
- 857
Thanked: 123
Does the entire length of the edge shave arm hair easily? Originally Posted by mpukas
If it does that, and you can see no visual indications as mentioned, then step up into your progression. Just normal alternating laps, x stroking it. Pressure about the weight of your hand to begin with, tapering off to just the weight of the razor. Look at your bevel and you should see, after only about 15 laps or so, the difference between the new finer scratch pattern and the scratches from the bevel setter. That will first of all tell you where the razor is not getting full contact with the hone. If you see that, and it doesn't clear up by itself in another dozen or two dozen laps with your next stone or film, report back in for advice on how best to hit the unhat parts. The transition between bevel setter and the first hone of your progression can be difficult the first time or two. On those first exploratory laps, whatever you do, don't lay your finger on the blade while honing. The finger press is a useful tool but only when called for and only when properly regulated. Remember, hone in one hand, razor in the other. Let them come together, don't force them. Think two spacecraft docking together out in the weightlessness of space. Now if you get good coverage from the next stone, hone until you feel the razor sort of getting sucky or sticky with the hone. It will slightly resist your effort to stroke it along the hone. This is called stiction and you usually start seeing it at around the 8k level but if you are very perceptive and you are really nailing it, you will feel it at the 4k stage. It will increase, then stop increasing. That's where you stop, or at least shift into a stage finish mode. Honing for too long can give you a bit of fin or wire edge, unless pressure is absolutely dead light. The magnitude depends on the stone and the steel, and your honing "fist", the fine nuances of how you hold and move the razor. One way to control this effect is to use a few "pull strokes" followed by a dozen extremely light regular laps. A pull stroke is where you lay the razor on the hone and instead of stroking it away from you or toward you, pull it by it's tail directly to the right about a half inch, then flip and do the other side. Do about a half dozen total per side and this will help to strip artifacts from the edge. It also slightly rounds the bevel right at the apex, so the extra laps following the pull strokes help to peak the apex back up. Another useful technique is to just do the last couple dozen light laps with a very short x stroke. Maybe 3" or so of travel. Be careful not to slap the razor down. Gently lower the edge to the stone. Either one of these tricks will help to fight those edge boogers and give you a nice smooth clean edge. You want the best edge possible before you move up to the 8k or whatever.
Your finish stage will call for a whole new set of skills and techniques if you really want to optimize that edge. And yeah, you do want that. So do your midrange work and get that right, first. You should be able to strop and shave reasonably well after the midrange stones. If not, you aren't quite ready for the finisher just yet. And if you think the razor IS ready for the finisher, well, one chicken at a time. We'll get to that.
-
05-25-2020, 12:35 AM #54Senior Member


- Join Date
- Apr 2012
- Location
- Diamond Bar, CA
- Posts
- 6,553
Thanked: 3215
If it is not the stone, it is technique.
Post some pics of the current bevels and one of the edge on a flat surface to ensure the edge is straight and one straight down on the edge to ensure the bevel is fully set.
Or continue doing the same thing and expecting a different result.
-
05-25-2020, 04:47 AM #55Member
- Join Date
- Mar 2011
- Location
- Gyptuckey, CO
- Posts
- 57
Thanked: 1
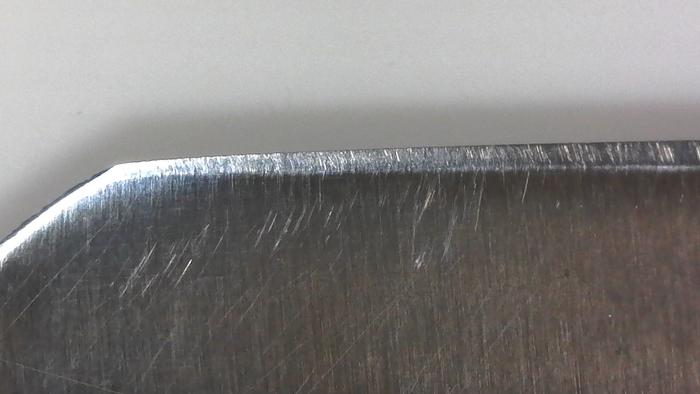
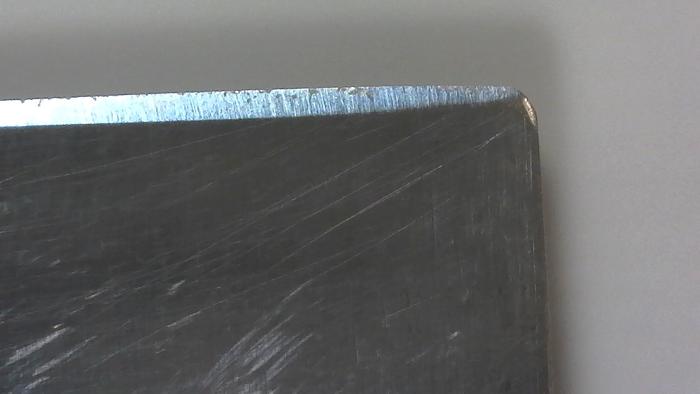
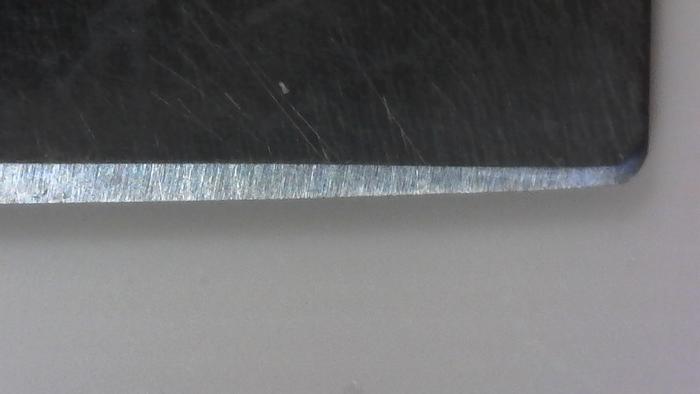
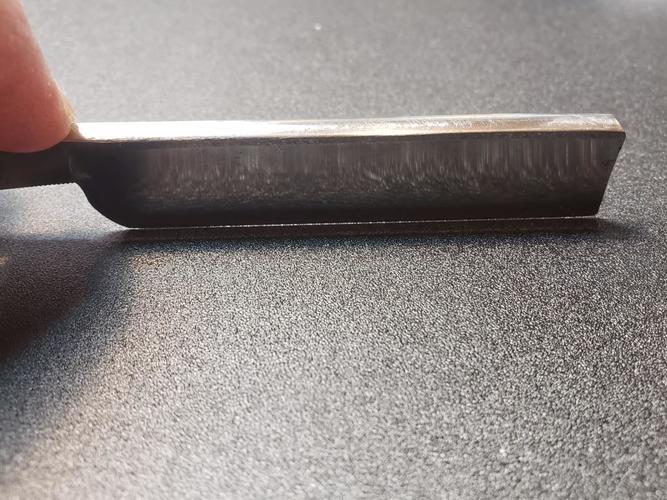
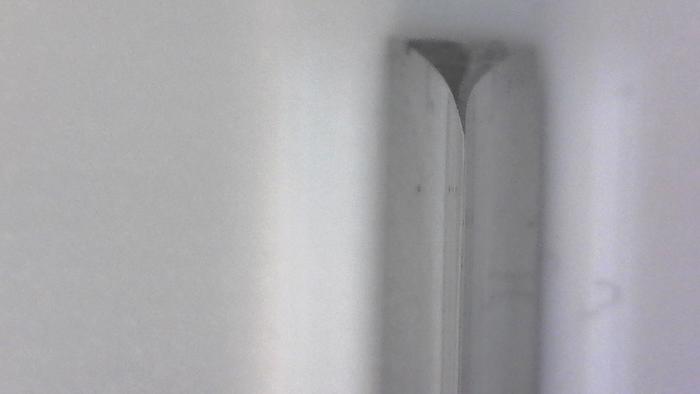
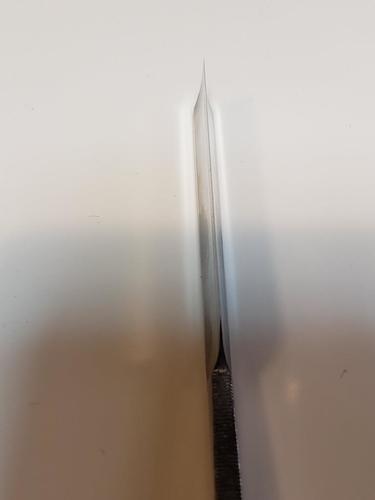
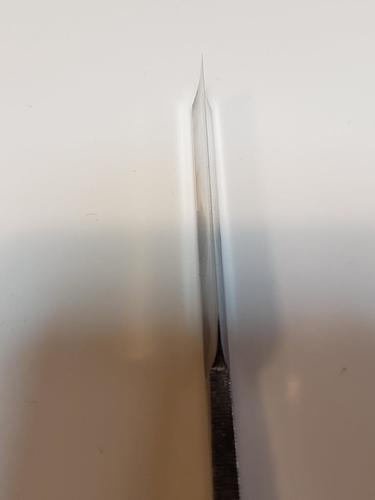
Bevel pics. I know the stria is not perpendicular the entire length. Part of improving my stroke. It's getting better. And more "gunk" keeps showing up at different parts of the bevel with further honing. Still pitting/corrosion at the bevel?
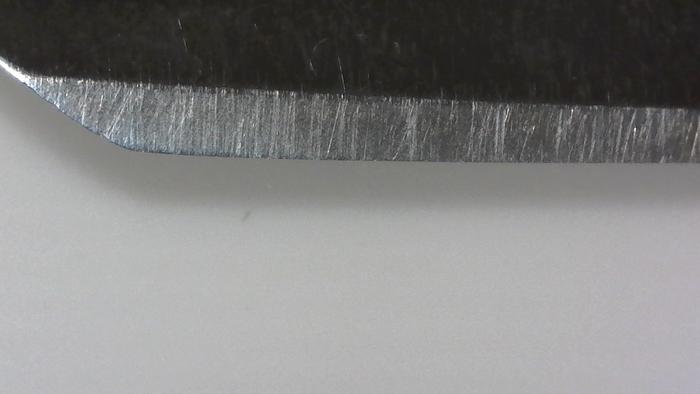
-
05-25-2020, 04:48 AM #56Member
- Join Date
- Mar 2011
- Location
- Gyptuckey, CO
- Posts
- 57
Thanked: 1
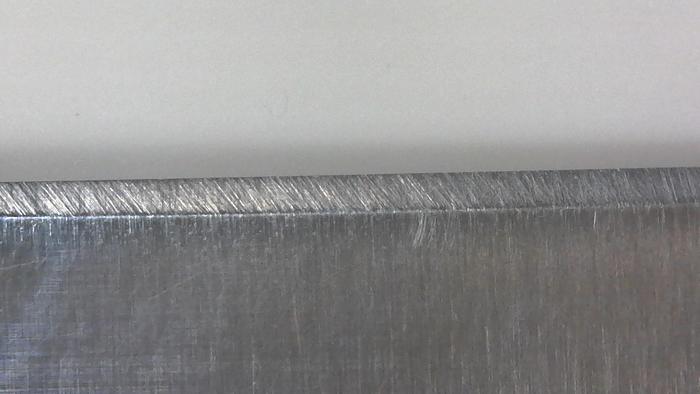
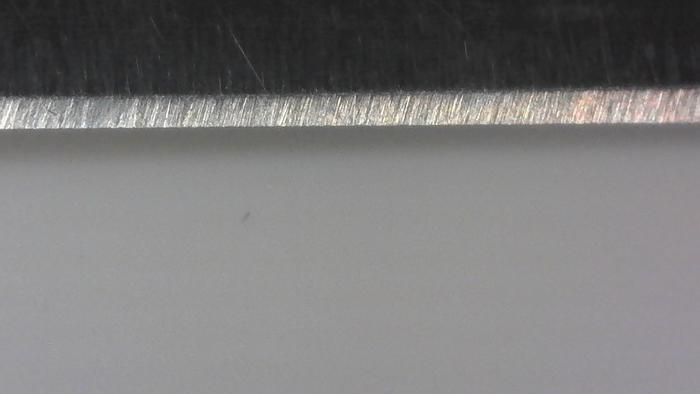
Edge flat on black plastic mouse pad.
-
05-25-2020, 04:50 AM #57Member
- Join Date
- Mar 2011
- Location
- Gyptuckey, CO
- Posts
- 57
Thanked: 1
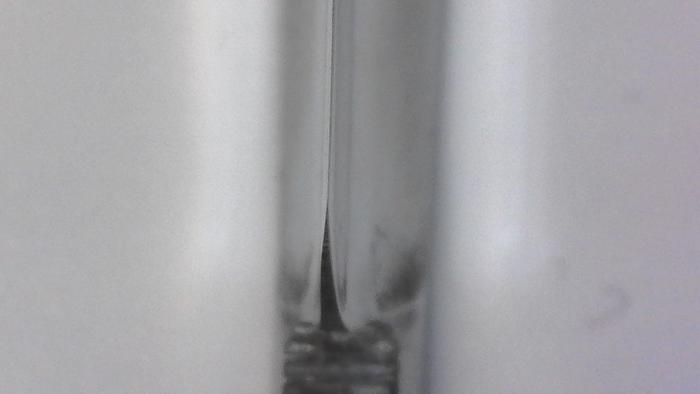
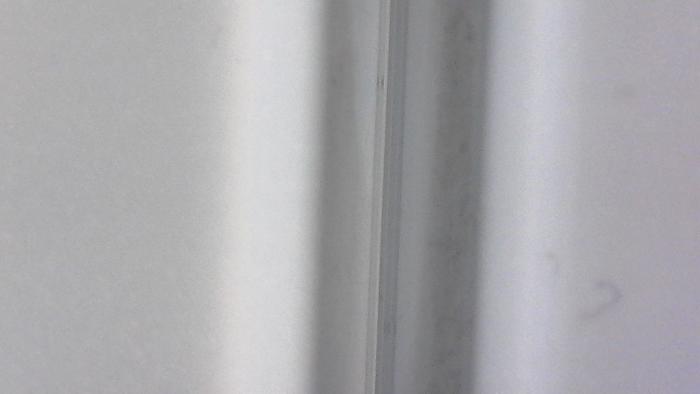
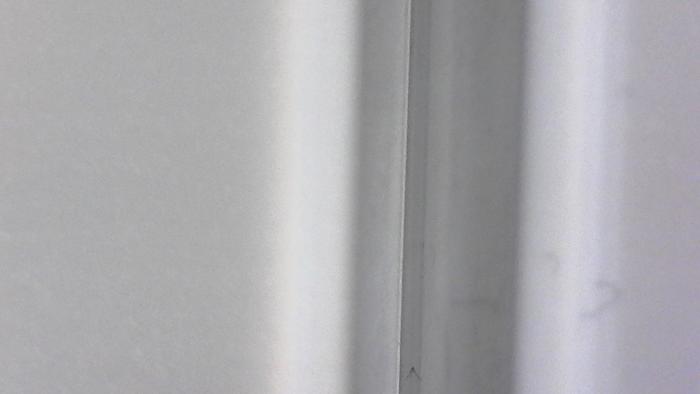
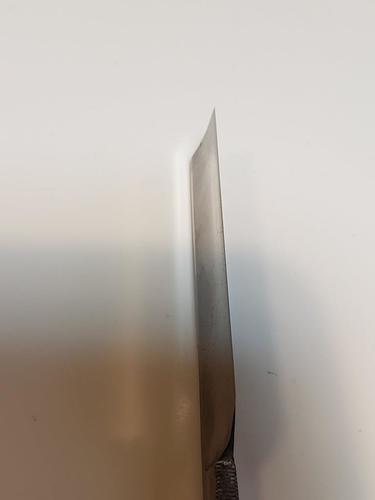
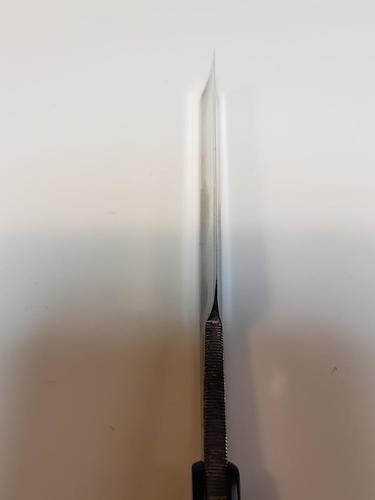
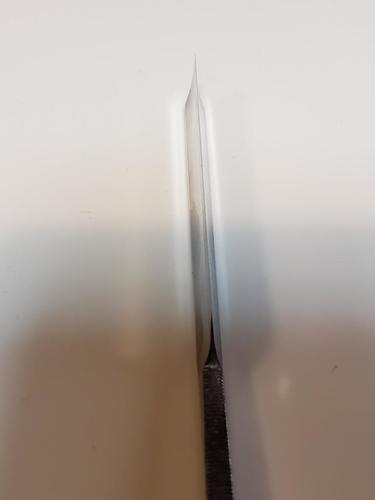
I tried to get pics of the edge under to 250x scope. I couldn't get the scope to focus on the edge.
-
05-25-2020, 04:54 AM #58Member
- Join Date
- Mar 2011
- Location
- Gyptuckey, CO
- Posts
- 57
Thanked: 1
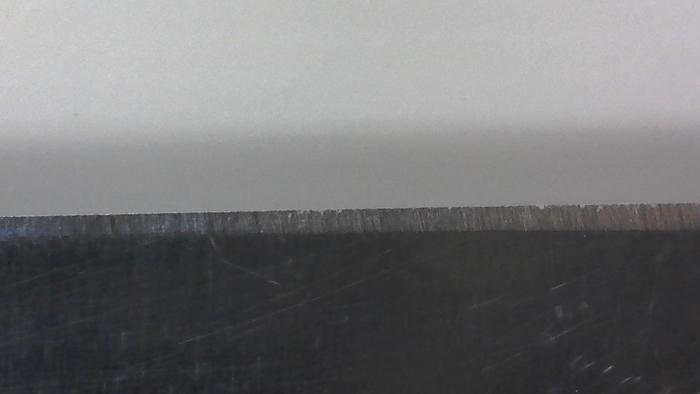
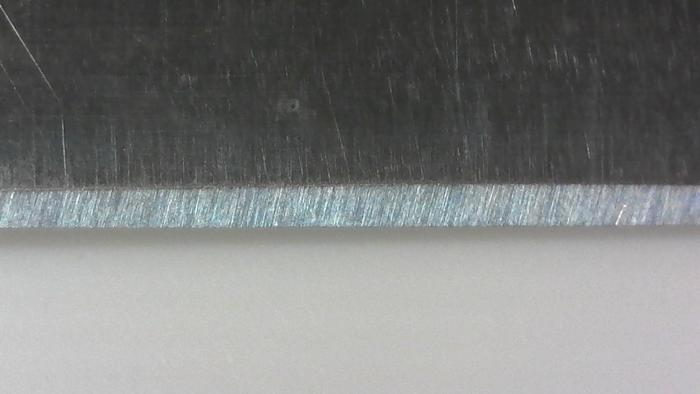
Camera phone pics of the edge against a white background. The black plastic mouse pad had too much glare and reflection. Again, very difficult for me to get good lighting without shadows and focus on the edge. It's the best I can get. Thanks again for all the feedback. I'm reading and re-reading it, and absorbing bits of it at a time.
-
05-25-2020, 05:44 AM #59The Great & Powerful Oz


- Join Date
- May 2008
- Location
- Bodalla, NSW
- Posts
- 15,636
Thanked: 3751
Originally Posted by mpukas
Originally Posted by mpukas
~~~~~~~~~~ Originally Posted by mpukas
Last edited by onimaru55; 05-25-2020 at 05:50 AM.
The white gleam of swords, not the black ink of books, clears doubts and uncertainties and bleak outlooks.
-
05-25-2020, 12:27 PM #60Senior Member
- Join Date
- Apr 2012
- Location
- Diamond Bar, CA
- Posts
- 6,553
Thanked: 3215
All good points made by Oz… and your bevel is still not set and the edge is not straight.
First you must straighten the edge, breadknife or high angle honing, then fully set the bevel. You are using too much pressure and the blade is flexing, lifting the edge off the hone.
You cannot hone a razor like a knife.
Many of us have come to razor, as competent knife honers. We have all experienced what you are and come to the realization that honing razors is different than knives.
Yes, some stones are similar, and some technique is also similar, but the goals are quite different.
Getting to sharp is easy, getting to keen and smooth enough to shave facial hair without removing skin can be a trick. A razor must be keen, smooth… and shave comfortably.
Many can produce an edge capable of shaving, but there is a whole other level of shaving that is enjoyable and painless.
Often experienced knife honers come to razors and refuse to embrace the difference, they usually go away frustrated, disenchanted, and some angry, some very skilled and prolific knife makers. If you embrace the fact that the two disciplines are different and are willing, to let go of some “knife technique” you can make room to learn the razor honing process.
It can take at least a year to produce a good shave quality edge, stropping alone can take a year to get to the point where you are consistently improving an edge, a single errant stroke can trash an edge. There is shaving and there is shaving.
Add to the technique the added challenge of restoration and repair of an abused vintage razor. Much of what you are experiencing is that your razors need repair. It is not honing, but repair, and must be done before honing.
Once you are capable of consistently producing a comfortable shaving edge, a year or so later you will notice a marked improvement in your edges in comfort and keenness.
Accept that knife and razor honing are different and require different skills. You have been given good advice, you only need to follow it.
Which is not to say that advise is not available, keep swinging and practice the advice given. Posting photos of razors and edges will assist others in attempting to diagnose your technique.
Flatten your stone on a steel cookie sheet with Wet and Dry. Drywall screen is not flat. If you start out with a stone with issues you will introduce more variables into the honing process. We are talking microns here, eliminate the variables.
With a one dollar cookie sheet and a sheet of 220 wet and dry you can eliminate a big one. It’s a start.mpukas likes this.


 Reply With Quote
 It's what you know. A lot of guys use 2 hands here also but the left hand applies no pressure. It's more like training wheels to keep you upright.
