
Results 111 to 120 of 281
 333Likes
 LinkBack URL
 About LinkBacks
-
03-26-2023, 02:14 PM #111Senior Member


- Join Date
- Dec 2020
- Posts
- 171
Thanked: 1
 Originally Posted by Gasman
 He only goes for a burr on the 1k, and even so only a very slight burr that I couldn't even detect with the pad of my finger. Originally Posted by onimaru55
I was asking him how he was deciding when he is done on the 4k and 8k, if he is counting time, or strokes, or whatnot. He said he mostly goes off the way light bounces off the bevel, or just sort of guesses when he is done. He doesn't feel for bevel on 4k or 8k.
I didn't ask him to touch up the razor, I intentionally blunted it against the edge of the stone beforehand so I could watch the entire process from scratch, so this is likely not the process he would use to touch up an edge.
-
03-26-2023, 03:40 PM #112Senior Member


- Join Date
- Dec 2018
- Location
- Gainesville, FL
- Posts
- 5,964
Thanked: 604
With all due respect, creating a burr is one sure way to know that an apex has been reached. It should not be necessary once you are well versed with honing and comfortable with all the nuances but if done as you described it will not hurt your razor. The process is burr one side till the burr can be felt the entire length; burr the other side in the same way; join the edges and remove the burr by drawing the edge along the stone; do light X strokes to bring the edge back. Additionally I personally wash the blade and stop on a canvas strop I keep specifically for stropping between stones.
Again, with respect, many people will frown on burring the edge but it is better for you to do it that way than to keep going all the way to finish on a blade that has an unset ot incompletely set bevel. Now,.I know some are probably currently gnashing their teeth and saying, "what you should be doing is learning how to do it.the right way." Theoretically that is true. You however are not in honing college working on countless edges for academics sake. You are trying to get and keep your small collection shave ready. Academics can come later. Remember that eventually you should be able.to reach shave.ready without this method but do what it takes to get you there now keeping the textbook method as a goal.
That is my two cents worth.Iron by iron is sharpened, And a man sharpens the face of his friend. PR 27:17
-
03-26-2023, 04:30 PM #113Senior Member
- Join Date
- Dec 2020
- Posts
- 171
Thanked: 1
What is the "correct" way to determine a bevel has been sufficiently set? Originally Posted by PaulFLUS
Last edited by rickytimothy; 03-26-2023 at 04:54 PM.
-
03-26-2023, 05:05 PM #114Senior Member
- Join Date
- Dec 2018
- Location
- Gainesville, FL
- Posts
- 5,964
Thanked: 604
Boy, that is a loaded question! That all depends on who you ask. There are many tests for bevel set. I frequently use the TNT (thumb nail test) but others will tell you NEVER do that on the basis of it damaging the edge but then so do joining (running the edge along the stone). I do not do it at the very end of the process but up to near the end. Our friend from Taiwan TMILO uses a similar method of drawing the edge against a tissue. Arm hair shaving too is another one. Optics help also. Look at the bevel from the side and look for chippiness. Don't just look at the striations, look at the very edge. Also look straight down on top of the edge for shiny spots. Those spots are where the two bevels do not meet to form an apex.
There are many more factors and more methods and MUCH more to add to that but in the interest of not muddying the water I would defer you to your knife guy you are working with for now. He is getting you good shaveable edges. Go with what works. Tell him POLITELY what has been discussed here and see what he says. Perhaps he is starting you off one easy way and will lead you to more advanced methods. He is spending the most useful time with you right now. Take advantage of that and make the best of it. At least I think that is the way to go.Last edited by PaulFLUS; 03-26-2023 at 05:53 PM.
rickytimothy likes this.Iron by iron is sharpened, And a man sharpens the face of his friend. PR 27:17
-
03-26-2023, 06:50 PM #115Senior Member
- Join Date
- Dec 2020
- Posts
- 171
Thanked: 1
Okay I get the idea I think. I just read over pretty much the entirety of scienceofsharp.com.
The most interesting thing on that site by far is the interaction between micro-convexity and strop material. I've been thinking about this process in terms of mostly abrasion vs burnishing, or varying fineness of grit, but never considered the possibility that going straight from 8k to leather would create foil edges that don't happen if you use a pasted linen strop in-between due to the geometry and compression mechanics of the cloth as well as other characteristics of the material at play (I don't think the guy who wrote that website expected this either.)
It certainly makes me appreciate further your gift of the pasted linen strop, that seems key to the entire process now. Hopefully I don't have to worry about resetting bevels for the indefinite future regardless, so the details of how I do or do not set a bevel shouldn't come into play that significantly regardless.
I'm not getting further lessons as we're on the subject, I essentially traded my guy some metallurgical testing for an evening of lessons, so there will not be a progression into more advanced techniques. I believe I should be able to develop more advanced techniques on my own now that I have a more solid foundation.
One thing still on my mind: The photos on scienceofsharp seem to indicate that pastes stropping, past a certain point 10-30 laps in, does not change much, however, it still seems to me to be a rather aggressive thing to do on a frequent basis as part of a regular stropping routine. What micron CrOx paste did you use to make that strop, and do you find it necessary to use frequently?
-
03-27-2023, 05:08 AM #116Home of the Mysterious Symbol


- Join Date
- Dec 2019
- Location
- New Orleans LA
- Posts
- 811
Thanked: 118
The burr method of setting the bevel is fast and easy for a beginner to understand. The burr proves that the two bevel faces have been moved inward beyond the central plane of the edge. This is a fact. It is also a fact that after the burr has been raised on each side in turn, much work remains to be done, in removing the burr and cleaning up the edge, including any bits that over-aggressive cleanup have broken off short. Since that small amount of extra steel will have to be removed anyway, the extra laps required may as well do more useful work, besides.
So, we have the hybrid burr method. In this technique, a burr is raised along part of the blade, not all. Then the razor is flipped onto the other side and a burr is raised along part of the edge, on the other side, preferably with some overlap so that there is part of the edge that has seen a burr raised to both sides in turn. Now the cleanup begins. And also, the bevel is not fully set yet, on all or most of the edge that has not seen a burr. So from that partial burr on both sides, the honer simply hones, preferably with a bit of slurry, on the bevel setting stone or film. While the burred part is getting cleaned up and a true bevel formed with a nice tight apex, the rest of the edge is getting its bevel set, too, with either diminishing sets of one side strokes and then the other side, or ordinary alternating x stroke laps, or a combination of both. The bevel has proven itself along the part that was burred. The rest is up to the judgement of the honer, as indicated by visual inspection and any sharpness tests or hone feedback that he likes.
Under a good loupe, or a microscope or even a strong magnifying glass, aided by a very bright work light, the difference between where the burr is definitely set and where it is not, is rather obvious, even to a beginner. The full burr method is more of a no brainer approach and can be good when a really primitive factory edge must be put to rights, or maybe for a newbie's first bevel. Otherwise the hybrid method works pretty darn good, and saves considerable time. For me, the hybrid burr method works, works quickly, and works well. Nothing wrong with NOT ever raising a burr, except sooner or later you will do it anyway, even if unintentionally. On the other hand, there is nothing wrong with intentionally raising a burr, as long as you recognize that the burr must then be removed, and possibly some extra steel be removed from the bevel faces to tighten up the apex.
I honestly don't care if people use the burr method or a variation of it, or not. I honestly don't care if people say it is very very wrong to do it that way. Just sharing what I know and what techniques have served me well on my honing journey so far. Every single razor that I have set a bevel on over the last 10 years or maybe more, has had a burr raised on it, at least partly. They all shaved just fine when I was done.
-
03-27-2023, 12:28 PM #117Senior Member
- Join Date
- Dec 2018
- Location
- Gainesville, FL
- Posts
- 5,964
Thanked: 604
I too don't see it as necessarily "wrong." The main concern is that the more you hone the more steel you remove. Keep in mind that the whole purpose of honing is to remove steel BUT there is only so much. If you can get there before it happens then you have removed less. If you go too far or if the edge chips because of it then you have removed more. Of course if you keep going back because you never quite got there in the first place then you may remove more cumulatively in the process. It's a balance. The key is being economical with it. You're fine with where you're going now. If you're getting good edges and loving your shaves then that is the aim. Razors are tools and tools must be cared for but also they are meant to be used. Use them correctly and they will serve their purpose for longer than you are alive.
Iron by iron is sharpened, And a man sharpens the face of his friend. PR 27:17
-
03-27-2023, 02:45 PM #118Senior Member
- Join Date
- Dec 2020
- Posts
- 171
Thanked: 1
What are you looking at exactly? Directly at the edge of the blade? Originally Posted by CrescentCityRazors
I am conscious of this, and this is exactly why I chose not to practice on my good razors, not out of concern to damage them but mostly to avoid wasting steel unnecessarily. I just don't really get how else you could confirm that the bevel is set without raising a burr, even with good optical microscopes there seems to be a very limited amount of information you can get by looking directly at the edge of the blade. I agree with the people who say that swiping it across your thumbnail seems like a bad idea if your goal is a keen razor. Attempting to cut hair seems unreliable off of a 1k bevel set. The hybrid technique sounds tricky and seems like it could also cause un-evenness in the blade. Originally Posted by PaulFLUS
Science of sharp essentially recommends to just raise the burr once and avoid ever doing it again as it's wasteful of steel, but that was on a beginner guide, he doesn't seem to recommend any more advanced and careful way of accomplishing the same task.
-
03-27-2023, 07:09 PM #119Home of the Mysterious Symbol
- Join Date
- Dec 2019
- Location
- New Orleans LA
- Posts
- 811
Thanked: 118
Directly at the edge itself, and also at the bevel faces. Looking at the edge in the edge-on view, with the strong work light already mentioned and a good loupe such as the one I recommend, the Belomo 10x Triplet, you will see tiny points of reflection where there is a chip or divot or unimproved part on the apex. The edge, ideally, is not even visible. Looking at the bevel, you look for where the bevel is making contact all the way out to the apex, and where it is not. Where the bevel is a single continuous surface, and where it is broken into two strips that are a slight angle to each other and therefore reflect the light separately from one another. Either case, edge sparklies or incomplete bevel facet, call for more work on the bevel setter. Originally Posted by rickytimothy
There are several pics on this page that might help to illustrate what I am talking about, and a couple that also show a very obvious burr. The incomplete bevel pics tell you that the bevel is not set, and it is pointless to jump up to a finer grit.
http://www.growleymonster.com/hybridburrmethod.html
A LOT of honers do not deliberately raise a burr. It can be done. Using the burr is perhaps a little easier to understand, though. And yes, it should only ever be done once, unless you severely damage the edge, maybe by banging it against the sink or faucet. Simple refresh of the edge after normal use and wear only requires a visit to your finishing stone or film. Your razor, but if you go back further in the progression you are honing away steel that does not have to be honed away. Similarly, if you set your bevel correctly and later you decide to return to the bevel setter, you are wasting steel. It's your steel to waste as you see fit, but it is unnecessary. Your new razor should last a couple hundred years. Maybe 30 years of hard use. Why burn it up in half that time? Leave some steel there for your grandkids to play with.I am conscious of this, and this is exactly why I chose not to practice on my good razors, not out of concern to damage them but mostly to avoid wasting steel unnecessarily. I just don't really get how else you could confirm that the bevel is set without raising a burr, even with good optical microscopes there seems to be a very limited amount of information you can get by looking directly at the edge of the blade. I agree with the people who say that swiping it across your thumbnail seems like a bad idea if your goal is a keen razor. Attempting to cut hair seems unreliable off of a 1k bevel set. The hybrid technique sounds tricky and seems like it could also cause un-evenness in the blade.
Science of sharp essentially recommends to just raise the burr once and avoid ever doing it again as it's wasteful of steel, but that was on a beginner guide, he doesn't seem to recommend any more advanced and careful way of accomplishing the same task.
Because you do remove significant amounts of steel when setting the bevel, it is important to make sure that you are not running the shoulder up onto the honing media, and that you are not applying the bulk of the honing pressure to the spine. Pressure should be properly balanced. Honing in hand helps with that, and also helps with managing a smiling edge, since the stone or plate held in hand will roll slightly as it responds to the slight pressure from the razor.
I will caution you, however, to NOT mix and match honing styles. You have a guru now. Follow him. Don't rely on your own understanding of what works with what. If your guru recommends raising a burr, raise a burr. If your guru recommends not, then don't. If you want to hone my way, hone my way, all the way. Random technique gives random results. mixed up technique gives confused results. Stick with your Sensei's way until you are consistently getting at least a professional grade edge on your razors, before you try another approach. The well trodden path is the easiest and will get you to yoru destination the quickest and cheapest. If he gets great edges, and you want his results, use his way, all the way, no excuses or second guessing. There is no reason why, with a willing teacher and room in your budget for the necessary tools, you can't be getting excellent edges within a week or two. This does NOT have to take months or years. I have had many students get better than professional quality edges by their second attempt, a few on the first attempt, equalling my own usual edge quality. It's all about staying on a well marked path, and not straying until you master it.
With one specific honing style under your belt, trying another way is pretty easy. I have had guys learn my way, and get bored with it, because they thrive on challenge, so they jump into Jnats, Coticules, slates, Arkies, whatever. Just go at it with your credit card at the high ready, will still frustrate, but not as much as it would otherwise, after first mastering ONE style of honing.
-
03-27-2023, 08:23 PM #120Senior Member

- Join Date
- Aug 2017
- Location
- Cowra, Australia
- Posts
- 628
Thanked: 86
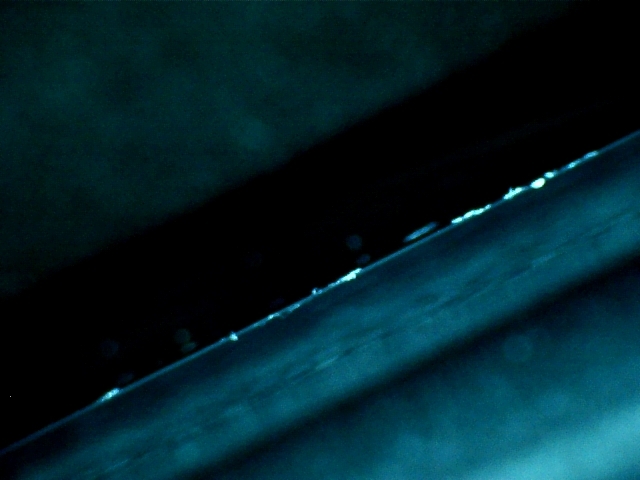
Here are some more good pics taken looking straight down onto the apex when checking if the bevel is set. As said earlier, you need plenty of good light shining directly onto the apex and a good loupe.
Here we are looking straight down onto the edge and we see a white line. Thats light reflecting off the edge because the bevels dont form an apex. The bevel is not set
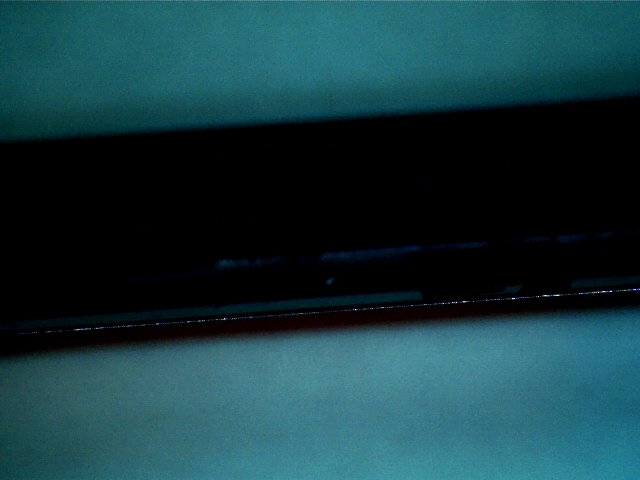
This pic is taken after more honing. But you can still see some light reflecting off the edge. The sparklies as we call em. Getting closer but the bevel is still not set.
In this pic there is no light reflecting off the edge. An apex is formed and the bevel is set.
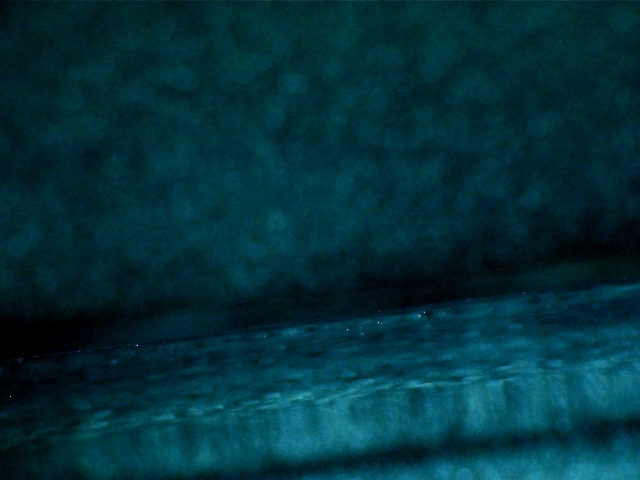
At this point we can move on to the next stone in the progression. If you dont set the bevel properly, all subsequent honing is a waste of time. A set bevel is the foundation on which all honing is built. You will NEVER get a true shave ready edge without a properly set bevel to begin with.- Mick.


 Reply With Quote