I work on an 8X11 piece of ¼ / 6mm inch craft foam, available at most craft stores for a couple bucks.
I then cover the foam with a blue paper shop towel and change the towel out as needed. Works great when cleaning a razor with WD40 and steel wool as it soaks up the mess and you can toss the whole thing and start with a fresh surface.
I then cut the foam into 2x2 inch pieces and work off of them supporting the razor on one and scales on the other, so it lays flat without pivot pin creating a focal point.
On just blades I use one pad. They wash nicely with Simple Green and dish soap. I also use 2x2 pieces of Yoga mats that I have picked up from thrift stores for a buck, wrapped around a cork or PVC make nice backers for sanding or mats, they are softer.
I use a large piece of mat under a plastic tray to level the surface and make a nonskid surface.
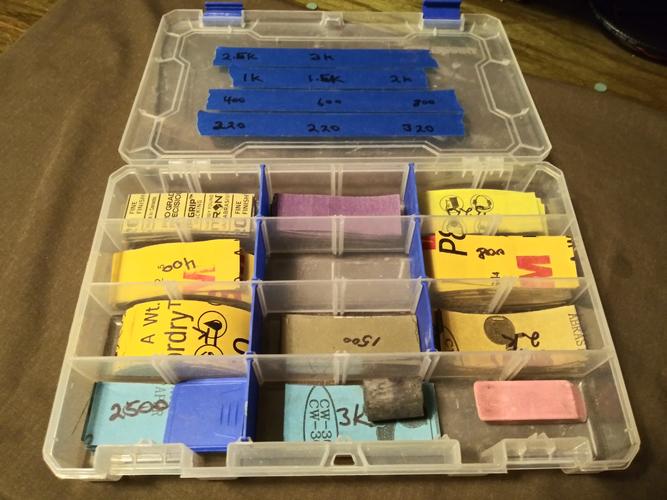
I cut my sand paper into 3X3 inch strips with an old guillotine paper cutter, clamp together, (I use a vice), and glue one edge to make a pad of sand paper. Make sure to write on the back what the grit is the minute you cut it up or you will have a mess on your hands not knowing what grit you have.
Here is an old post on making the sandpaper note pad. And photos of the foam and paper towel set up.
From 1 or 2k grit you can polish easily with any good metal polish or a buffer. From 600 it does not take much to get a high gloss shine with 1k. Change your paper often, paper is cheap, if you use up the grit you are just wasting time and effort and run the risk of scratching the already polished surface using worn paper. Nick Wheeler has a great video tutorial on hand polishing a knife, Hand Sanding 101, notice how often he changes paper.
