
Results 17,541 to 17,550 of 20573
 91474Likes
Thread: What are you working on?
 LinkBack URL
 About LinkBacks
-
12-07-2019, 02:31 PM #17541Senior Member


- Join Date
- Feb 2018
- Location
- Manotick, Ontario, Canada
- Posts
- 2,793
Thanked: 557
Thanks for the suggestion Mike.
Those old cardboard coffin boxes, especially the ones for heavier razors, deteriorate at the ends. Probably from the razors being put away damp or sliding in the box and banging on the ends. I have a few in that condition.
I was scanning my local Yellow Pages and discovered a book binder who also does restoration work. Think I’ll take them in to him and see if he has any ideas. Seems like it might be similar to what he does for old books. If it is too costly, I’ll try the fabric idea.David
Shared sorrow is lessened, shared joy is increased
― Spider Robinson, Callahan's Crosstime Saloon
-
12-07-2019, 03:23 PM #17542Senior Member

- Join Date
- Apr 2012
- Location
- Diamond Bar, CA
- Posts
- 6,553
Thanked: 3215
I'm thinking of a piece of fabric that can be placed from inside the box, then sealed with something from the outside. any thoughts.?!
I repaired an antique Halloween Cat Lantern that had some holes and cracks. It was made from pressed Paper Mache.
I used CA glue and kicker to seal cracks while squeezing to shape, then small strips of brown paper soaked in thinned white glue and built up the layers. With a heat gun I could get several layers on at a time and build up layers from inside and out.
You can achieve any shape and thickness by layering and sanding the hardened material to shape and finish. I painted with black acrylic paints. The repairs were invisible from the outside.
For the box, I would cut some cardboard to the ID of the end and glue with CA inside the end to supply some rigidity and shape, then Paper Mache over the outside to shape. You could lay strips inside with some long tweezers for strength.
I dont have any pic of the project but here is a similar lantern.

-
The Following 2 Users Say Thank You to Euclid440 For This Useful Post:
DZEC (12-07-2019), ScoutHikerDad (12-07-2019)
-
12-07-2019, 04:31 PM #17543Senior Member

- Join Date
- Oct 2010
- Location
- 50 miles west of randydance
- Posts
- 9,673
Thanked: 1354
If you have enough length in the box how about a plug like from a piece of balsa wood. Then put paper over the end to hide it.
-
12-07-2019, 04:45 PM #17544Razor Vulture

- Join Date
- Oct 2010
- Location
- Lone Star State
- Posts
- 26,119
Thanked: 8612
I have used bits from donor boxes to make new bottoms and tops. A wide sharpie to paint them.
Took forever to dry, but Birchwood Casey tru-oil looks great and seeps-in, restoring stiffness.
-
The Following User Says Thank You to sharptonn For This Useful Post:
DZEC (12-07-2019)
-
12-07-2019, 04:52 PM #17545Senior Member

- Join Date
- Mar 2015
- Location
- Akron, Ohio
- Posts
- 12,064
Thanked: 4312
I've thought also in some form of those directions as well as making a rectangular dowel that I could use as a mold to make a cup that fits the inside of the box, then build up the outside like Marty is talking about.
I could make it by wrapping wax paper around the dowel, then wetting down a piece of 3/4 oz fiberglass with epoxy and form it around the dowel. Once cured I can remove it from the dowel and slide it to the bottom of the box and secure with a couple drops of CA. The rest would be fillers of some sort. Won't never poke out the ends again, and done right, you could even lengthen the box slightly, being most seem to have shrunk some.Last edited by outback; 12-07-2019 at 04:54 PM.
Mike
-
12-07-2019, 05:01 PM #17546Razor Vulture
- Join Date
- Oct 2010
- Location
- Lone Star State
- Posts
- 26,119
Thanked: 8612
Here is the first one I used the Tru-oil on. Glad I was able to save it..
https://sharprazorpalace.com/custom-...different.html
-
12-07-2019, 05:04 PM #17547Senior Member

- Join Date
- Feb 2013
- Location
- Haida Gwaii, British Columbia, Canada
- Posts
- 14,443
Thanked: 4828
I think it was science guy or voidmonster that had a thread on this a while back. I cannot search from this device, but the basic pretence was coarse fabric and paper-maché then died with shoe dye.
It's not what you know, it's who you take fishing!
-
12-07-2019, 10:19 PM #17548Senior Member


- Join Date
- May 2010
- Location
- Upstate South Carolina
- Posts
- 3,308
Thanked: 987
Wow, incredible work on that rusty heel, Mike-I swear you guys are always inspiring me with new ideas to up my game! I got in quite a bit of shop time myself today. No pics yet, but I met my local knife-maker friend at a craft show today. He made me a damascus straight razor blade that I have yet to see (apparently it's a Christmas present of sorts?). Anyway, I'm super excited, as I have some beautiful stabilized book-matched birdseye cherry burl that he also gave me that I think will show it off beautifully.
In anticipation of that, I went ahead and flattened/thicknessed the blanks and epoxied them on to .020 G10. I'm thinking brass hardware and maybe some sort of dark red recon stone wedge. I'll know more when I get the actual blade in hand. Here are the scales (on the left):
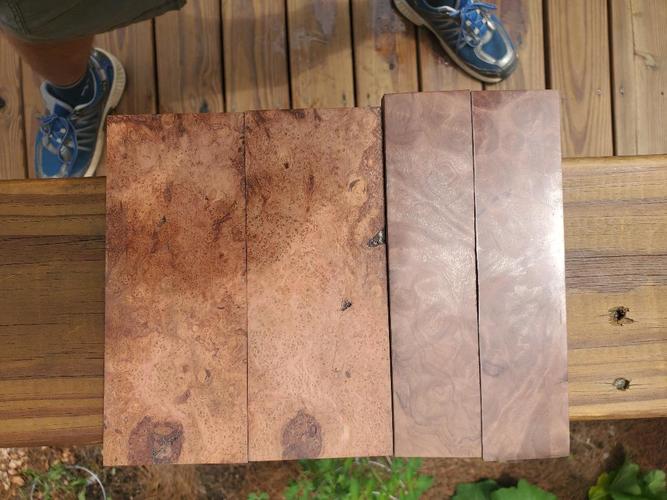
If this works out, I'm thinking of asking him if we can collaborate on some kind of series. The 1st one is going to be mine, though!There are many roads to sharp.
-
The Following User Says Thank You to ScoutHikerDad For This Useful Post:
outback (12-07-2019)
-
12-07-2019, 11:16 PM #17549Senior Member

- Join Date
- Aug 2015
- Location
- Montreal
- Posts
- 853
Thanked: 128
Cardboard folded into a U shape of cut so 4 tabs to fold up. Put glue on tabs, put in place with some kind of spacer to hold it there from the inside while glue dries, then some kind of filler to fill in the gaps and then a heard somewhere that shoe polish is good Originally Posted by outback


-
12-12-2019, 01:19 AM #17550Senior Member
- Join Date
- Aug 2015
- Location
- Montreal
- Posts
- 853
Thanked: 128
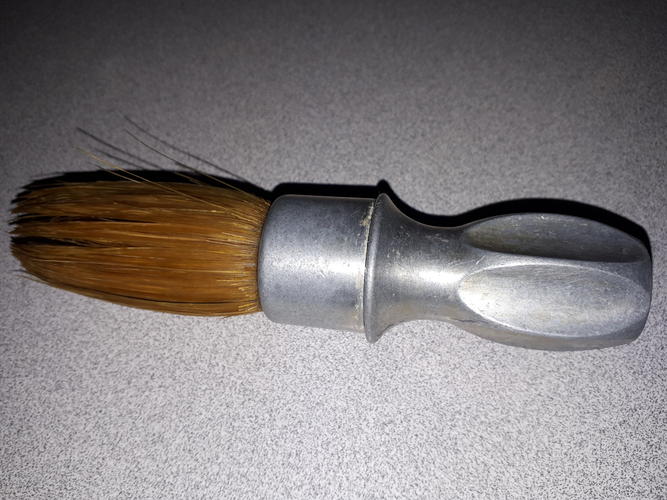
Cleaned up this rubberset and am just waiting for a knot to finish it


 Reply With Quote
 any thoughts.?!