
Results 11 to 20 of 98
 318Likes
Thread: An idea for a contact grinder.
 LinkBack URL
 About LinkBacks
-
02-18-2019, 08:53 PM #11Senior Member


- Join Date
- Jan 2015
- Location
- Pinole, ca
- Posts
- 1,526
Thanked: 339
I think I see what your trying to do with the lathe, space is an issue for me too.
Voidmonster and MikeT like this.
-
The Following User Says Thank You to jfk742 For This Useful Post:
Voidmonster (02-18-2019)
-
02-18-2019, 09:09 PM #12Captain ARAD.


- Join Date
- May 2011
- Location
- Pacifica, CA
- Posts
- 2,474
Thanked: 2226
Exactly. I've got about 6x10 feet of space to fit 2 work benches and a drill press into, and on those two benches are the 3-4 machines I need at any given time. So the more I can fluidly move things around and reconfigure, the better. Originally Posted by jfk742

The lathe is currently sitting on the workbench I use for assembly, tooling, & storage. My drill press is currently doing double duty as a drill press and a drum sander, which I have successfully ground a razor on. (Well, a RSO -- it's mystery steel, so I'm never gonna HT it, plus the scrap I used wasn't quite thick enough for the design). That works because it's an old Rockwell radial-arm drill press that I can just rotate 90 degrees so the sanding drum is parallel to the floor.-Zak Jarvis. Writer. Artist. Bon vivant.
-
03-06-2019, 08:00 PM #13Captain ARAD.
- Join Date
- May 2011
- Location
- Pacifica, CA
- Posts
- 2,474
Thanked: 2226
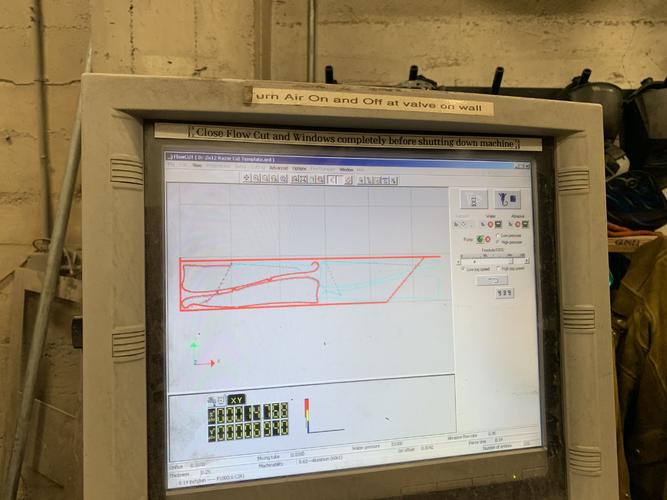
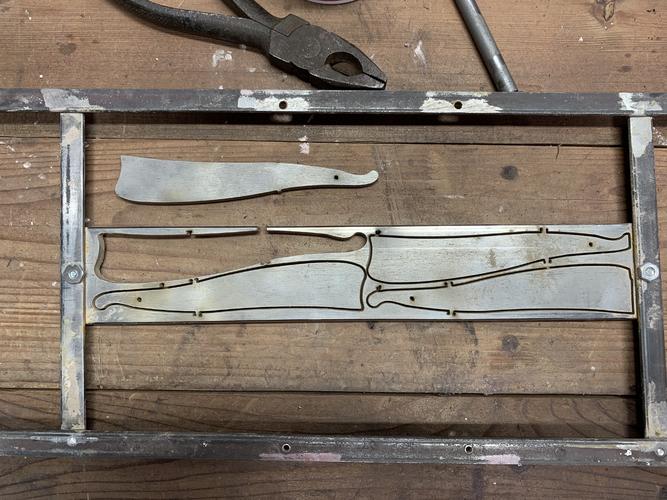
The shop finally got their waterjet up & running again and I went over last night and cut out blanks. Screwed up two of them with my work holding, but that’s good because I’ll need test pieces for heat treat (thanks, SRP member for offering to do that! I’ll be in touch soon!) and other experiments.
When I arrived at the shop last night, they were in the middle of cleaning out the waterjet — it had been in operation for years without having tank/tub/pool? cleaned of garnet and mysterious small cutoff parts. So I had to wait until it was refilled with water. It was after midnight when I got to cutting, but the cuts went fast — once I stopped screwing them up. (2/3rds of the way through without garnet, half way through set to aluminum instead of steel — did I mention it was after midnight?)
No more teasing.
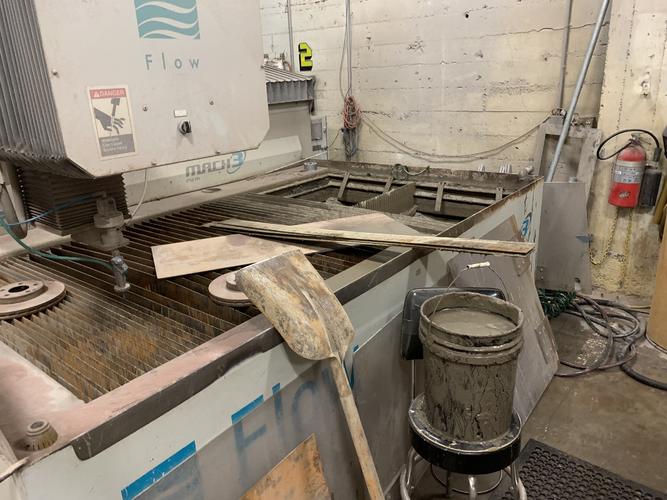
The state of the machine when I arrived.
The business!
I’m also going to play with using their various laser engravers to see if I can do good decorative blade etches with it.
I’ve decided to put my mark on the blades using the CNC machine and Fusion 360’s engraving tools, it should be very close to a struck mark (especially if done before heat treat), and I will have total control over it and can change things a little from one blade to another. My idea is to use ‘stamps’ that are appropriate for different eras of Sheffield razors. (WARRANTED / CAST STEEL / UNIVERSALLY APPROVED, etc)-Zak Jarvis. Writer. Artist. Bon vivant.
-
-
03-07-2019, 12:29 AM #14Senior Member


- Join Date
- Jun 2013
- Location
- archbold ohio
- Posts
- 2,378
Thanked: 546
thanks for the update Zak! looking forward to seeing more.
-
The Following User Says Thank You to tintin For This Useful Post:
Voidmonster (03-07-2019)
-
03-08-2019, 07:33 PM #15Captain ARAD.
- Join Date
- May 2011
- Location
- Pacifica, CA
- Posts
- 2,474
Thanked: 2226
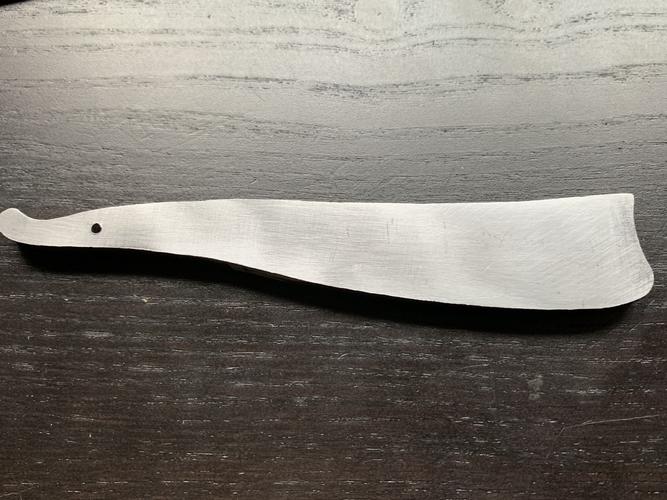
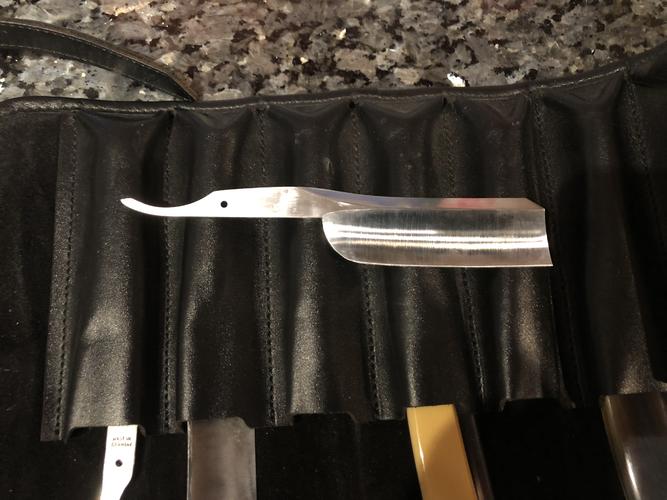
So now here’s where I’m at:
I would like to turn this:
Into this:
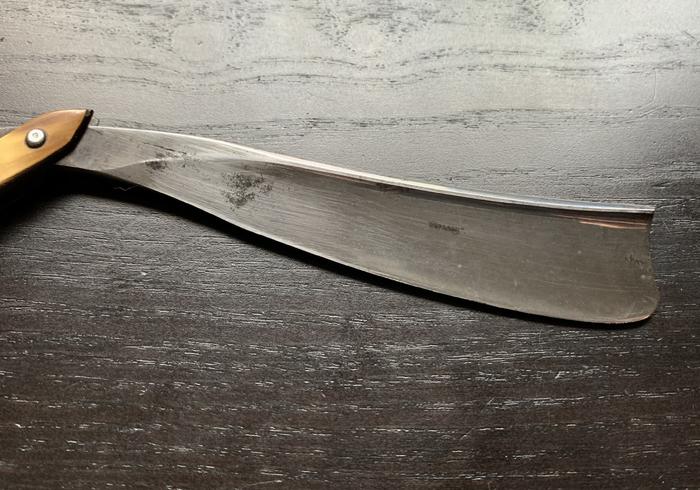
I know I can do this with the drum sander on my drill press. I’ve made one out of mystery steel already, and having made that one, I have confidence I can make plenty more.
But I’d like more repeatable results. I’d like the razors I make to all be substantially the same.
The old Sheffield guys had two solutions they used for this problem. Honestly, they used both, but only one is available to me.
The first one was to press-gang me into an apprenticeship when I was ten years old and then for 7 years feed me stale biscuits (with beef drippings at Christmas) and hit me with a stick any time I did something wrong.
For various reasons, that’s not a viable option for me.
The second one was what was called a stiddy stick. Stiddy is an old Yorkshire dialect word for an anvil. In this particular usage — FANCY WORD ALERT!!!— the word is a synechdoche. The part standing in for the whole, like calling men who work on ships hands or a bathroom a toilet. So a stiddy stick was a custom, one-off ... tool... thing that cutlers made to organize and repeat things when making blades so they could be done repeatedly. There were probably stiddy sticks at the forge, there were probably stiddy sticks at the grinder, and there were likely stiddy sticks at the polisher. They were a way of holding the work and controling which surfaces got what treatment.
Unfortunately, there aren’t any surviving records that I know of of what they looked like or how they were used, just mention that they existed and were common.
I don’t pretend that I can make the stiddy stick that was used in the production of the razor I’m copying, but I’m 98% certain I can make one that will do what theirs did.
Initially I’d thought I could control grind angle this way, but that means constraining 2 axes of movement. Maybe later I’ll get into this enough to do that, but for now it’s more complicated than I wanna deal with.
So I knocked this design up in Fusion 360 just as a visual reference. I’ll probably cut this out of wood for real, and not nearly as fancy as these pictures, but the idea holds.
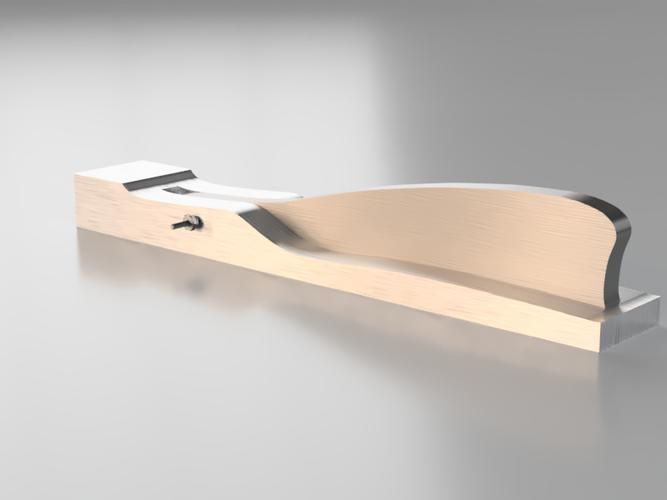
What you’re seeing is my blade blank bolted through the pivot hole into a block of material that has a cutaway where I want to grind. That lip on the side will butt up against the side of my drum sander and prevent me from going over, and it will also push the piece away to get that nice shoulder at the pivot end.
Here’s the thing disassembled:
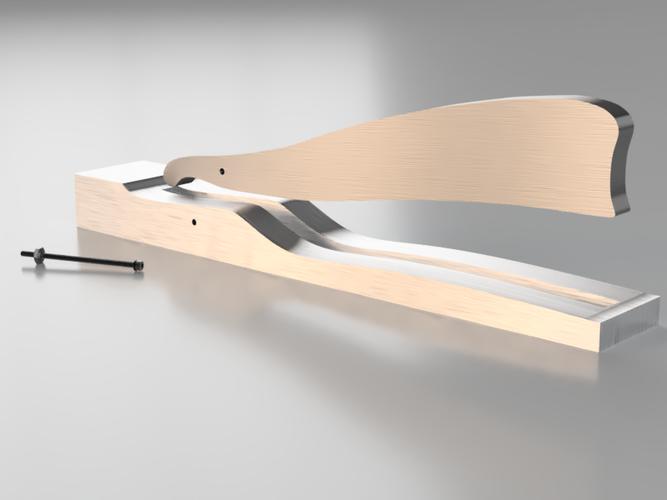
This should improve repeatability of the design and I can use it both before and after heat treat for grinding down the blade.
Maybe as I get better at all this stuff I will actually mill these little tools out of aluminum or something using the CAM model on the CNC machine, but for now it was just a way of organizing my thoughts and seeing how it might work without cutting or grinding anything for real.-Zak Jarvis. Writer. Artist. Bon vivant.
-
-
03-08-2019, 07:45 PM #16Skeptical Member


- Join Date
- Nov 2016
- Location
- Colorado Springs
- Posts
- 10,548
Thanked: 2194
Very cool Zak. I like the idea of making the jig so all turn out the same. You have some great ideas. I will be watching to see how it turns out. Nice shape BTW. I find my best shaves come from that shape.
Now if you could make a CNC machine cut the hollows, that would be so accurate it could never missLast edited by Gasman; 03-08-2019 at 07:47 PM.
Voidmonster likes this.It's just Sharpening, right?
Jerry...
-
The Following User Says Thank You to Gasman For This Useful Post:
Voidmonster (03-08-2019)
-
03-08-2019, 08:07 PM #17Captain ARAD.
- Join Date
- May 2011
- Location
- Pacifica, CA
- Posts
- 2,474
Thanked: 2226
All these good ideas are shamelessly stolen! Originally Posted by Gasman
CNC machines that can do that exist. There are marvels out there in the world for manufacturing.
Honestly though, I think with practice it should be possible to make jigs and a modified grinder setup that would be faster than most any CNC machine and accurate enough that there'd be no visual difference.-Zak Jarvis. Writer. Artist. Bon vivant.
-
The Following User Says Thank You to Voidmonster For This Useful Post:
spazola (03-09-2019)
-
03-08-2019, 08:45 PM #18Truth is weirder than any fiction..

- Join Date
- Jun 2012
- Location
- Land of the long white cloud
- Posts
- 2,946
Thanked: 580
Test pilot on standby...
Voidmonster and MikeT like this.Into this house we're born, into this world we're thrown ~ Jim Morrison
-
03-08-2019, 08:54 PM #19Senior Member
- Join Date
- Jan 2015
- Location
- Pinole, ca
- Posts
- 1,526
Thanked: 339
Is the tang tapered? If so that nice tapering shoulder will grind itself.
Had I kept the grind going I would have eventually had a tapered look similar to the one on that blade in your picture. I also could be completely wrong as I have ground a total of 1.5 razors.
I like your idea for making a jig for repeatability and speed. Hopefully bluesman will chime in as he showed us a jig he made for his rough grinding, it was pretty similar to a door hinge, he would set the razor on one side and then push that whole deal into the belt, he had a side hollowed in about 20 seconds.
-
03-08-2019, 11:02 PM #20Captain ARAD.
- Join Date
- May 2011
- Location
- Pacifica, CA
- Posts
- 2,474
Thanked: 2226
That's a nice looking razor! Originally Posted by jfk742
It is tapered, but not enough for the shoulder on the original razor. Other than the curvature which my jig should take care of, I'll just freehand the falloff.
I'd love to see Bluseman's jig, too.-Zak Jarvis. Writer. Artist. Bon vivant.


 Reply With Quote