Results 51 to 60 of 98
Thread: An idea for a contact grinder.
-
03-15-2019, 01:30 AM #51

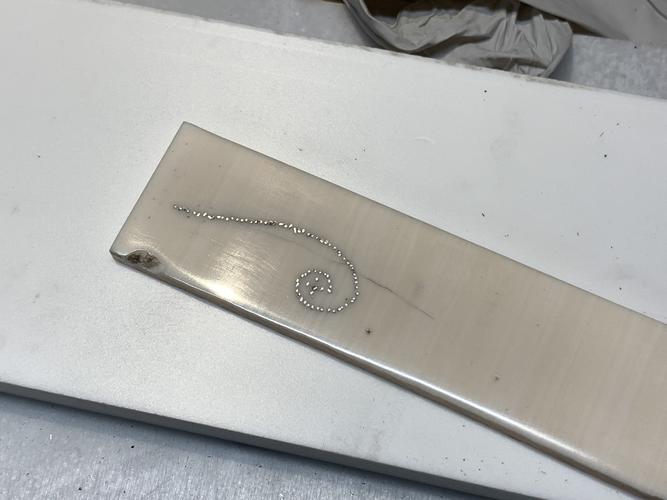
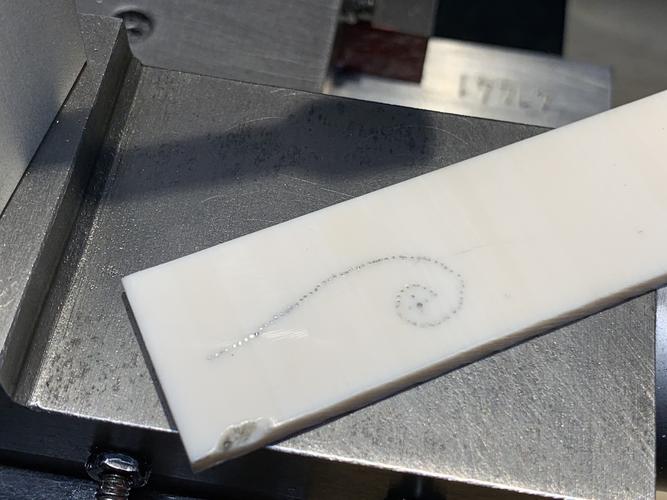
I finished a test piece on the fake ivory (which I cut with the grain going the wrong direction, but nevermind that).
There were several points during this when I really wonderered if doing a non-usable piece as a test was really the way to go.
Oh hell yes was it the way to go.
The amount of work required to make the important mistakes meant it would have sucked to be doing this on scales I could have used if only I hadnít made these mistakes.

So! A catalog of things I learned doing this.
- Printing a design on paper is very helpful, but also gets in the way
- The paper gets lifted up by debris from the drilling and offsets the location of your bit, which is how things got so... wandery.
- Cut as close as you can, but not too close!
- The worst sins (visible here) of not cutting too close can be erased with a thorough sanding (not shown, but only because the piece is downstairs and Iím upstairs and now too lazy to go and get a picture)
- HALF OR LESS the number of pins I used for that space
- Embrace the mess. Itís not really gonna be perfect, but neither are any of the real ones Iíve ever seen
- Better way to mark the design is to print onto adhesive, then carefully use a centerpunch to score each of the dots
- Fake ivory ó like real ivory! ó will cheerfully crack if you whack it too hard
- MAKE USE OF THE DEPTH GAUGE ON THE DRILL PRESS. I drilled all the way through about 1/3d of them. Couldnít have helped with structural stability.
- To do this properly, you need to hold the wire, the work piece, a pair of tweezers, and the flush cutters. Technically you can put the tools down, but it really slows things down. Itís possible to hold them all at once (if youíve got tweezers with finger loops).
- Tweezers are important! I put the wire into the hole, then use the tweezers to push it to maximum depth. Itís easier if you can grab the wire very close to the surface of the hole to help it not just bend
- If youíre careful, and thereís no real way to do this without being careful, you can do basically the whole design before peening the pins.
- Once peened, slather a little bit of thin formula CA glue over the works. Youíre gonna sand everything anyway, but the thin CA will wick around all those pins and help hold them in place
- Once I really got going, it was kinda meditative. That is, if you periodically stop meditating to swear at things. You donít? Maybe Iím doing it wrong.
Okay, I lied. Had to go downstairs to help with dinner so I took a picture of the sanded test piece.

(There arenít any missing pins there, just ones reflecting the dark ceiling of my garage)-Zak Jarvis. Writer. Artist. Bon vivant.
-
-
03-15-2019, 01:48 AM #52Str8Faced Gent.


- Join Date
- Aug 2013
- Location
- Orangeville, Ontario
- Posts
- 8,466
- Blog Entries
- 1
Thanked: 4207
That looks pretty cool Zak.
Piqued my interest yet,,
Thanks for posting the journey, enjoying the tag along..
 "Depression is just anger,, without the enthusiasm."
Steven Wright
https://mobro.co/michaelbolton65?mc=5
-
The Following User Says Thank You to MikeB52 For This Useful Post:
Voidmonster (03-15-2019)
-
03-15-2019, 01:48 AM #53

Oh, I forgot to add the things I used here:
'Alternative Ivory' from Masecraft
#80 drill bits for the small pins and #77 bits for the one large one
30 gauge sterling silver wire for the little pins
24 gauge sterling silver wire for the big pin
FYI, sterling silver wire in these gauges is very cheap. It's a TINY amount! And even for all those tiny pins, with some losses, I used less than half of what I bought. 12 inches of both sizes cost less than a dollar.-Zak Jarvis. Writer. Artist. Bon vivant.
-
-
03-15-2019, 02:11 AM #54

Were both sides of the scales typically done or just one?
Your patience, or is it experience, that allows you to do test pieces amazes me. I always plan on doing that for new techniques but then think to myself “I got this” then immediately screw it up or paint myself into a corner, both of which could have been easily avoided by a few minutes of testing.
I can’t wait for the end results of your razors.
-
The Following User Says Thank You to jfk742 For This Useful Post:
Voidmonster (03-15-2019)
-
03-15-2019, 03:19 AM #55

Thankfully, just one side. Otherwise, I'd probably be pulling my hair out and running away.
On this one, my every instinct told me 'just make a full set of scales. You've got a couple of old razors that need them anyway!', but my hands said 'do something small but representative instead.'
My hands were correct. Mostly because when I started doing this, I thought I was going to have to drill out each hole using just my fingers on the tiny little pin vise. I still kind of had to do that, but I'm pretty sure I can mitigate that on a real project.
Oh yeah, I broke three of those fiddly little #80 bits doing this and bent one of them into unusability.-Zak Jarvis. Writer. Artist. Bon vivant.
-
03-15-2019, 03:30 AM #56

"Embrace the mess. Itís not really gonna be perfect, but neither are any of the real ones Iíve ever seen"

-
03-15-2019, 10:20 AM #57

what's the reason for peening the ends? Is it to tighten them? And how does one peen something so small? Doesn't it all get sanded off?
-
03-15-2019, 12:12 PM #58

I notice you mentioning a mill.
If you are doing a rattler grind and have access to a mill, wouldn't it be easier to remove the first 90% by milling?
I've made rattler grinds on a wheel like that, and the big issue is to avoid getting a wavy blade due to small differences in pressure.
Once that starts happening, it's very difficult to recover.
If you use a jig that could take part of that issue away though.
Just thinking about milling vs sanding.Til shade is gone, til water is gone, Into the shadow with teeth bared, screaming defiance with the last breath.
To spit in Sightblinderís eye on the Last Day
-
The Following User Says Thank You to Bruno For This Useful Post:
Voidmonster (03-15-2019)
-
03-15-2019, 07:37 PM #59

I don't... THINK it's all getting sanded off? At any rate, the pins don't completely fill the holes before peening, and after sanding they do. I'm sanding down less than 1mm. Maybe it also kinks the pin deeper into the hole. They definitely stay in better after being whacked (LIGHTLY) with the hammer.
I have access to both a manual mill and a CNC mill, and maybe what I really should be doing is sorting out the work-holding situation enough to use the CNC. The blade shape is very simple and really shouldn't be that difficult for it. The last few MM will need to be done by hand after heat treat anyway.
Thinking out loud here, but I'm thinking that would go something like this:
Don't use the blanks I cut, and instead do the majority of that with the CNC for work holding stability. The blanks I have can be used for various tests.
Using the stock I cut them from, face the whole piece so it's precise.
Put precisely drilled holes in all corners so it can be bolted down from either side with perfect registration.
Design the tool path to leave a few small tabs like the waterjet did, but otherwise let the machine do all the work. Rough in with an endmill or two, drill the pivot out, engrave mark with an engraving bit, finishing pass with a ball nose. Do it as two sides, leave enough thickness at the edge that HT won't warp. (Charlie's suggestion of about a nickel's width -- roughly 2mm).
Cut the tabs.
HT.
Final grind on the drum sander at low speed with high grit.
Sound about right?
Edited to add:
While I *do* have a milling vise in my home workshop, it's not useful for anything precise at all.-Zak Jarvis. Writer. Artist. Bon vivant.
-
03-15-2019, 07:50 PM #60

You’re edge thickness should end up in the .005” area. I would think you could go slightly less than 2mm for ht.
You could set your drum sander up to do final sanding pretty easily I would think. A machinists vise with some flat stock and a series of spacers may work to keep from getting wavy. As you get close to final thickness free hand it to blend in anything around the shoulder since that may be a problem area with the swoop you’ll need to do to get the shoulder right.
I should be up and running in a month or two for heat treating so if you want to experiment with different thicknesses for heat treating we could probably get something figured out so you’re not spending all your time on finish grinding. Finish grinding is what took me the longest. There seems to generally be enough thickness to take care of any warping due to ht when grinding post ht. Smiling blades lend themselves to being slightly warped and still being able to maintain an even bevel and easy honing.
-
The Following User Says Thank You to jfk742 For This Useful Post:
Voidmonster (03-15-2019)


 318Likes
 LinkBack URL
 About LinkBacks


 Reply With Quote


